


This easy and probiotic-rich recipe for fermented red cabbage is made with just a few simple ingredients. Also known as red or purple sauerkraut, this easy Lacto-fermented condiment goes with a variety of dishes and is the perfect way to preserve your extra red cabbage!
I started my first forays into fermenting, souring, and culturing in my first-ever apartment about 10 years ago. The learning curve was steep back then. And sometimes it felt like I was getting in too deep and my comprehension was low. How wrong I was!
Just like sourdough, fermenting is actually quite simple once you learn the basics. Soon enough you begin to understand some of the "why" and "how" behind the process. Even though it may seem like you're reading a different language at first, once you have it down you can ferment just about anything!
And while I've shared easy Lacto-fermentation recipes for jalapenos, blueberries, lemons, and apples, I have yet to share a basic beginner recipe for the world's most famous fermented food.
This fermented red cabbage (AKA red sauerkraut) is an excellent foundational recipe for beginners (and novices alike). It's a great way to practice fermentation basics like salt content, submerging under the brine, and monitoring for activity. Best of all? It tastes absolutely delicious!
Reasons to Make Fermented Red Cabbage Sauerkraut:
- It's wayyyyy less expensive than purchasing small bottles from the health food store.
- Fermented red cabbage sauerkraut is rich in probiotics and enzymes - making it a delicious raw, living food that aids in digestion.
- Easily preserves cabbage for months - no canning needed!
- It makes a gorgeous and easy side dish for your favorite meals - who can resist the allure of bright pink food!?
Ingredients
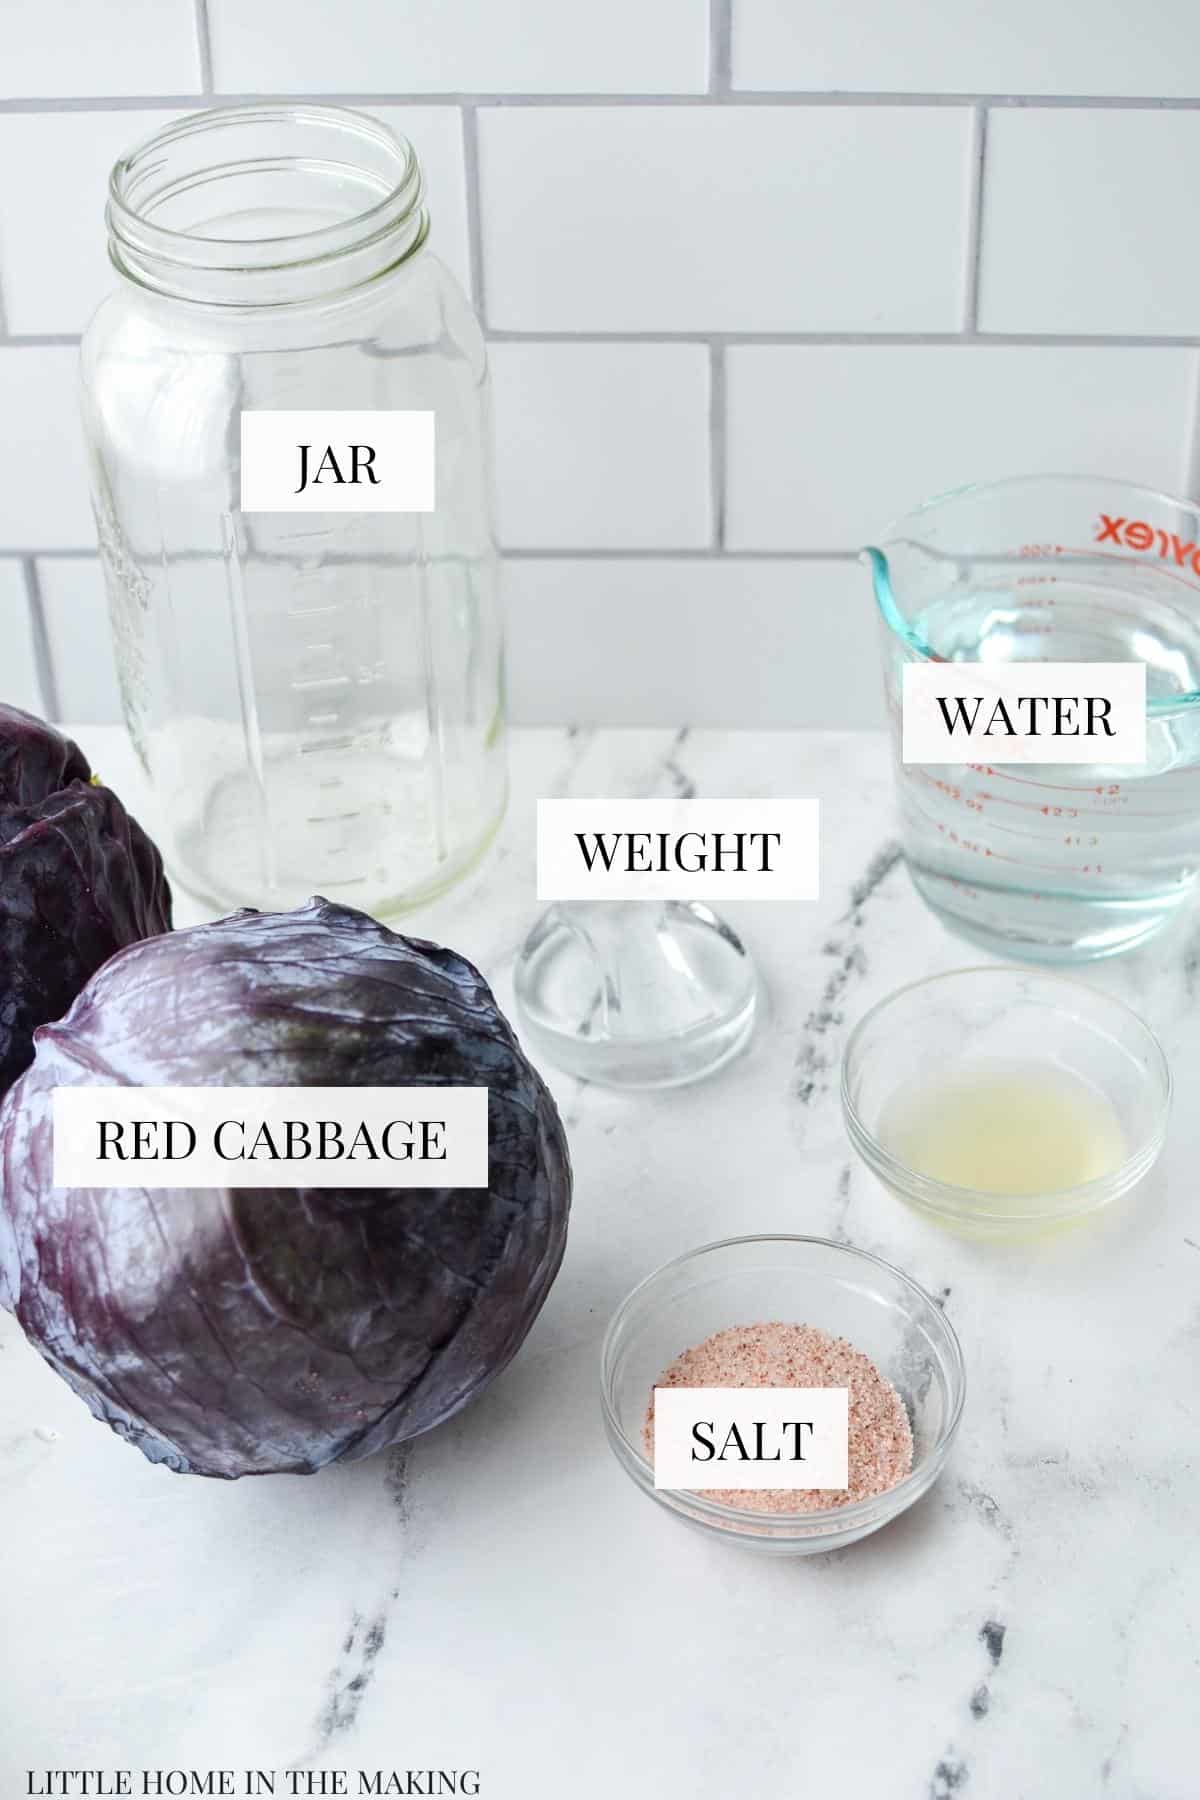
- Red Cabbage: Depending on the size of your jar(s), you'll need about 1-2 medium-sized heads. Select those release liquid when you pierce the outer leaves with your fingernails. If you can't find any like that, it's okay - we have a workaround for dry cabbages.
- Salt: You'll want to use unrefined salt. I like to use a fine grind of Redmond Real Salt for my fermenting projects.
- Water: This is to top off the ferment if the cabbages do not produce enough juice. If you think you'll need to use water, I encourage you to do 3% salt content. This will help you avoid diluting the ferment (more on that in a minute). Remember to ensure that your water is filtered and/or non-chlorinated.
- Starter culture (optional): This is totally optional, but if you have some leftover sauerkraut juice from a previous batch, I strongly encourage you to use it as a "starter" culture. You can also use sweet whey, water kefir, or homemade kombucha as a starter. A starter culture gives your red cabbage the best chance of successful fermentation as it introduces good bacteria to the fermentation process at the start.
Equipment and Tools
- Jar: A half gallon mason jar (or several quart jars) will work perfectly fine for making sauerkraut. I do recommend using a fermentation crock if you have one available. The lack of light seems to produce a more crisp texture and complex flavor.
- Kraut pounder: If needed you can definitely use your hands or a wooden spoon and some elbow grease, but I highly recommend a kraut pounder if you plant on fermenting often.
- Fermentation weight: I love to use the glass fermentation weights with handles that are specifically made for mason jars. If you don't have fermentation weights, you can use a plastic bag weighed down with water OR a 4oz mason jar filled with brine or water.
- Lid: You'll need to keep your ferment free from dust and dirt, so an airtight lid for your jar is recommended. You can use the two-piece canning lids but they can get rusty with ferments, so I recommend switching them out for a plastic one if possible.
- Digital scale: This is to help you calculate the weight of the cabbages, as well as the salt. You can get the Amazon basics model for under $10 and it's well worth it if you bake or ferment a lot.
Calculating Weight and Required Salt
Before you get started, it's important to determine how much salt you need in order to have a successful batch of fermented red cabbage (AKA sauerkraut). This is done by first weighing the cabbage, and calculating what 2-3% of that weight would be in grams.
Like sourdough, many fermentation projects are weighed in grams - it's far more accurate than pounds or ounces. So you will start off by calculating the weight of your red cabbage(s) in grams and taking notes on a piece of scrap paper.
Then you will multiply that number by 2% or 3% to get the amount in grams you will need to use for salt. The basic equation looks like this:
Weight in grams x 2% = grams in salt required OR weight in grams x 3% = grams in salt required.
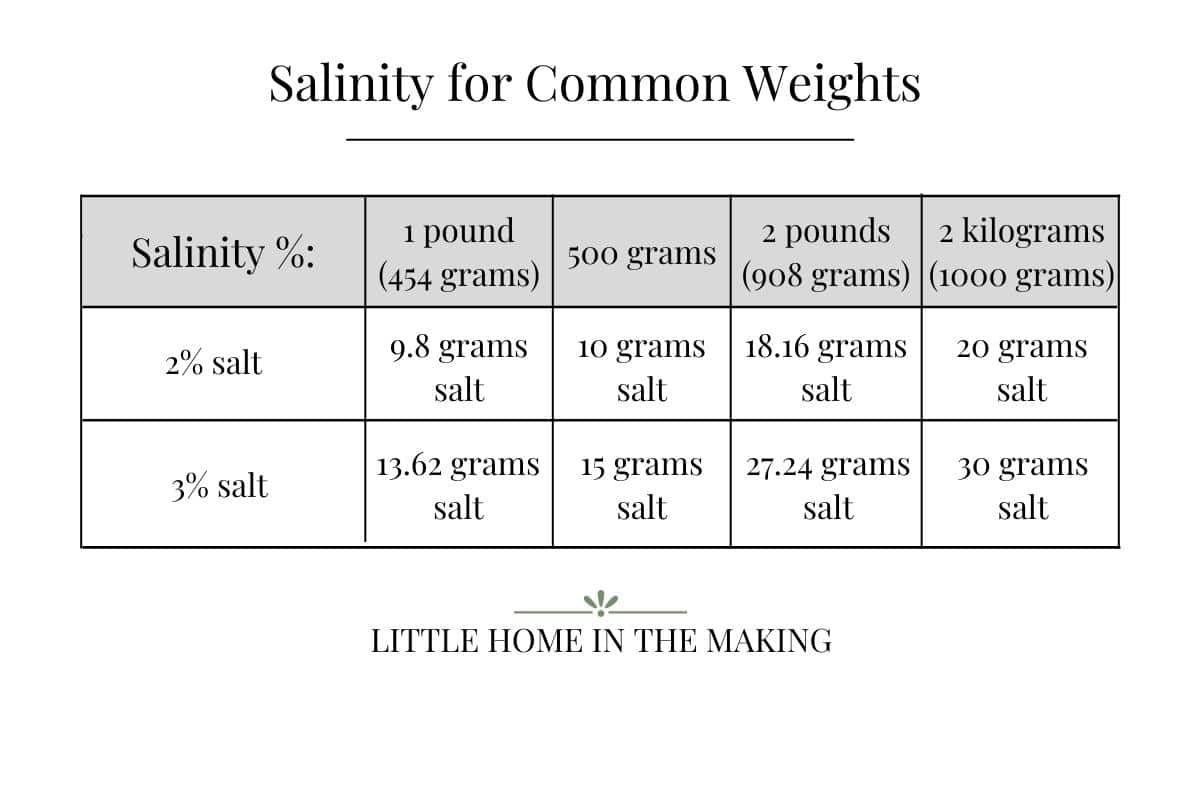
If your cabbages are on the "dry" side (in my experience, many are), you will need to add some water or brine to the ferment. If you want to just add water (without mixing up a batch of brine), I would aim for a 3% salinity (or even 4% if your cabbages have been in cold storage). This gives you some margin and won't dilute the salinity below 2% when you add the water.
Calculating Weight and Salt without a Scale
If you purchased your cabbages from a grocery store or small market, you could check your receipt. Since produce is sold by weight, there should be a weight listed for the cabbage purchased. You can use this to make a calculation to get an adequate amount of salt.
Also, if you can only weigh in pounds or are looking for a workaround to weighing and using a digital scale, you can use 1 ½ - 2 teaspoons of salt for every 1 pound of cabbage. The lower number will give you roughly 2% salinity and the higher roughly 3% salinity.
Most of all, it's important to know that sauerkraut is really very flexible and a lot more simple than it seems. If you're willing to try, you will most likely have a successful batch! And for beginners: it's better to err on the side of a little too much salt than not enough.
How to Make Sauerkraut with Red Cabbage
To get started, remove the outer leaves of your cabbage(s) and cut them in half. Then use a sharp knife to remove the core from the middle, and compost or give it to your chickens.
Then slice the cabbage halves into thin slices, anywhere from ⅛ - ¼" thick. You could also use a food processor or box grater to shred the cabbage. In my opinion, this creates sauerkraut that is less crisp and complex in flavor. It also ferments much more quickly.
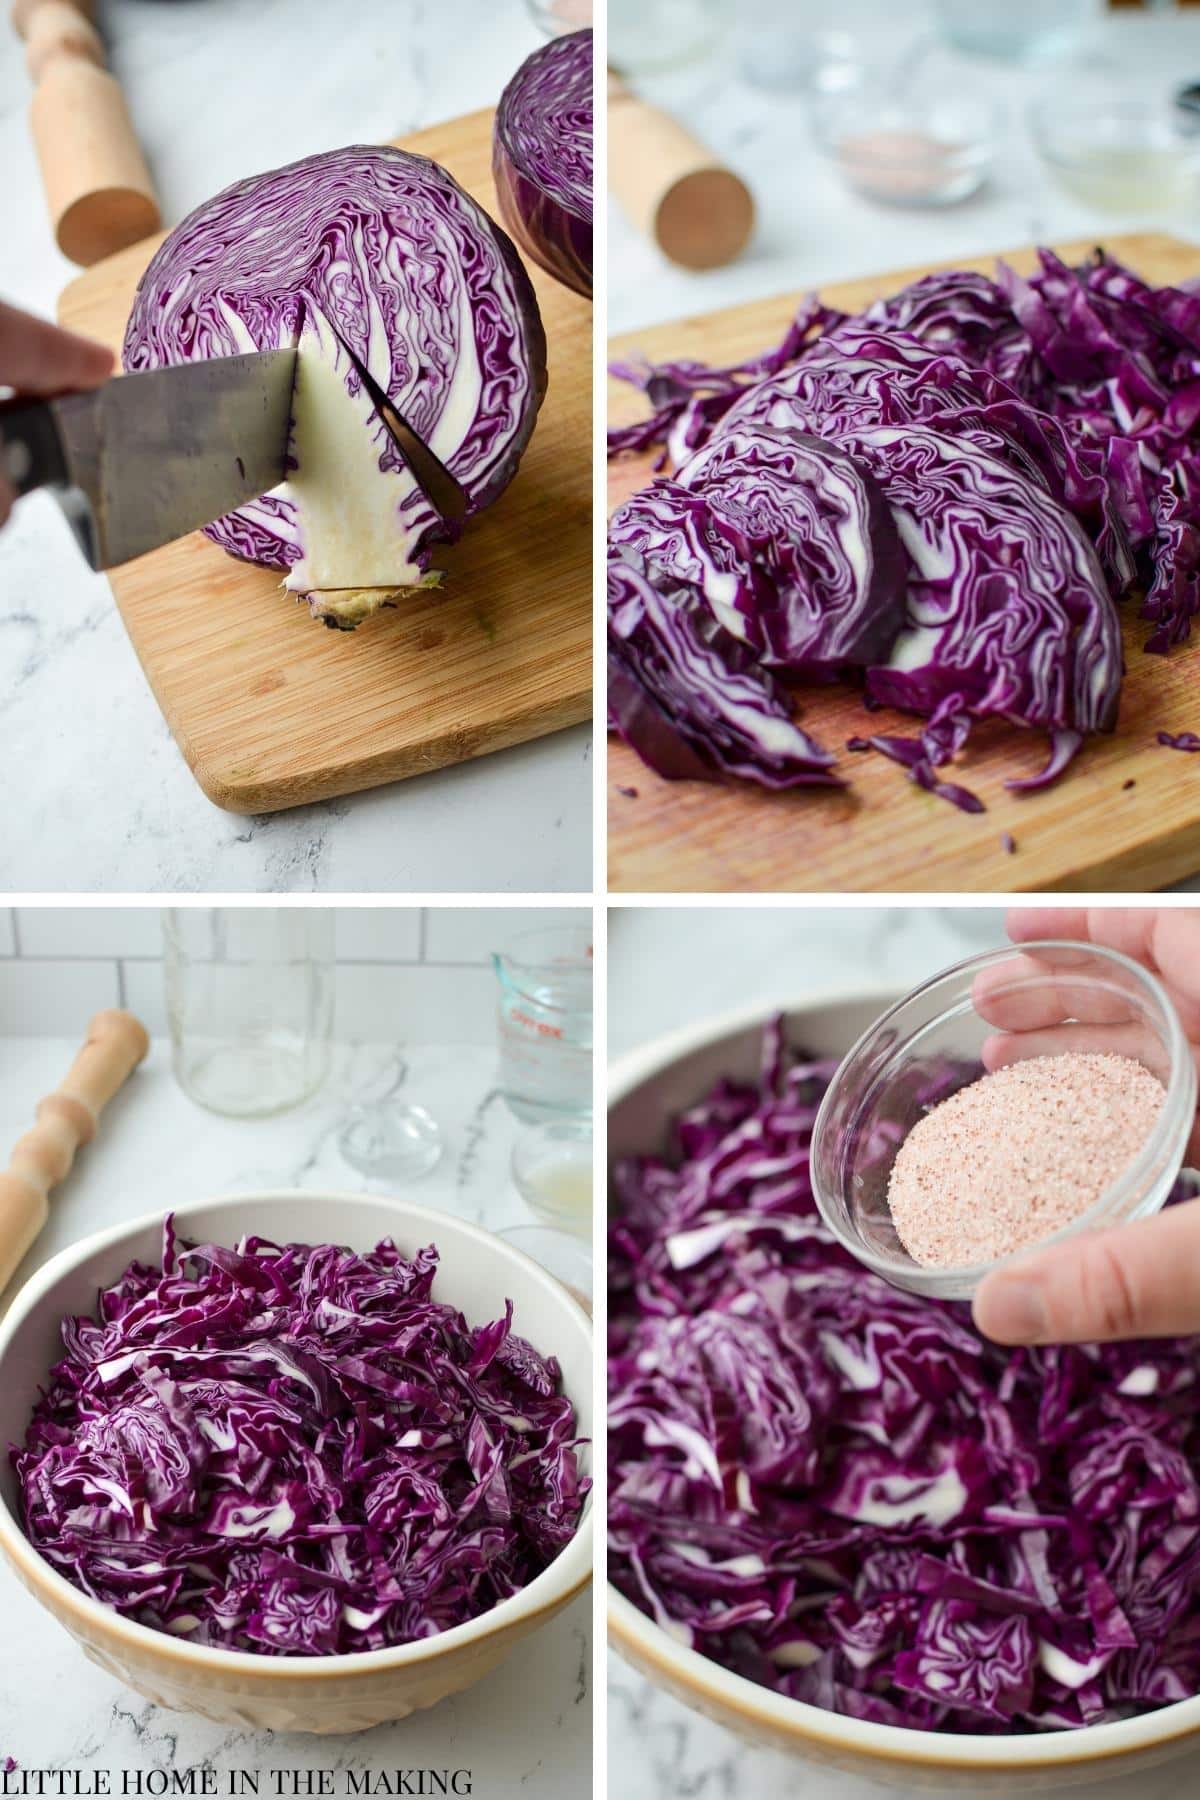
Once all of your red cabbage has been shredded, add it to a big bowl (or several bowls).
Sprinkle the cabbage with the amount of salt you determined was needed to get 2-3% salinity by weight (approximately 1 ½ - 2 teaspoons of salt for every 1 pound of cabbage).
Use your hands to gently massage the salt into all of the shredded cabbage leaves. Then, use a kraut pounder to begin to "bruise" the cabbage, helping to release some juices.
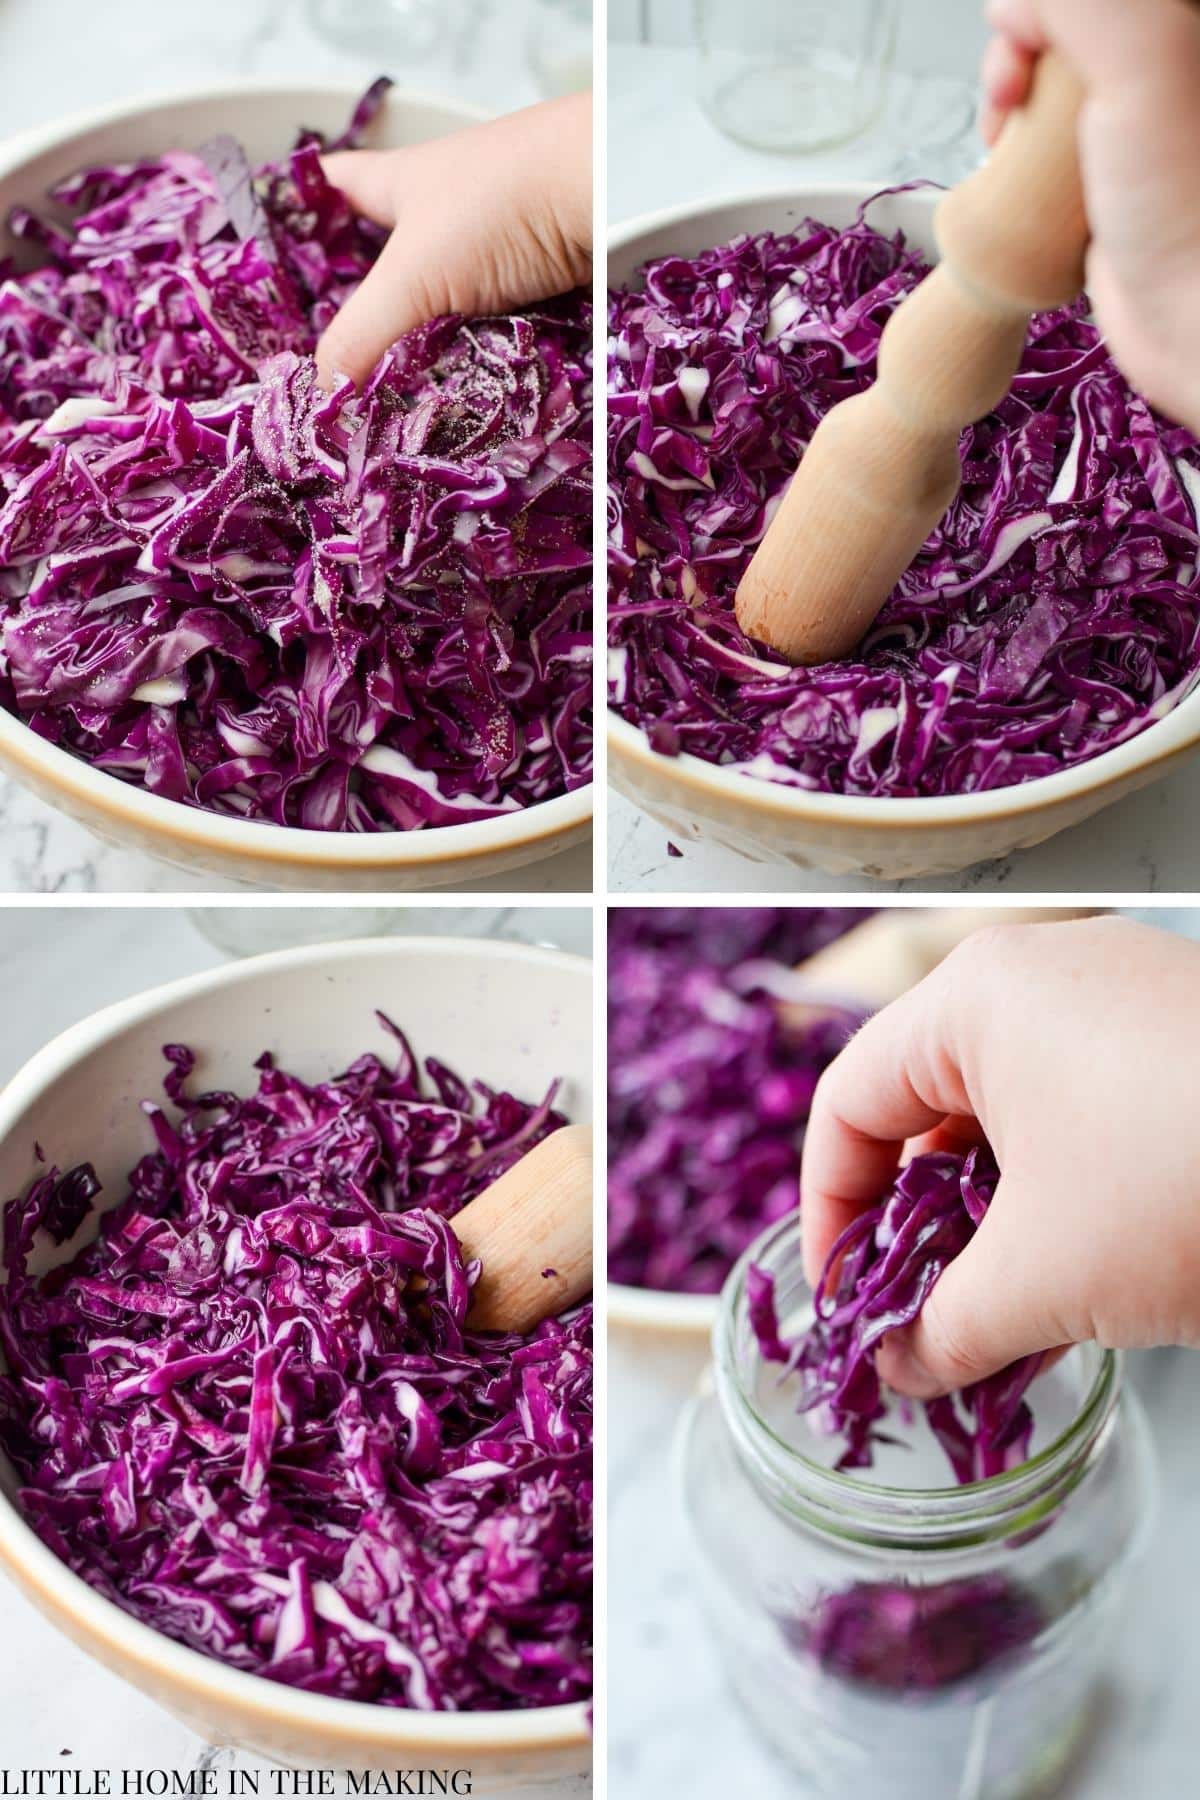
Once the salt has thoroughly been worked into the cabbage, cover it with a lid or damp tea towel. Allow it to rest for at least 30 minutes and up to 1 hour. This will give the salt a chance to work and pull any liquid from the shredded purple cabbage. This liquid will become the brine that ferments the cabbage into sauerkraut.
Packing it into Jars
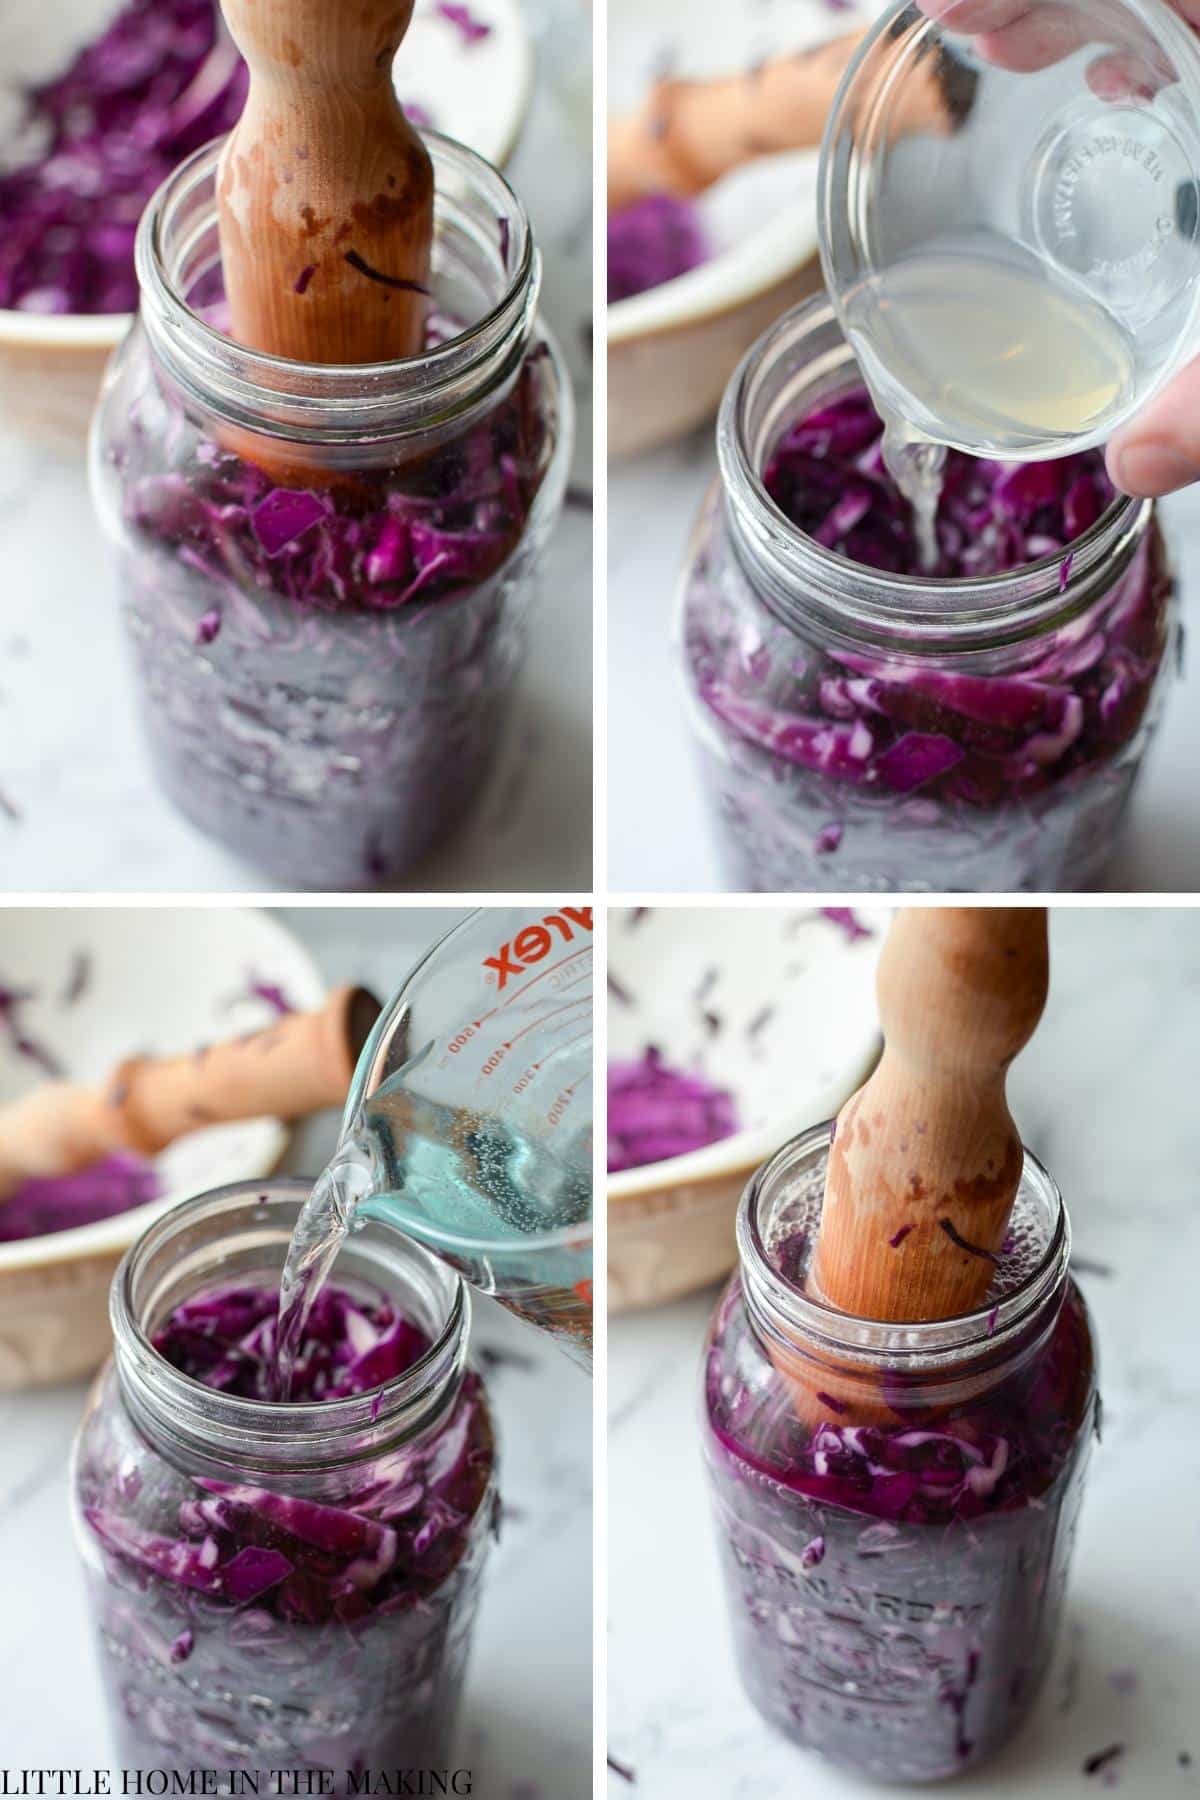
Once your cabbage has had time to rest with the salt, you are ready to pack it into jars (or a crock) for fermentation. Check to see the amount of liquid that was produced. If there are just a few tablespoons, you're going to need to add water or brine (more on that in a minute).
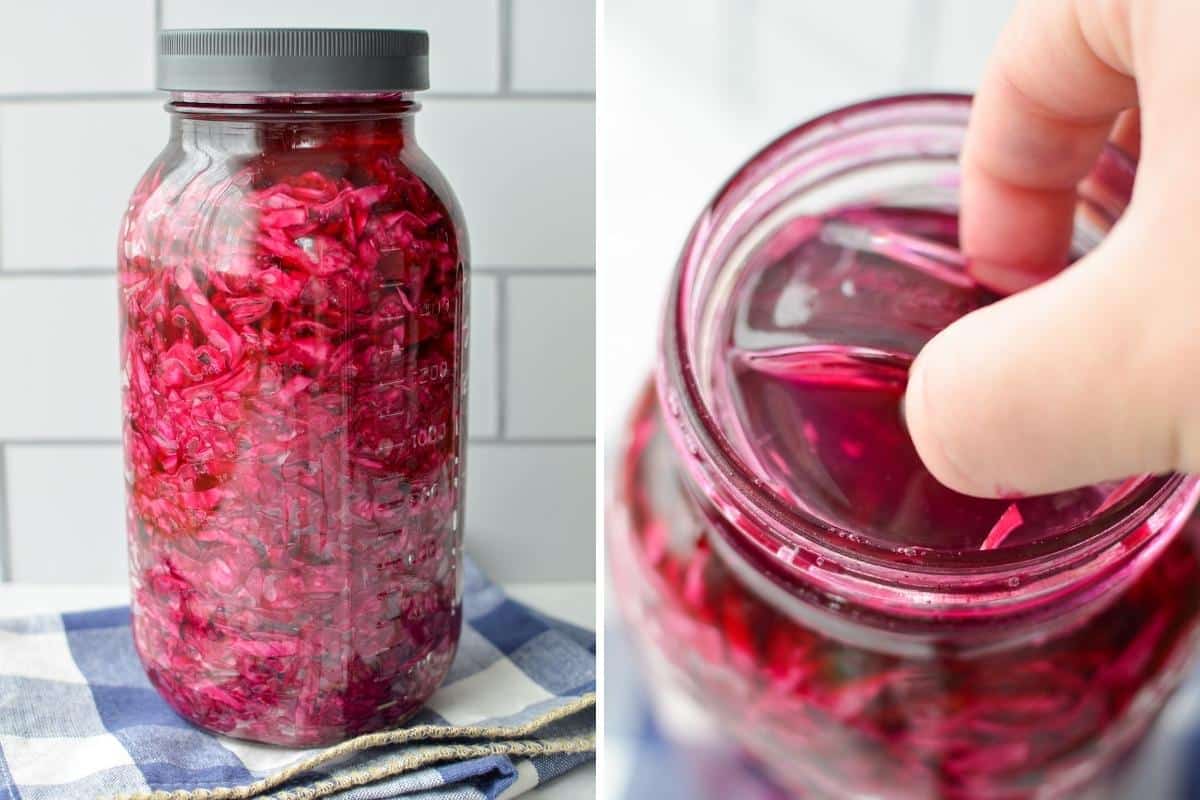
Pack the cabbage into your jars (including the brine). Use a kraut pounder or the bottom of a wooden spoon to pack it in super tightly. As you press, you should see some liquid rise up to cover the cabbage.
If you're using a starter culture (like leftover sauerkraut brine, kombucha, water kefir, or whey), add that when you start to reach the mouth of the jar. You'll want to use about 1-2 tablespoons per half gallon jar or 1 ½ teaspoons to 1 tablespoon per quart jar.
Adjusting the Brine
If you prepared a 2% salinity solution, you'll have to add more salt to the mixture if you need to add liquid. The cabbage needs to be completely submerged under brine in order to successfully ferment and avoid mold, so it's important to have adequate liquid.
I like to prepare a 3% salinity (use the upper amount of salt) and add a touch of water to help keep the cabbage submerged. I've never had a problem doing it this way!
You could also mix a fermentation brine of 1 cup of room temperature water + 1 ¾ teaspoons of unrefined salt. Use this to top off the jar and keep the fermenting red cabbage submerged.
Fermenting the Cabbage
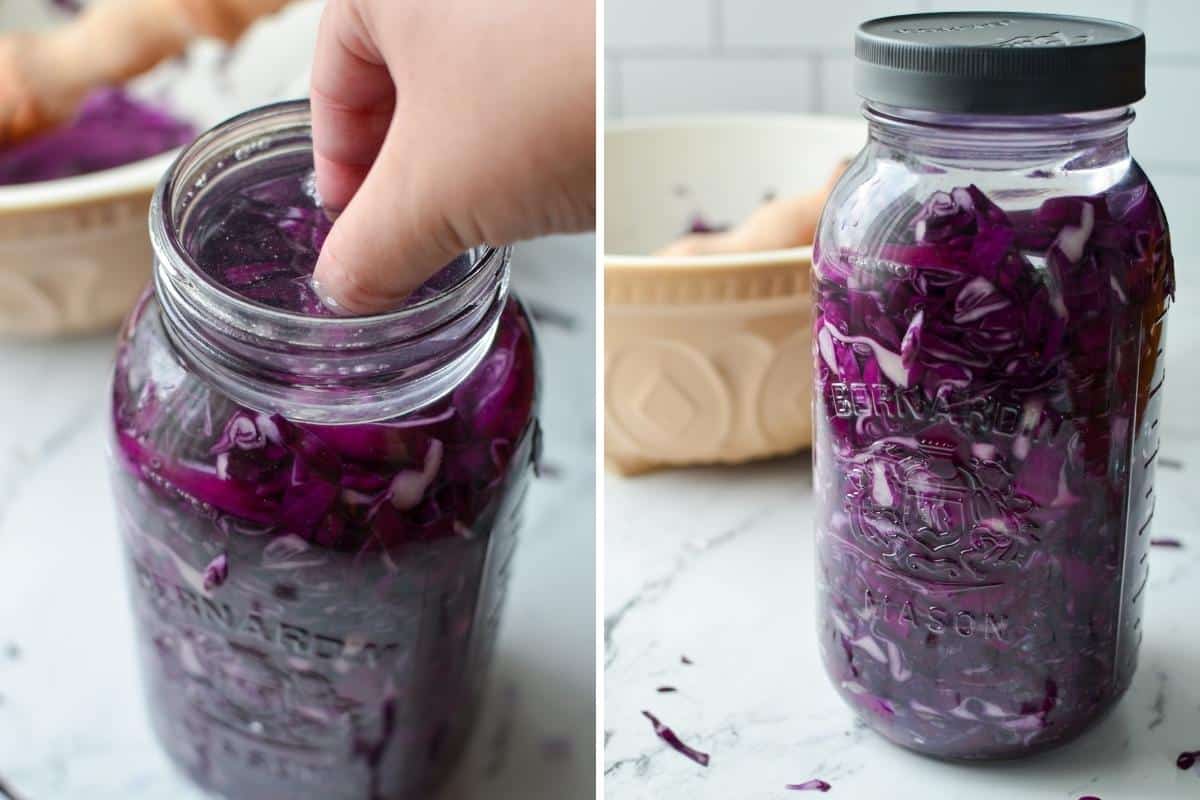
Once you have enough liquid in the jar, add a fermentation weight (I like these glass ones with handles) to the top of the jar or crock and press down. This will hold your cabbage under the brine, bringing the liquid level up.
If you don't have a fermentation weight - use a small plastic bag filled with water OR a 4oz canning jar filled with water or brine. Press this onto the surface, pushing the cabbage below the brine.
Wipe around the edge of the jar to clean up any cabbage pieces or debris, and top with a lid. Although you can use the two-piece metal canning lids, I recommend that you use a plastic lid - this prevents rust and corrosion.
Place your sauerkraut in a room temperature (around 68ºF or 21ºC) place in your kitchen, in a dark cupboard if possible (though not necessary) and ferment for 2-6 weeks, or until the bubbling and activity have reduced and the red sauerkraut tastes and smells pleasantly sour.
Signs of Successful Fermentation:
- A period of bubbling activity with the most activity occurring within the first 3-7 days
- A pleasantly sour smell
- Reduced saltiness
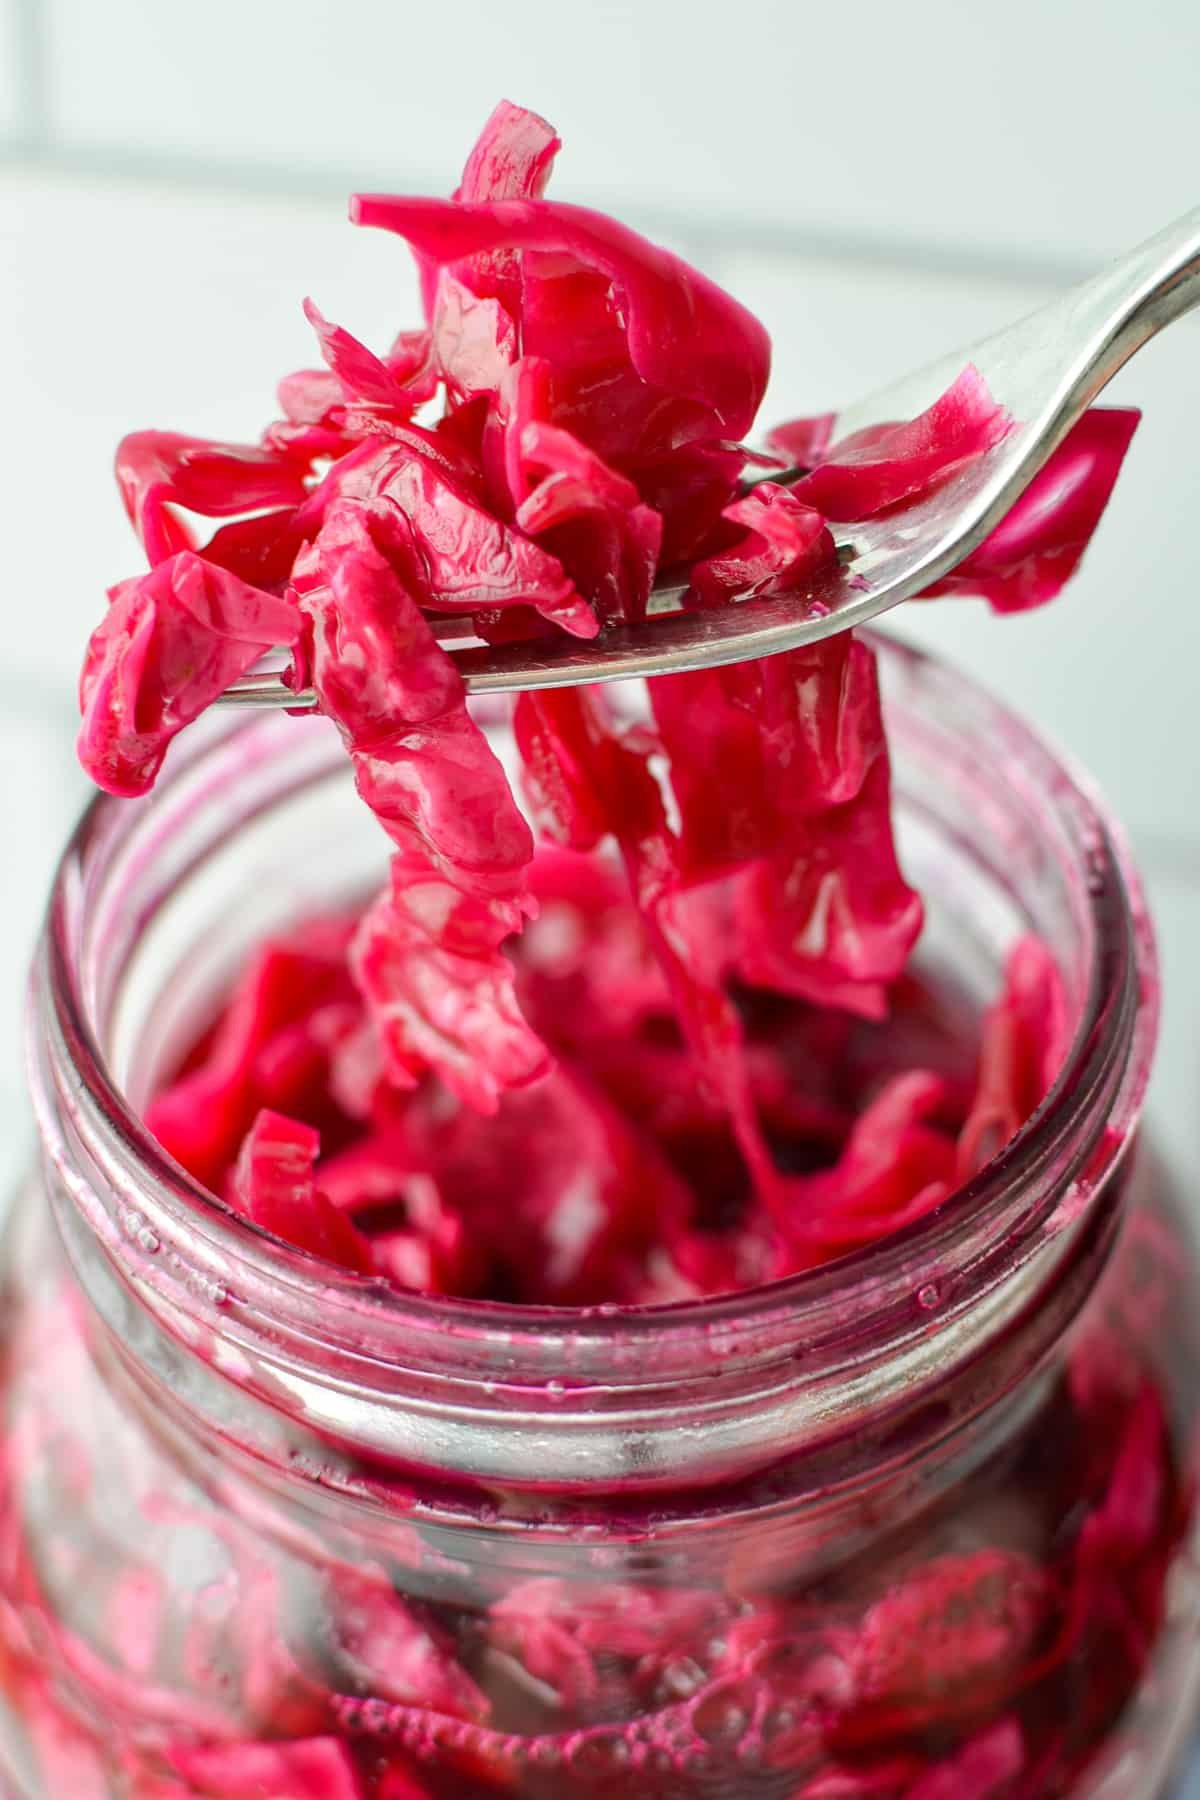
- A crisp texture
- A pleasantly sour taste
- No signs of mold
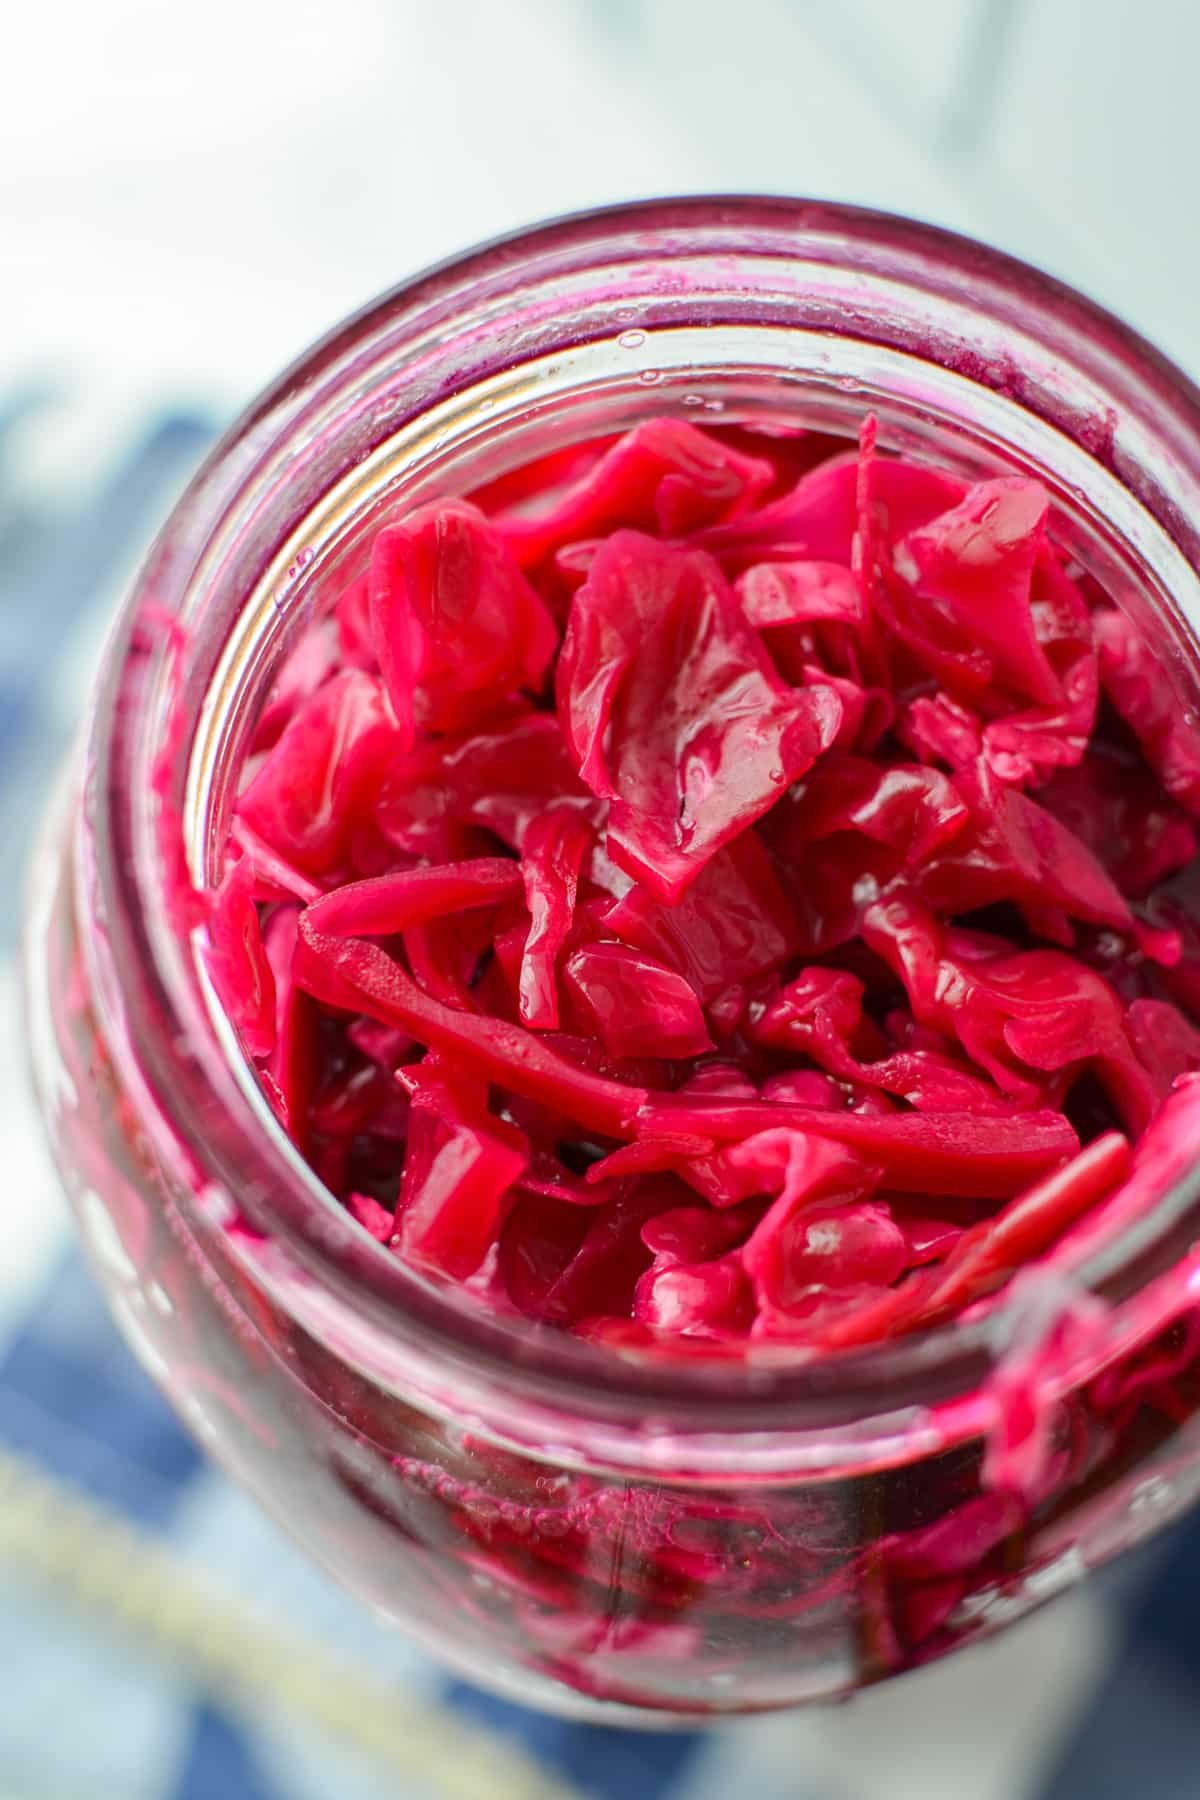
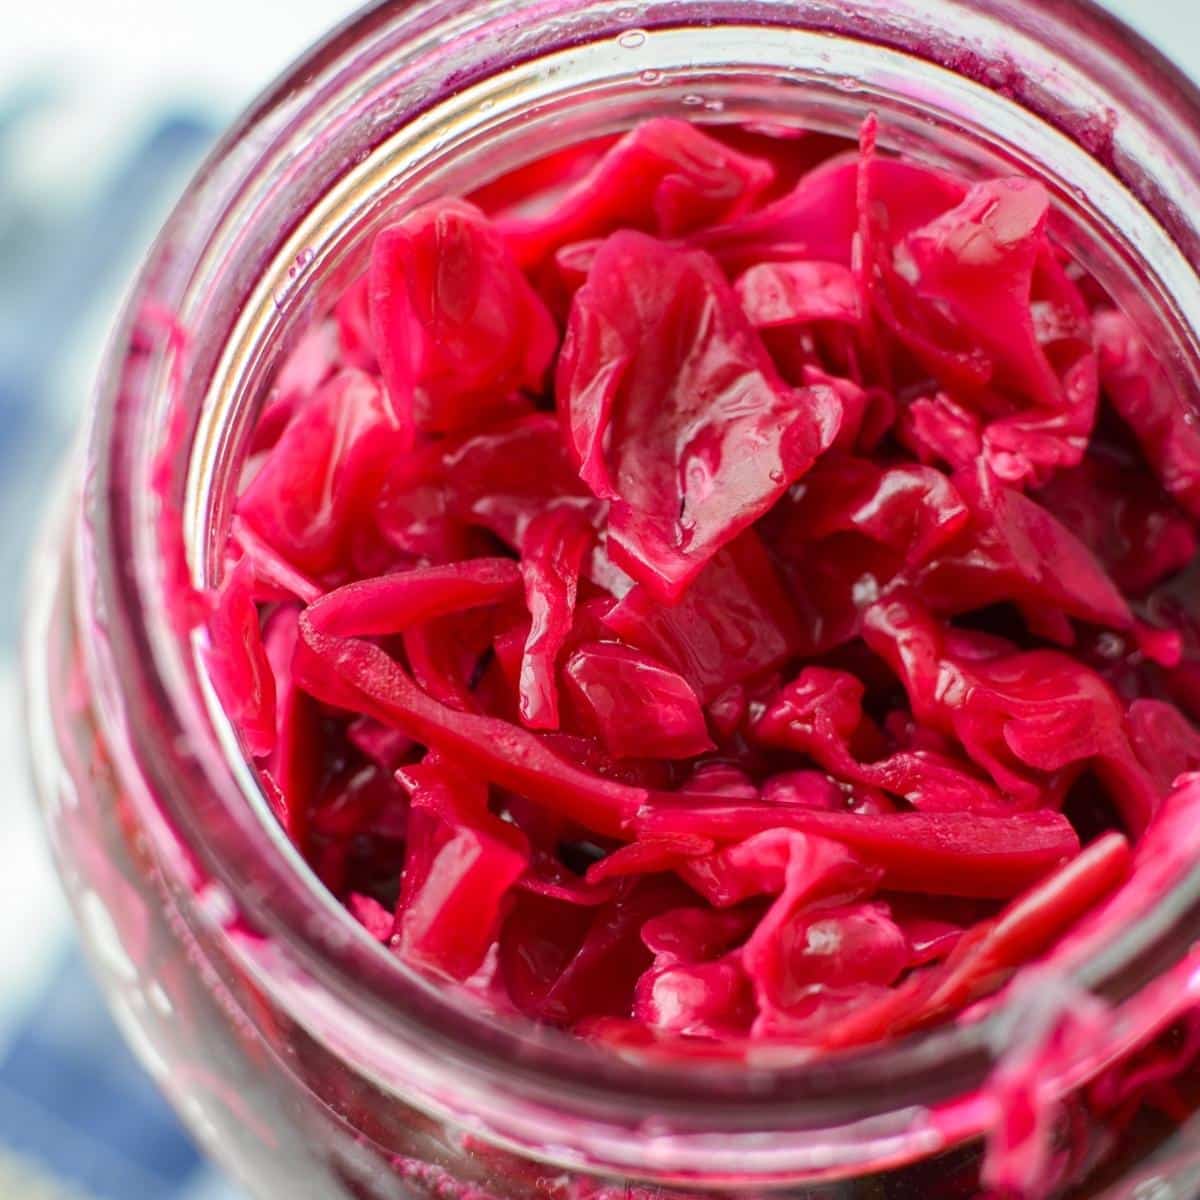
The discoloration is common with sauerkraut - and is not a sign of an unsuccessful fermentation. In the instance of fermented red cabbage, you're going to see it transform from purple to reddish pink after fermentation. This also happens after cooking red cabbage. Perhaps this is why it is most often called red cabbage rather than purple cabbage.
Even if you were to use green cabbage you may see a pinkish hue to the brine. This is caused by using unrefined salt, which is pink in color.
Transferring the Fermented Red Cabbage (Sauerkraut) to Storage
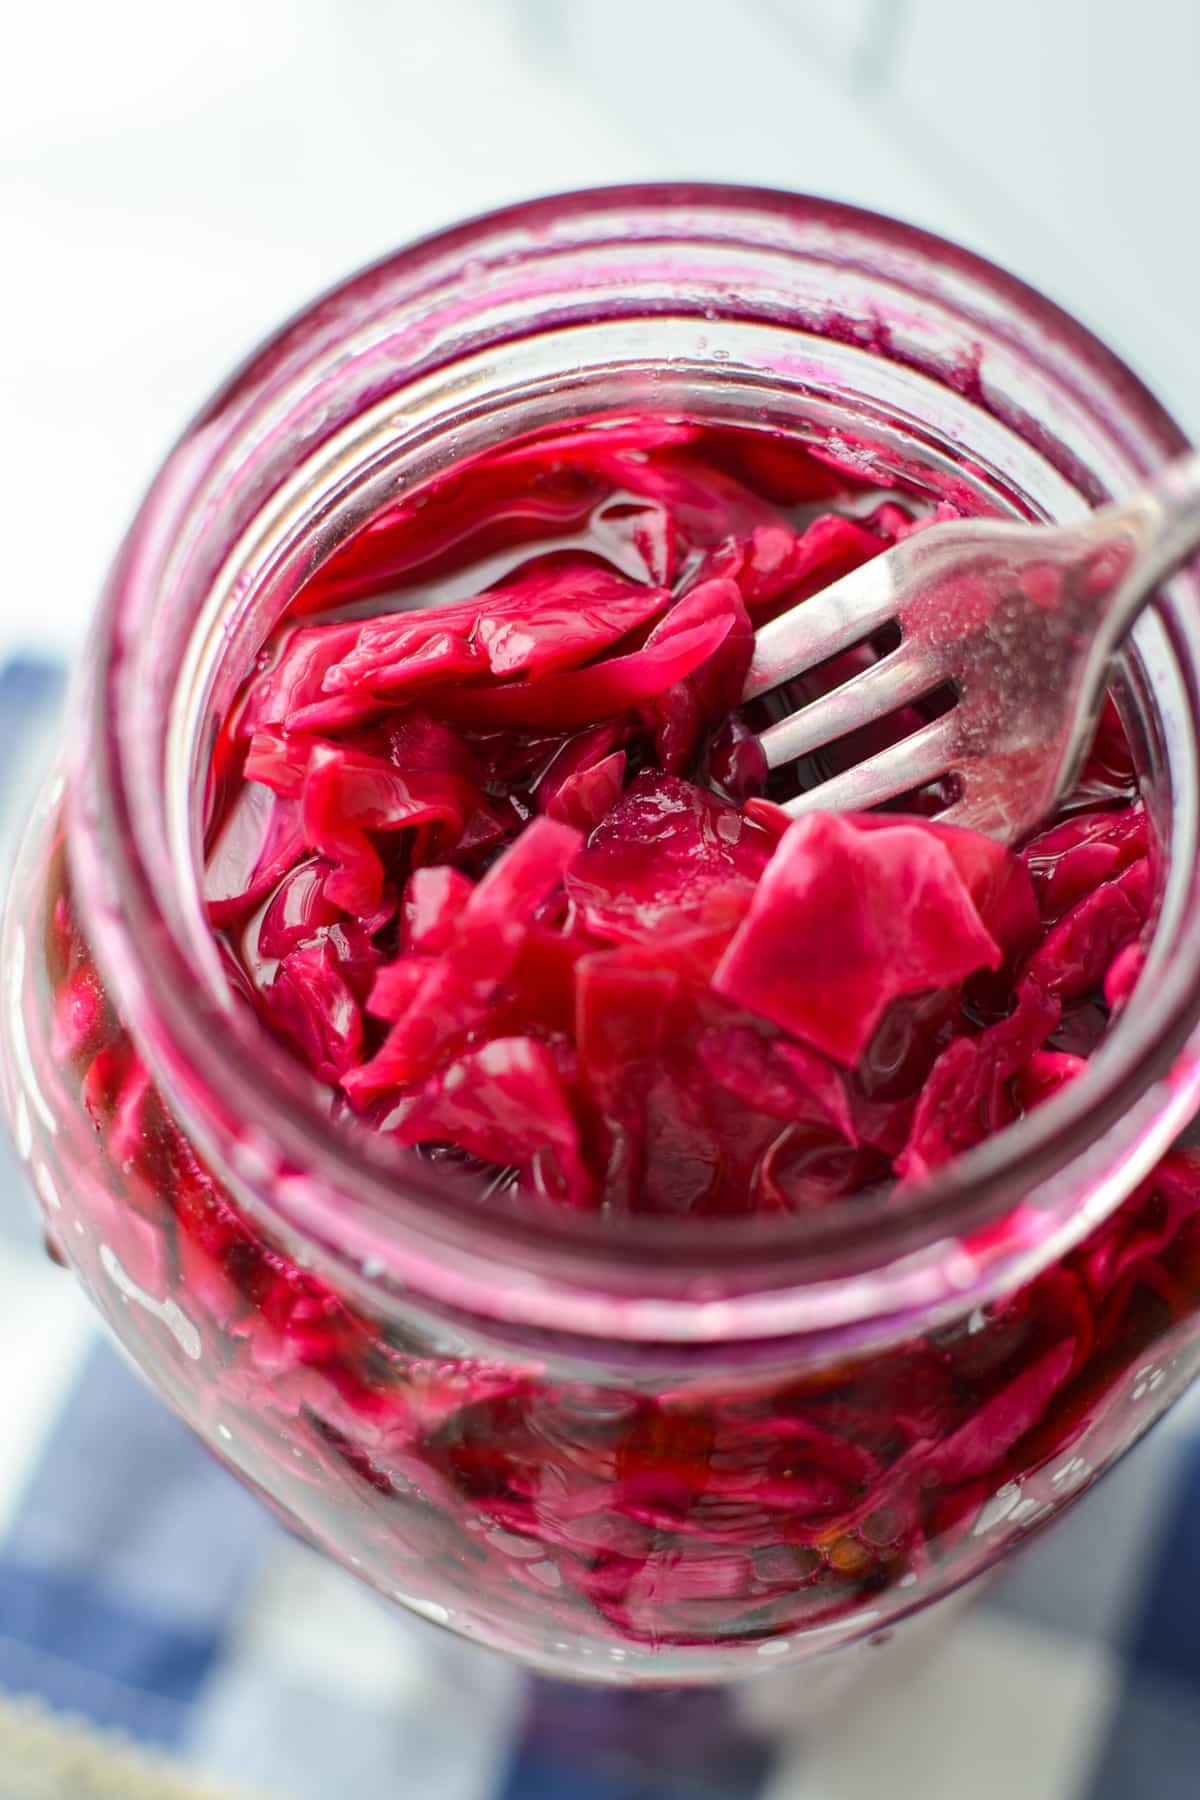
Once your red sauerkraut is fermented to your liking, you're ready to transfer it to storage. If the liquid level is ample, you can remove the fermentation weight. I like to keep it in place if the level is low. Then I just remove it each time I serve from the jar. Keep a lid on the jar and transfer it to cold storage.
Storage Options
- The fridge is the most common and easiest option. I like to store my extra jars on the bottom shelf, and my current jar on the fridge door for easy access. Jars need to be kept cold enough to slow (or stop) the fermentation process. Otherwise, they will continue to ferment.
- Sauerkraut can be kept in the fridge for many months. In fact, I've definitely had jars for far longer than a year that continued to taste great. As long as there are no signs of spoilage, you're probably just fine!
- For those kept in root cellar storage, the goal is for there to be a slow, gradual, and continuous fermentation process. This is why root cellar sauerkraut is often done in large vessels. Large vessels take much longer to ferment than smaller ones like quart or half gallon jars.
- Another option is to can your sauerkraut - although I don't consider this to be a great option since the canning process will destroy all of the enzymes and beneficial bacteria, which is kind of the point of eating sauerkraut!
- A final option is to freeze your sauerkraut in plastic containers or bags - This allows for longer-term storage while preserving many of the benefits, but it can cause it to be mushy or off in texture after thawing. Since the fridge does such a good job of keeping sauerkraut fresh for many months, I would personally advise that option instead.
Troubleshooting
If your sauerkraut is mushy - It was probably fermented too quickly because of a very warm environment. Sauerkraut and kimchi (another cabbage containing ferment) are traditionally produced at the end of the harvest season. Firstly because that is when the main crops are harvested and ready. Secondly, because the cooler weather makes for a more favorable ambient temperature for fermenting.
If your sauerkraut is salty - You may have used too much salt, OR it may need to ferment for a longer period of time. As fermentation takes place the saltiness will reduce, so you may be tasting your sauerkraut too soon. If it continues to be salty, you may have added too much salt. You can soak your sauerkraut in small batches in cold water for 10-15 minutes, OR rinse it with cool running water. Only do this with as much as you plan to serve.
If your red sauerkraut has mold on it - The likely culprit was that your cabbage did not stay submerged under the brine. Another reason may be that there was significant debris around the rim lid of your jar. It could also be that a high enough salinity was used. Next time try a higher brine solution and ensure the liquid level is adequate.
Fermenting Tips
- Use clean tools and equipment - No need to sterilize, but you should make sure all tools and equipment is clean. This means that they have been thoroughly washed, dried, and inspected for any lingering debris.
- Keep your cabbage submerged - The single best piece of advice I can give you is to ensure you keep your fermenting red cabbage fully submerged. Oxygen is the enemy when it comes to ferments. The brine is there to ensure your vegetables ferment in an oxygen-free environment.
- Taste it - fermentation is a spectrum, and its "doneness" is completely dependent on the particular tastes of the individual crafting it. Don't be afraid to taste your sauerkraut. Start at the 2-week mark, and keep going until you absolutely love the taste. Then you're ready to prepare it for cold storage and enjoy!
- Keep away from other ferments - This is more of a cautionary step, but I have heard of other ferments cross contaminating. This fermented red cabbage is done with a lid, so it shouldn't be able to cross-contaminate with other nearby ferments. I always say it's better to be safe than sorry. Keep your other ferments (sourdough, kimchi, kombucha, water kefir, etc) at least 4 feet away.
More Fermentation Recipes
📖 Recipe

Fermented Red Cabbage (Sauerkraut)
Ingredients
- 2 medium heads red cabbage approximately 2kg or 4.4lbs
- 40-60 grams unrefined salt approximately 6-8 ½ teaspoons
- 1-2 tablespoons leftover sauerkraut brine (optional)
Instructions
Cook Mode- Weigh your cabbages to get an exact weight in grams (2kg=2000 grams). Multiply the total weight by 2% to get the minimal salt in grams, and 3% for the upper range of salt in grams. For 2000 grams of cabbage (4.4 lbs) this will equal 40-60 grams but will vary greatly based on the actual weight of your cabbages.
- Use the upper range of salt if your cabbages are dry or you are a beginner. Use the lower range if you are using a starter culture and are comfortable with fermentation.
- Remove the outer leaves of your cabbage(s) and cut them in half. Then use a sharp knife to remove the core from the middle and discard it.
- Slice the cabbage halves into thin slices, anywhere from ⅛ - ¼" thick. You could also use a food processor or box grater to shred the cabbage, but in my opinion, this style of sauerkraut ferments too quickly and has a less crisp texture.
- Add the cabbage shreds to a very large bowl (or several bowls) and sprinkle the required amount of salt all over the surface.
- Use your hands to gently massage the salt into all of the shredded cabbage leaves. Then, use a kraut pounder to begin to "bruise" the cabbage, helping to release some juices.
- Once the salt has thoroughly been worked into the cabbage, cover with a lid or damp tea towel and allow to rest for at least 30 minutes and up to 1 hour. This will give the salt a chance to work and pull any liquid from the shredded purple cabbage.
- After the cabbage has rested check to see the amount of liquid that was produced - if it was a mere few tablespoons, you're going to need to add water or brine to get an adequate amount of liquid.
- Pack the cabbage into your jars (including the brine), using a kraut pounder or the bottom of a wooden spoon to pack it in super tightly. As you press, you should see some liquid rise up to cover the cabbage.
- If you're using a starter culture (like leftover sauerkraut brine, kombucha, water kefir, or whey), add that when you start to reach the mouth of the jar. You'll want to use about 1-2 tablespoons per half gallon jar or 1 ½ teaspoons to 1 tablespoon per quart jar.
- If the liquid level is not high enough to submerge the cabbage, either add a small amount of water (if you’re using a 3% salt solution and/or a starter culture), OR prepare a fermentation brine (*See notes).
- Pour the water or brine into the jar just enough to submerge the shredded cabbage.
- Once you have enough liquid in the jar, add a fermentation weight to the top of the jar or crock and press down. This will hold your cabbage under the brine, bringing the liquid level up. If you don’t have a fermentation weight, check the notes** for an alternative.
- Wipe around the edge of the jar to clean up any cabbage pieces or debris, and top with a lid (plastic is preferred).
- Place your sauerkraut in a room temperature (around 68ºF or 20ºC) place in your kitchen, in a dark cupboard if possible (though not necessary), and ferment for 2-6 weeks, or until the bubbling and activity have reduced and the red sauerkraut tastes and smells pleasantly sour.
- Once your red sauerkraut is fermented to your liking, you're ready to transfer it to storage. If the liquid level is ample, you can remove the fermentation weight. Place a lid on the jar and transfer it to the fridge or cold storage.
Notes
- A period of bubbling activity with the most activity occurring within the first 3-7 days
- A pleasantly sour smell
- Reduced saltiness
- A crisp texture
- A pleasantly sour taste
- No signs of mold
Nutrition
Please note that some of my blog posts here at Little Home in the Making may contain affiliate links. If you make a purchase through these links, I will get a small commission at no additional cost to you. Please see my Disclaimer for more information.


Leave a Reply