


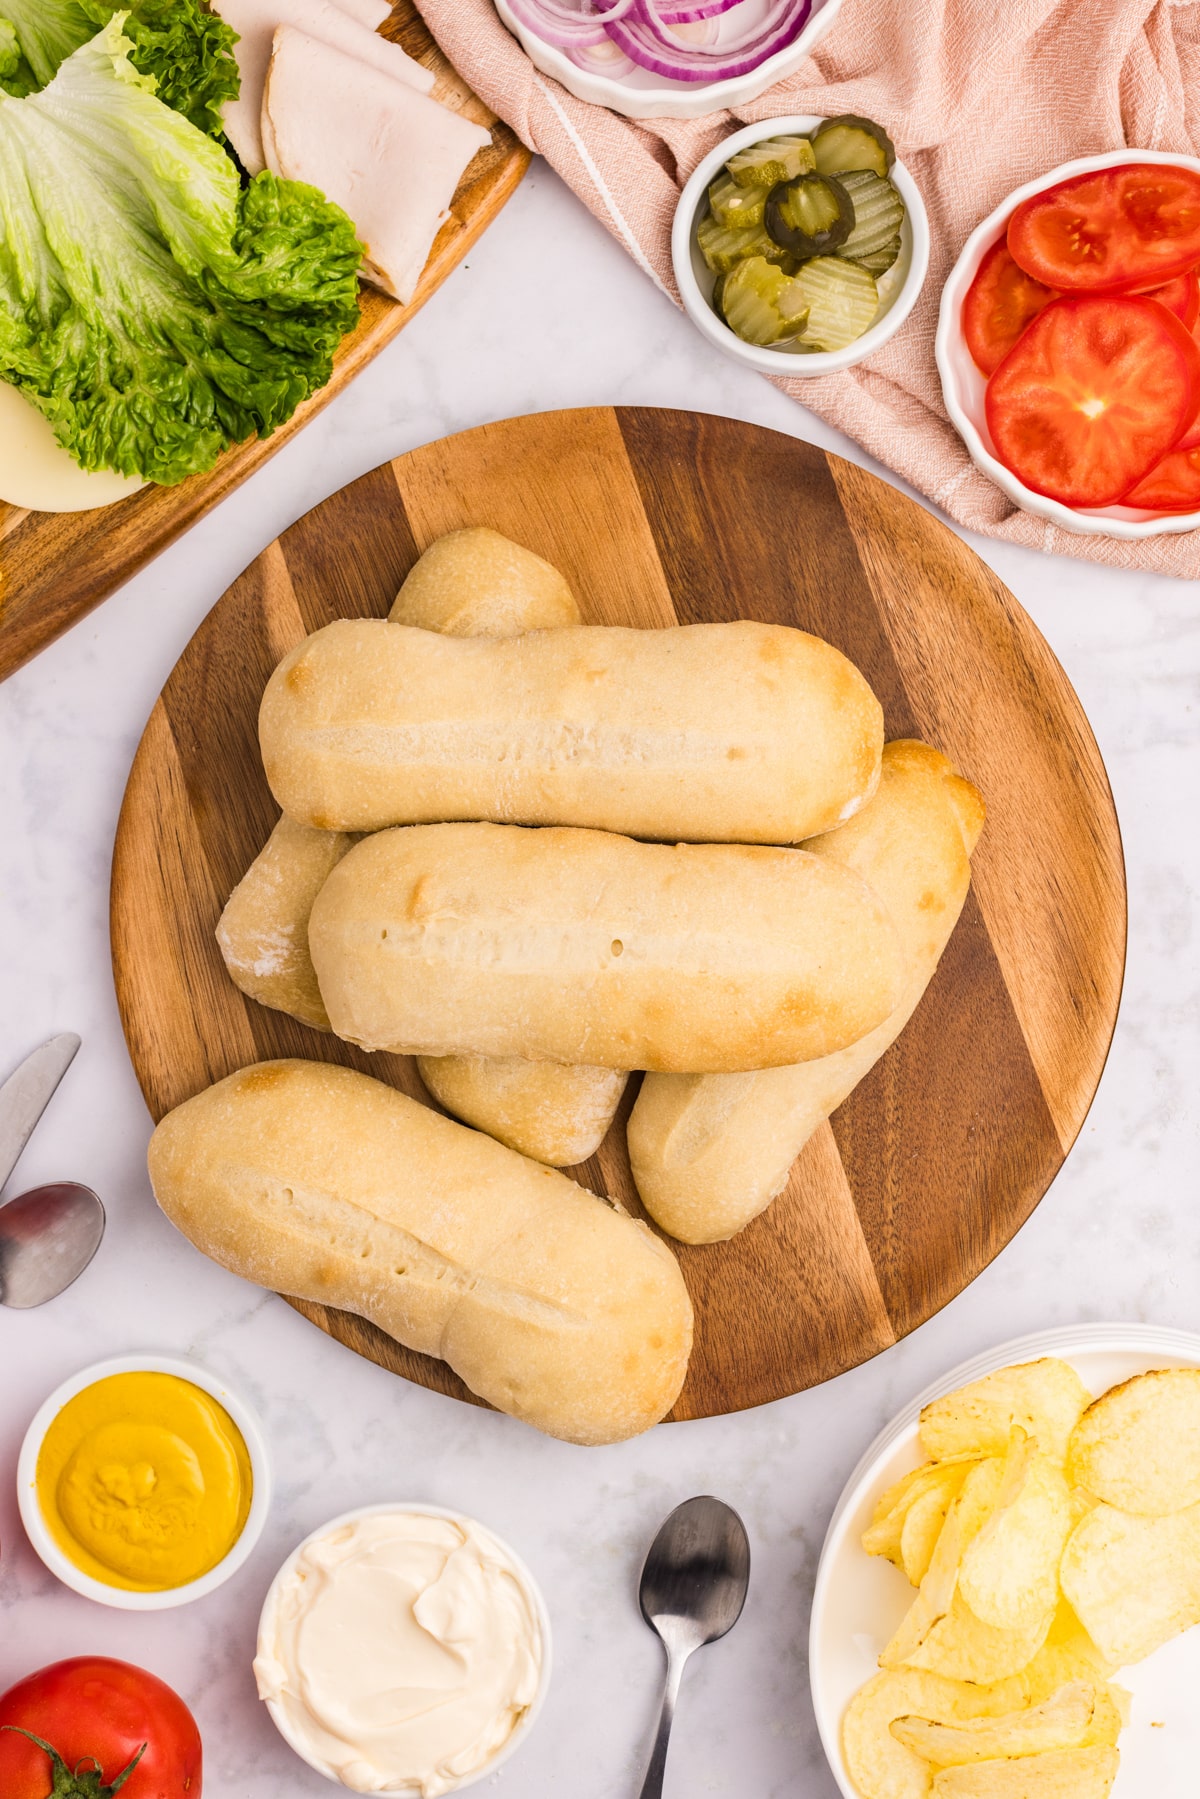
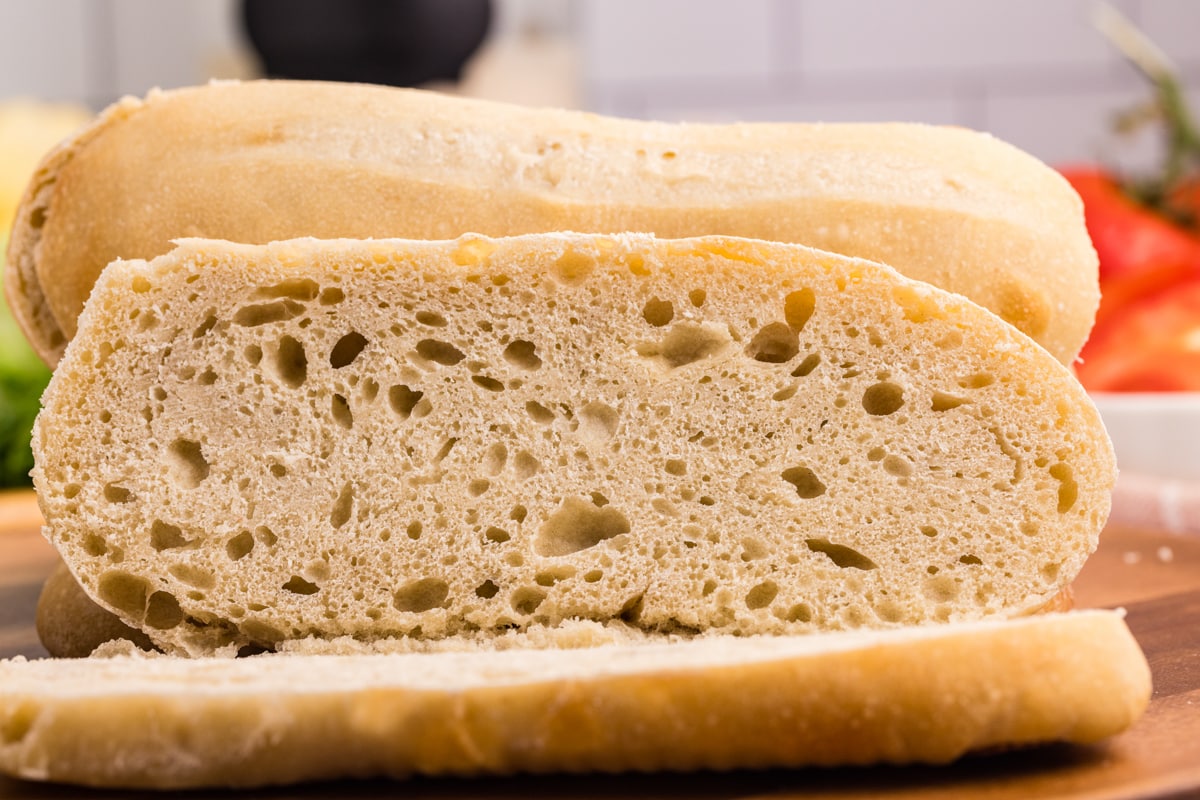
These Sourdough Sandwich Rolls (AKA Sourdough Hoagies) are the perfect way to make your favorite subs and sandwiches at home! Who needs to go out to eat when you can have all of your favorites made with sourdough starter instead.
This recipe is made without eggs (although you can add an optional egg wash), and includes a detailed baker's schedule, PLUS instructions for adapting the recipe to be made with sourdough discard if preferred.
Are you a sourdough lover like me? Even if you're a beginner (and haven't tried my perfect sandwich bread or 5-star Dutch oven sourdough bread), you're going to love how straightforward this recipe for sourdough sandwich rolls is.
I've included every detail so that you can have baking success – even if it's your first time doing a long fermentation recipe.
Why You'll Love It:
- Perfect for sandwiches. I'm sure you love making sourdough sandwich bread, but these sourdough hoagies are a great way to keep things interesting! They are our favorite way to have "Subway" at home. Just fill them with your favorite veggies, sauces, and sliced meats. Yum!
- Versatile. This dough isn't limited to sandwich rolls! Try making hamburger buns, hot dog buns, or try it with a little whole wheat flour in place of some of the bread flour.
- Flexible. The bulk rise can be done either during the day, overnight, or partially in the fridge. I've also included instructions to make them with sourdough discard, and a detailed baker's schedule so you can have success every time!
Ingredients

- Flour: I recommend bread flour, as the higher protein and gluten help to create dough strength. This results in a sturdy crumb that holds up to slicing. I don't recommend all purpose flour for this recipe, but it can be used in a pinch (or you can make your own bread flour).
- Sourdough starter: You'll want to use a sourdough starter that is mature and strong enough to rise bread (at least 2-3 weeks old). If you don't already have a starter, check out my guide on how to make your own sourdough starter.
- Honey: This adds a gentle sweetness and also helps to feed the wild yeast in the sourdough starter.
- Butter: Creates a tender texture and irresistible flavor. Everything is better with butter!
- Water: This should be slightly warm (about 90ºF) and filtered if you are using tap water that isn't from a filtered well.
- Salt: Any fine salt will work just fine for this recipe! I like to use sea salt, but unrefined salt works well too.
Note: If desired, you can brush the tops with an egg wash to help give them a golden color, but it's totally optional!
Tools and Equipment
- Stand mixer (optional)
- Dough hook attachment (optional)
- Baking sheet
- Parchment paper
How to Make Sourdough Sandwich Rolls
Also known as sourdough hoagie rolls, these sandwich rolls are perfect for making your favorite subs at home! We also love to use the dough to make hot dog rolls or hamburger buns.
Making the Dough
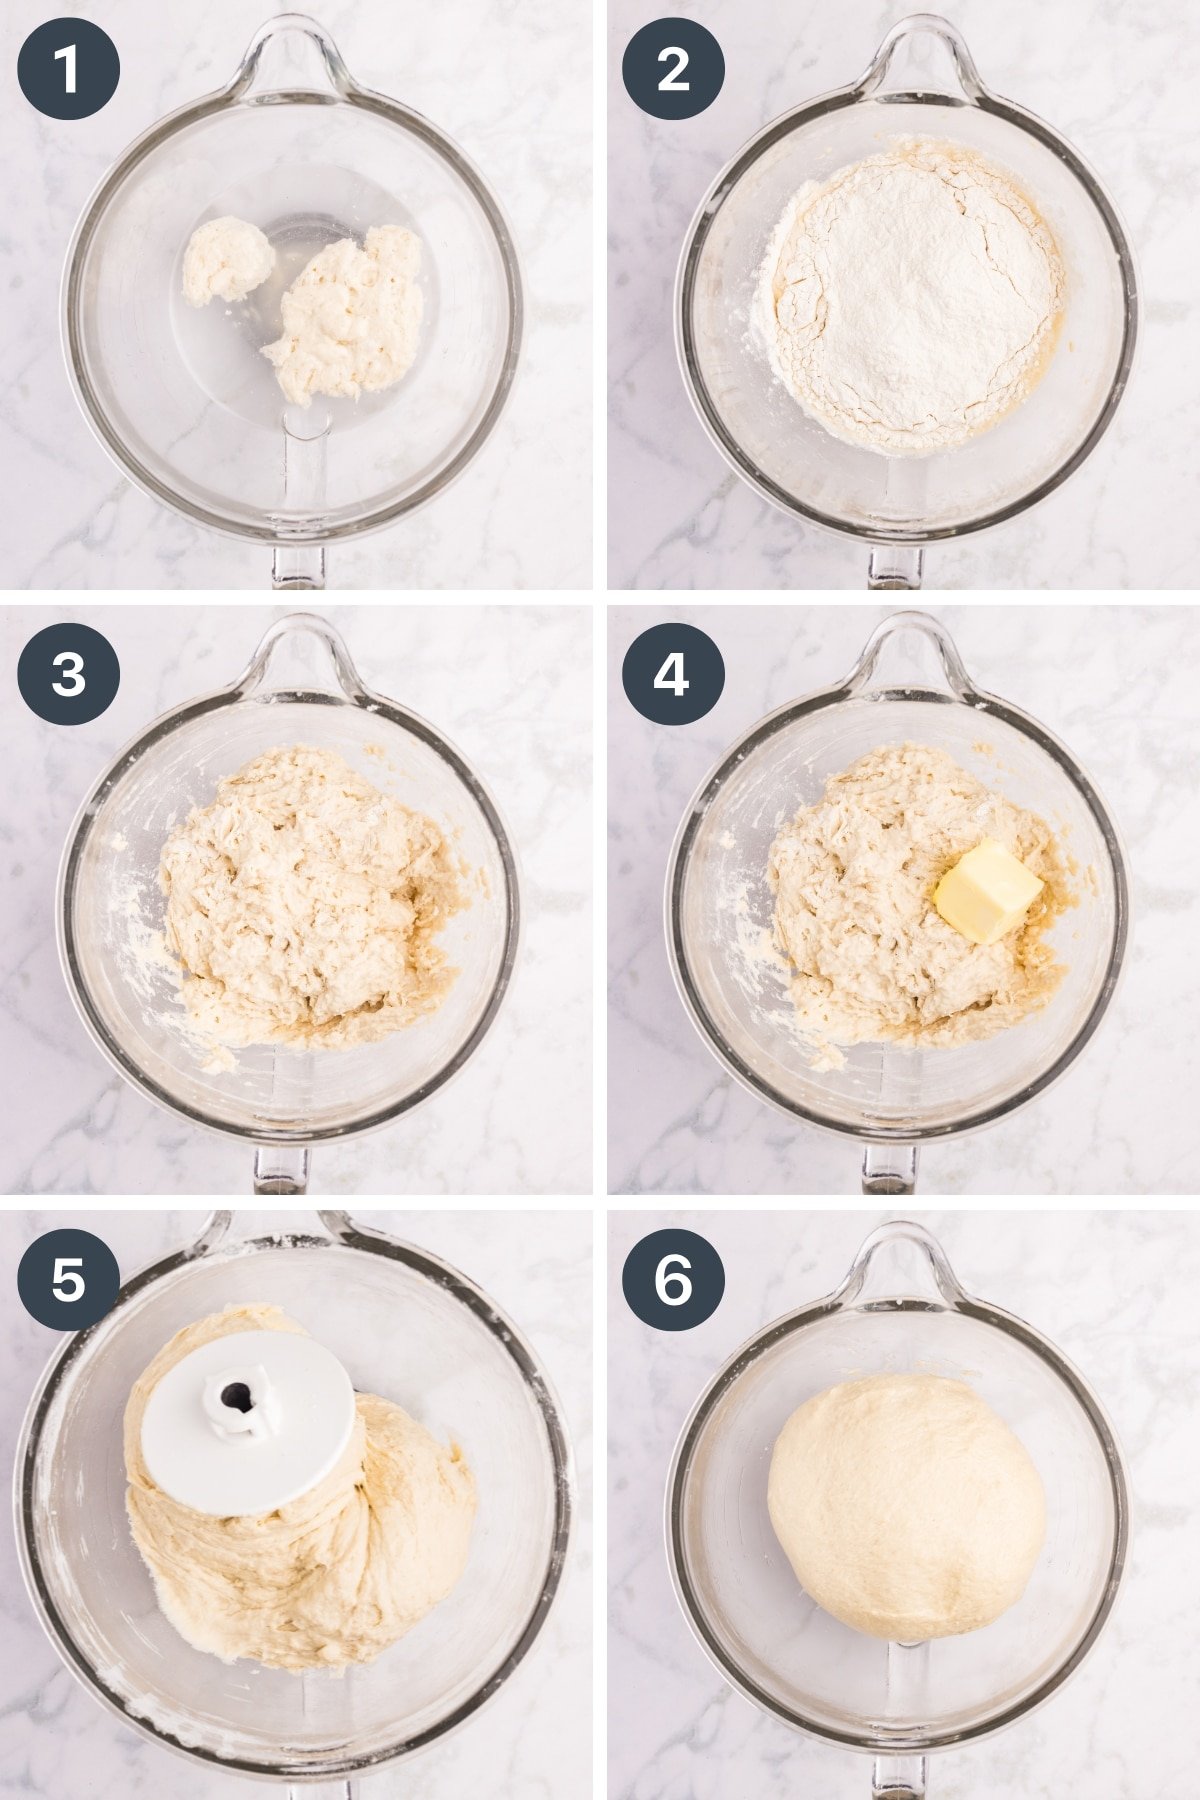
- Combine 1 ½ cups of warm water and 100 grams of active sourdough starter, stirring until the liquid appears milky. Then, add in ¼ cup of honey and 2 teaspoons of salt. Stir well.
- Add 2 cups of bread flour to the liquid.
- Mix the flour into the liquid until a shaggy dough forms.
- Then, add 4 tablespoons of softened butter and mix until fully combined.
- Add the remaining bread flour, about ⅓ cup at a time, until the dough comes together. Mix using a dough hook (if using a stand mixer).
- Knead for 3-5 minutes if using a stand mixer, or 6-8 minutes if doing so by hand.
The Bulk Rise
Lightly oil the bowl and place the kneaded dough at the bottom. Cover tightly with plastic wrap (or a damp kitchen towel). Let the dough ferment for 8-12 hours, or as long as it takes for the dough to roughly double in size.
Shaping the Rolls
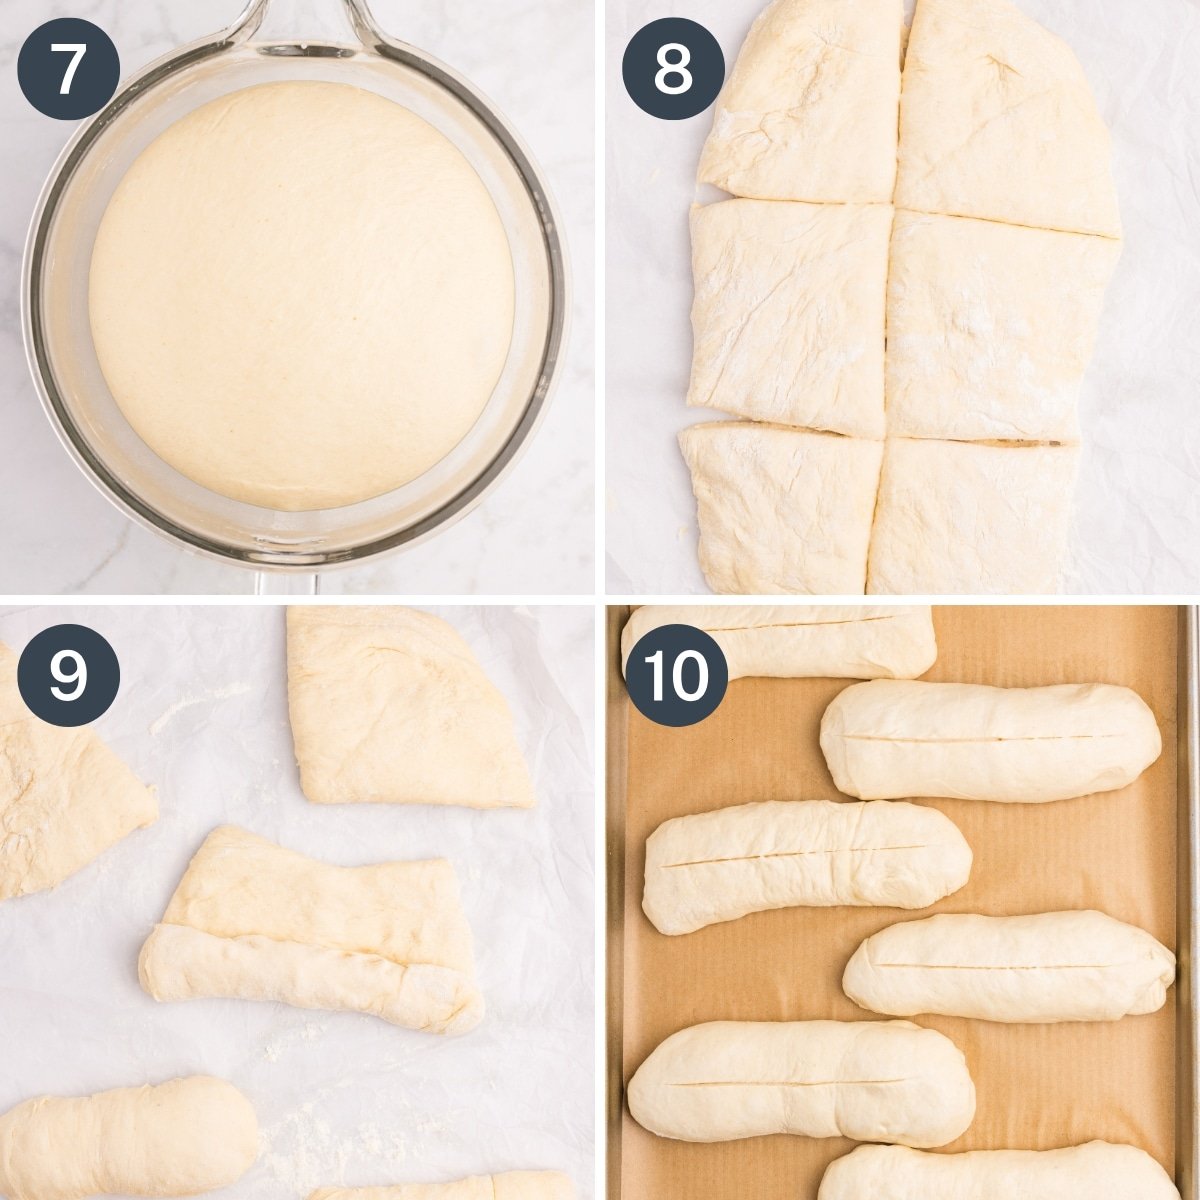
- Once the dough has roughly doubled in size (about 8-12 hours – we like to do this overnight) and springs back when gently pressed with your thumb, it's ready for shaping.
- Turn the dough out onto a clean surface (if it is very sticky, use a lightly floured surface) and divide it into 6 equal pieces using a bench scraper.
- Gently flatten each piece of dough, then roll it into a log, tucking in the edges as you go.
- Short second rise: Place the logs on a parchment-lined baking sheet (seam side down) and heat the oven to 350ºF (180ºC). Cover the rolls with plastic wrap and allow them to rise next to the warm oven for 30-45 minutes.
Score and Bake
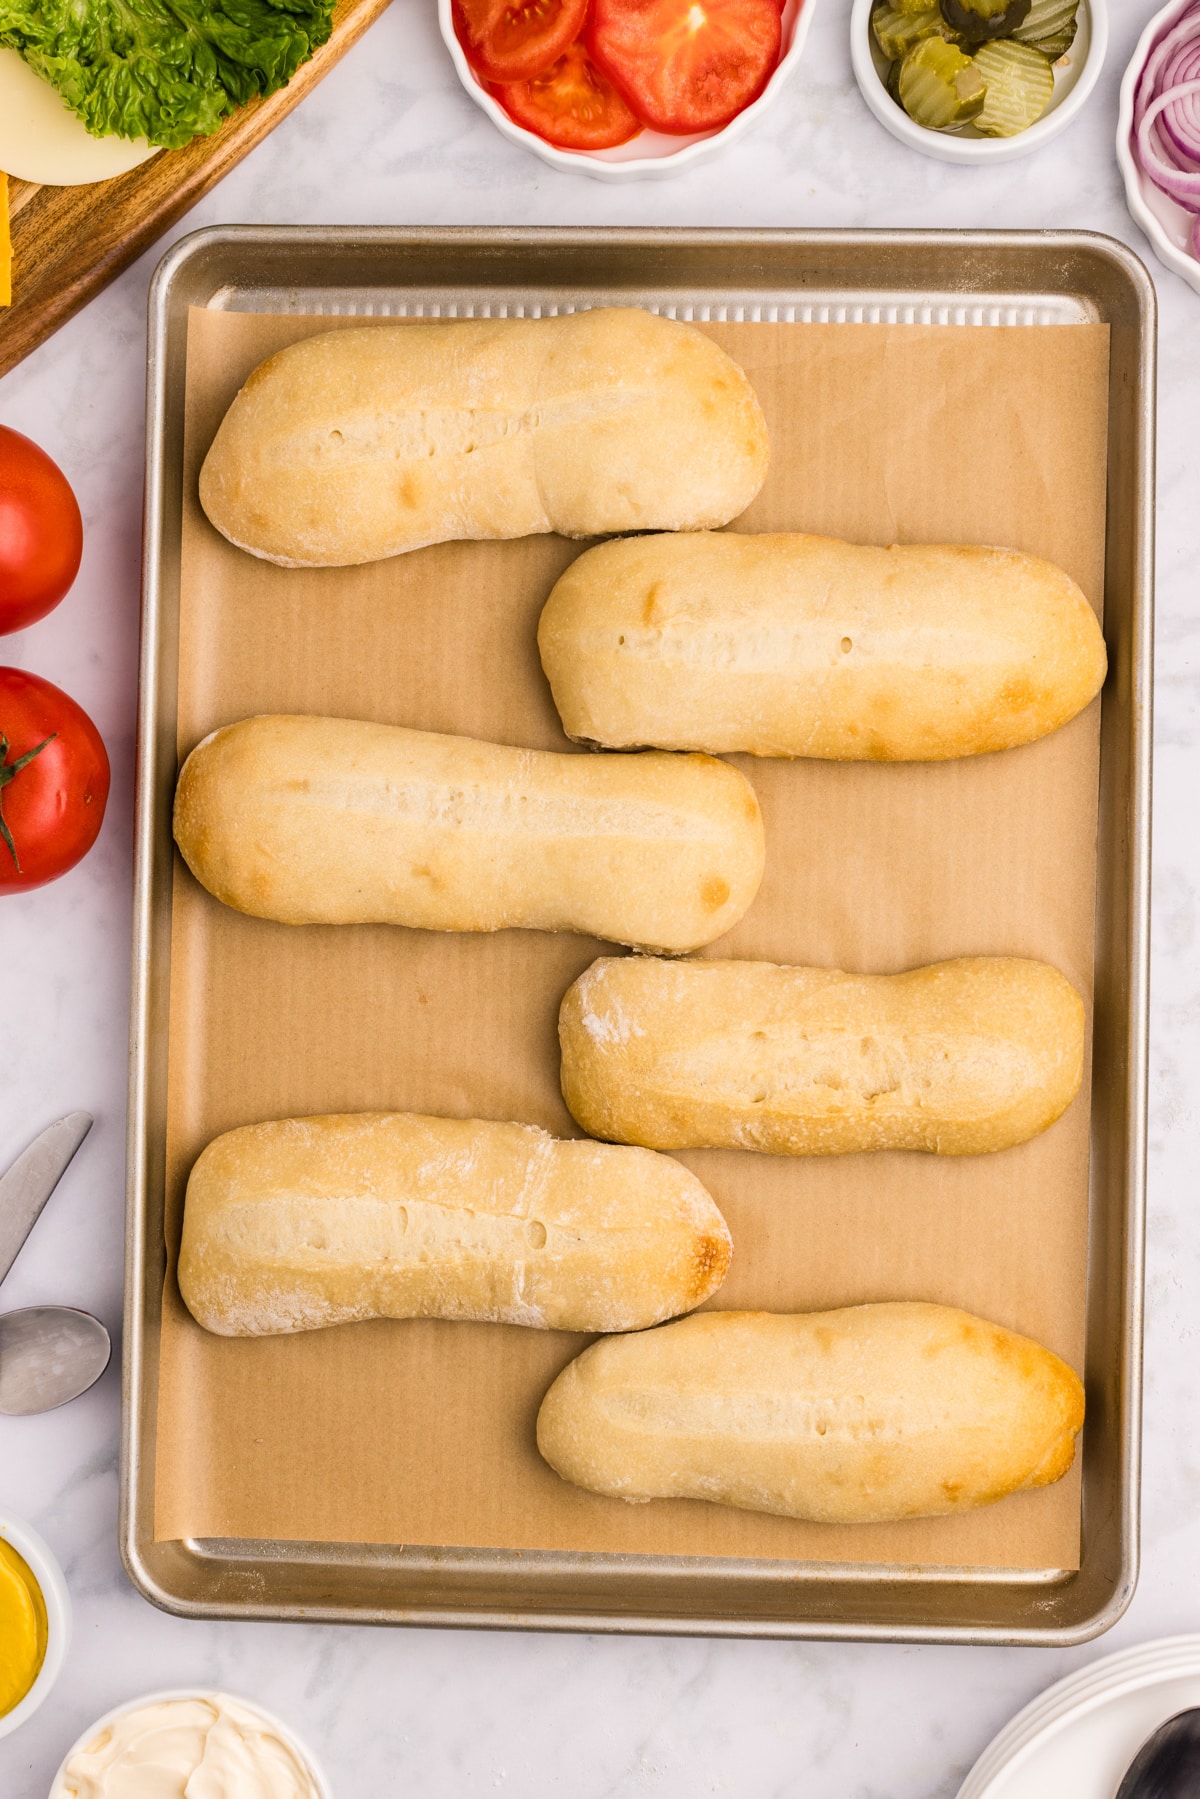
- Once the rolls are slightly puffy, uncover them and score them directly down the center using a bread lame, razor, or bread knife.
- Brush with an egg wash, if desired (see below)
- Bake in the oven for 25-28 minutes, or until the tops are golden brown and the inside has reached a minimum internal temperature of 190-200ºF (88-94ºC)
Optional egg wash: This recipe was developed during an egg shortage, so I wanted to make sure that everyone was able to make the recipe without issue. If desired, you can brush the tops of the rolls with egg wash to give a golden color. Whisk together 1 egg and 1 tablespoon of water, then brush the tops of the rolls using a pastry brush.
Storing Leftovers
- Rolls keep well at room temperature for 2-3 days (keep them tightly wrapped!), but do tend to be softest on days 1-2.
- They can be stored in the refrigerator for 3-4 days, but they do become more "dense".
- For longer storage, freeze them and thaw as needed. We like to make a large bulk batch and thaw as needed!
Freezing Sourdough Rolls
If you want to freeze your sandwich rolls, first allow them to cool, then place them in a freezer bag. Remove any air, label, and freeze for up to 3 months.
Thaw the rolls as needed at room temperature. Warming them in the microwave for 15 seconds after thawing can help with texture.

Without a Stand Mixer
This recipe can easily be made without a stand mixer, but you will need to use a little bit of elbow grease instead! Use a large mixing bowl and a dough whisk (or wooden spoon) to bring the dough together. Once you begin adding more flour and the dough becomes stiffer, switch to your hands.
When the dough is ready to be kneaded, knead it on a clean countertop for 6-10 minutes, or until it bounces back easily. The bulk rise will help build gluten strength, so there is no need for it to pass the windowpane test.
Using Sourdough Discard
If you want to make these quickly and/or with sourdough discard, you can use commercial instant yeast to help it along! Use the required amount of sourdough (you can use active or discarded starter), along with 2 ¼ teaspoons of instant dry yeast.
The "bulk rise" will be just 1 hour (give or take, until doubled), and the second proof after shaping should take just 15-30 minutes.
This way, you can make the dough, shape it, and bake it all the same day!

Expert Tips
- Let it rise. Make sure to give the dough enough time to rise. Sourdough takes longer to proof than using commercial yeast.
- Use bread flour. Bread flour is higher in protein and gluten, which helps to strengthen the dough, creating a better texture.
- Make sure your starter is active. How do you know your starter is active? It's bubbly, pleasantly sour, has nearly doubled in volume, and passes the float test. A float test is done by spooning some of the starter into warm water - if it floats, it's a good indicator your starter is ready to use.
Recipe FAQs
Yes, but it will make the rolls denser. Start by swapping up to 20% (about a cup) of the bread flour with whole wheat for better results.
Can I add seeds or toppings? You sure can! Brush with water or egg wash before baking and sprinkle sesame seeds, poppy seeds, everything but the bagel seasoning, or rolled oats on top.
After the initial bulk rise, you can cold-proof the dough overnight in the fridge. This deepens the sourdough flavor and gives you some flexibility in your schedule. This can be done after shaping, or you can cold ferment the bulk rise and shape, and bake the next day (or when you're ready).
Baker's Schedule (2 Options)
Standard:
Day 1:
- 4 PM: Feed your starter OR prepare a levain.
- 8-10 PM: Prepare the dough and cover for a bulk ferment.
Day 2:
- ~8 AM: Shape the rolls.
- ~8:30-9 AM: Bake the rolls
Bulk rise + overnight ferment:
The night before:
Feed your starter just before going to bed, giving it enough flour and water so that it will not reach its peak until the morning. The goal is to wake up with an active starter that’s ready to go.
Day 1:
- 7 AM: Prepare the dough, cover, and allow to bulk ferment at room temperature.
- 5-7 PM: Once the dough has doubled in size, shape the rolls and place them on a baking sheet.
- Overnight: Cover the baking sheet and place it in the fridge to cold ferment overnight.
Day 2:
When you’re ready to bake, remove the rolls from the fridge and allow them to rise at room temperature for 2 hours, or until slightly puffy. Bake as directed in the recipe.
More Sourdough Bread Recipes


If you loved this recipe for sourdough hoagie rolls, let me know by leaving a 5-star review in the recipe card or comment below! You can also tag me on Instagram @littlehomeinthemaking.
📖 Recipe

Sourdough Sandwich Rolls (AKA Hoagies)
Ingredients
- 1 ½ cups warm water 90ºF/32.2ºC (360 g)
- 100 grams sourdough starter active and bubbly (about ½ cup)
- ¼ cup honey (85 g)
- 2 teaspoons salt (11 g)
- 5 cups bread flour (600 g)
- ¼ cup unsalted butter softened (58 g)
Instructions
Cook ModeBefore you get started:
- Feed your sourdough starter about 4-6 hours before you plan on making the dough. You will need 100 grams; you can either feed your main sourdough starter or prepare a levain. To make a levain, combine 20 grams of starter, 40 grams of flour, and 40 grams of water. Stir, cover, and rest until doubled.
Making the Dough:
- Add 300 grams (1 ½ cups) of warm water to the bowl of your stand mixer, along with 100 grams of active sourdough starter. Using the whisk attachment, mix slowly to combine until the liquid appears milky.
- Next, add the honey and salt, whisk to combine. Note: If your honey is stiff, try heating it first.
- Add 2 cups of the bread flour and mix until incorporated. Then, add ¼ cup of softened butter and mix until fully combined.
- Replace the whisk attachment with the dough hook attachment.
- Slowly add the remaining flour by adding about ⅓ cup at a time, allowing the flour to become fully incorporated before adding more. *The dough will still stick to the sides of the bowl, but hold its shape.
- Set your stand mixer to medium speed. Knead the dough using the dough hook for 3-5 minutes (6-8 minutes if doing it by hand), or until the dough begins to come away from the sides of the bowl. The dough should be soft, but it may still stick to the bottom of the bowl. That’s okay! The dough should be slightly sticky/tacky – it’s a good sign that it will not be too dense once baked.
- Cover the bowl tightly with plastic wrap (or a damp kitchen towel) and allow to ferment at room temperature until it roughly doubles in size, about 8-12 hours. Note: The time can vary depending on the temperature of the room and how active your starter is. The best indicators are a dough that nearly doubles in size, and springs back when gently pressed with a thumb.
Shaping the Rolls:
- Line a rimmed baking sheet with a piece of parchment paper. Set aside.
- Once the dough has doubled in size, turn it out onto a clean, dry surface.
- Cut the dough into 6 even pieces using a sharp knife or bench scraper.
- Take one portion of the dough and gently form it into a log shape. I recommend that you gently flatten it out (try not to pop all of the bubbles), then roll it up, tucking in the edges as you go. Note: An unfloured surface helps to keep surface tension, making shaping a little easier, but if your dough is very sticky, you may like to dust the surface very lightly with some flour.
- Place the shaped sandwich roll on the baking sheet, then repeat with the remaining dough until you have shaped all 6 rolls.
- Preheat the oven to 375ºF (190ºC).
- Cover the rolls with a sheet of plastic wrap and allow to rise next to the warm oven for 30-45 minutes, or until puffy.
Baking the Rolls:
- Using a bread lame, razor, or very sharp knife, score a line down the middle of each roll, the long way.
- Optional egg wash: Whisk together 1 egg and 1 tablespoon of water and brush it over the surface of each of the rolls.
- Bake in the preheated oven for 25-28 minutes, or until the outside is golden brown and the inside has reached a minimum internal temperature of 190-200ºF (88-94ºC).
- Remove from the oven and allow to cool for at least 30 minutes before slicing into them, although 2-3 hours is best.
- Serve and enjoy! Leftovers freeze very well, so feel free to make them in bulk and freeze for later.
Notes
Nutrition
Please note that some of my blog posts here at Little Home in the Making may contain affiliate links. If you make a purchase through these links, I will get a small commission at no additional cost to you. See our disclaimer for more information.


Dolly | Little Home in the Making says
We love making these sourdough sandwich rolls and keeping extras in the freezer. They are perfect for making subs at home when you're craving deli or take out.