


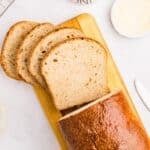


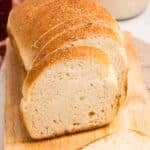


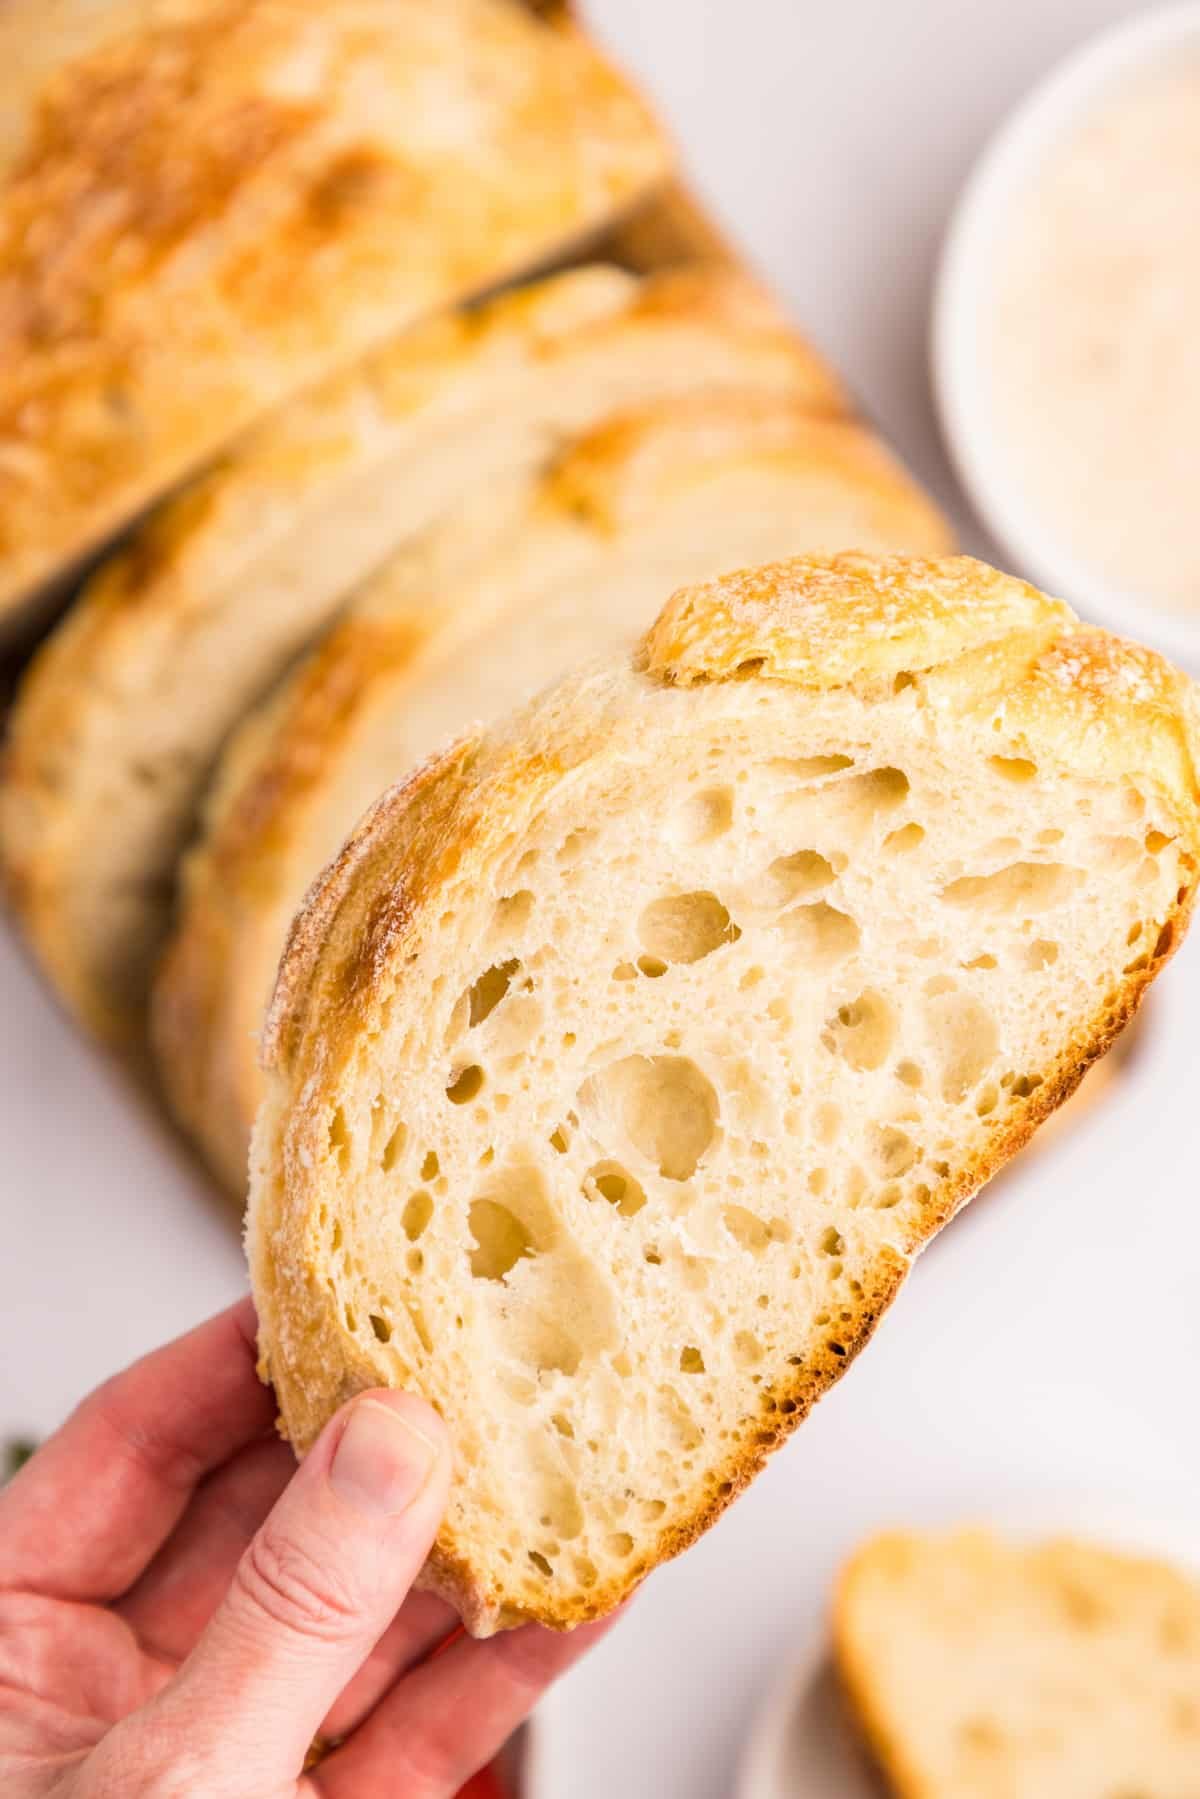
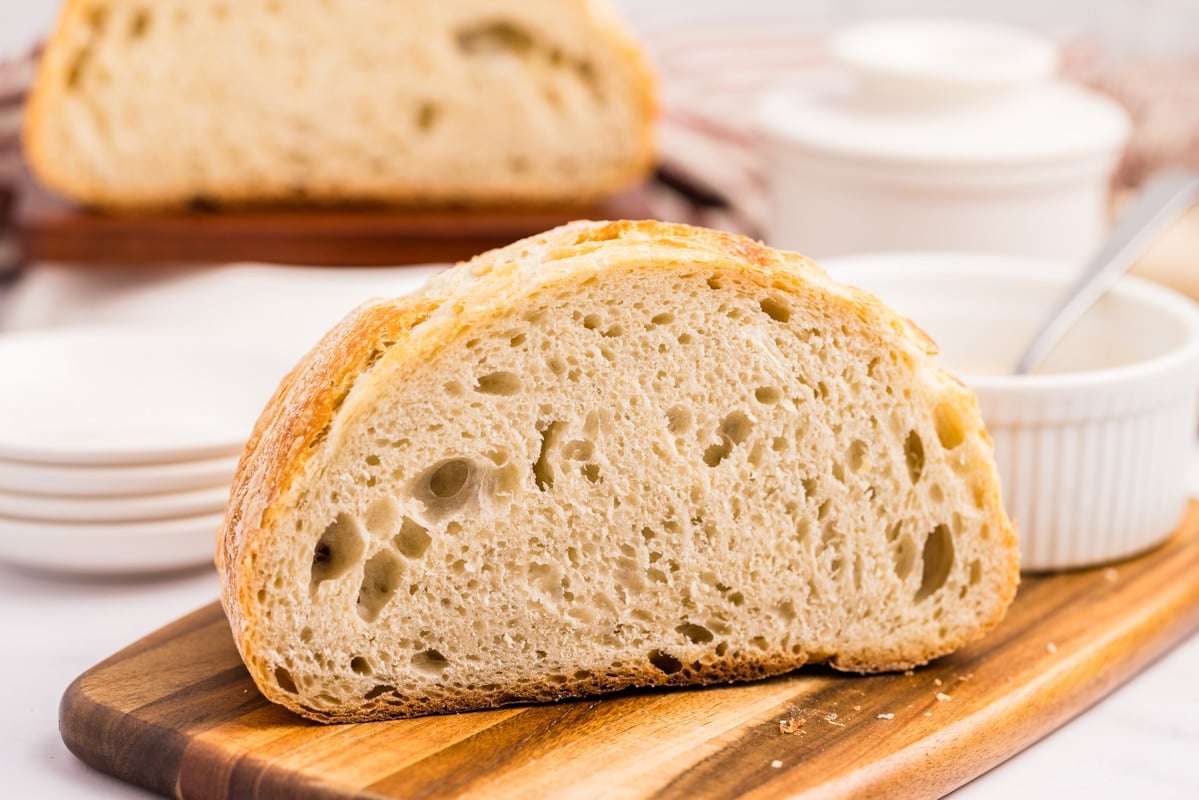
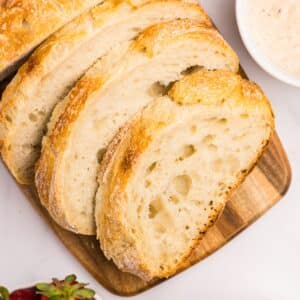
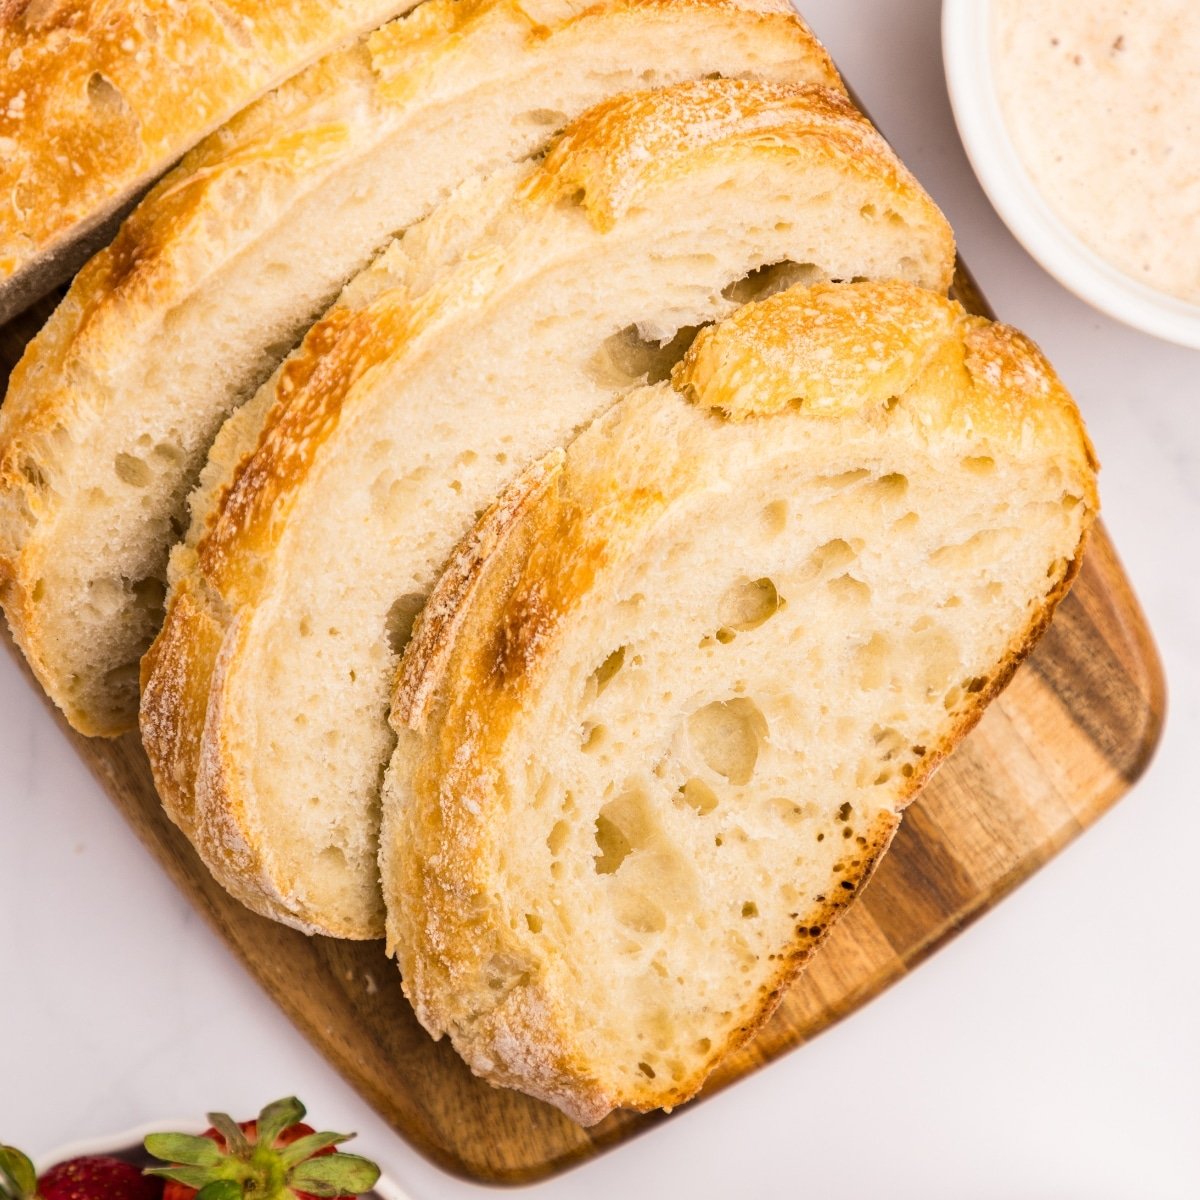
This easy recipe for Dutch Oven Sourdough Bread is perfect for both beginner and experienced bakers! Moisture is trapped inside of the Dutch oven, yielding a delicious and fragrant sourdough bread with a delightful crumb.
Includes step-by-step instructions and a baker's schedule so you can feel confident in the fermentation process.
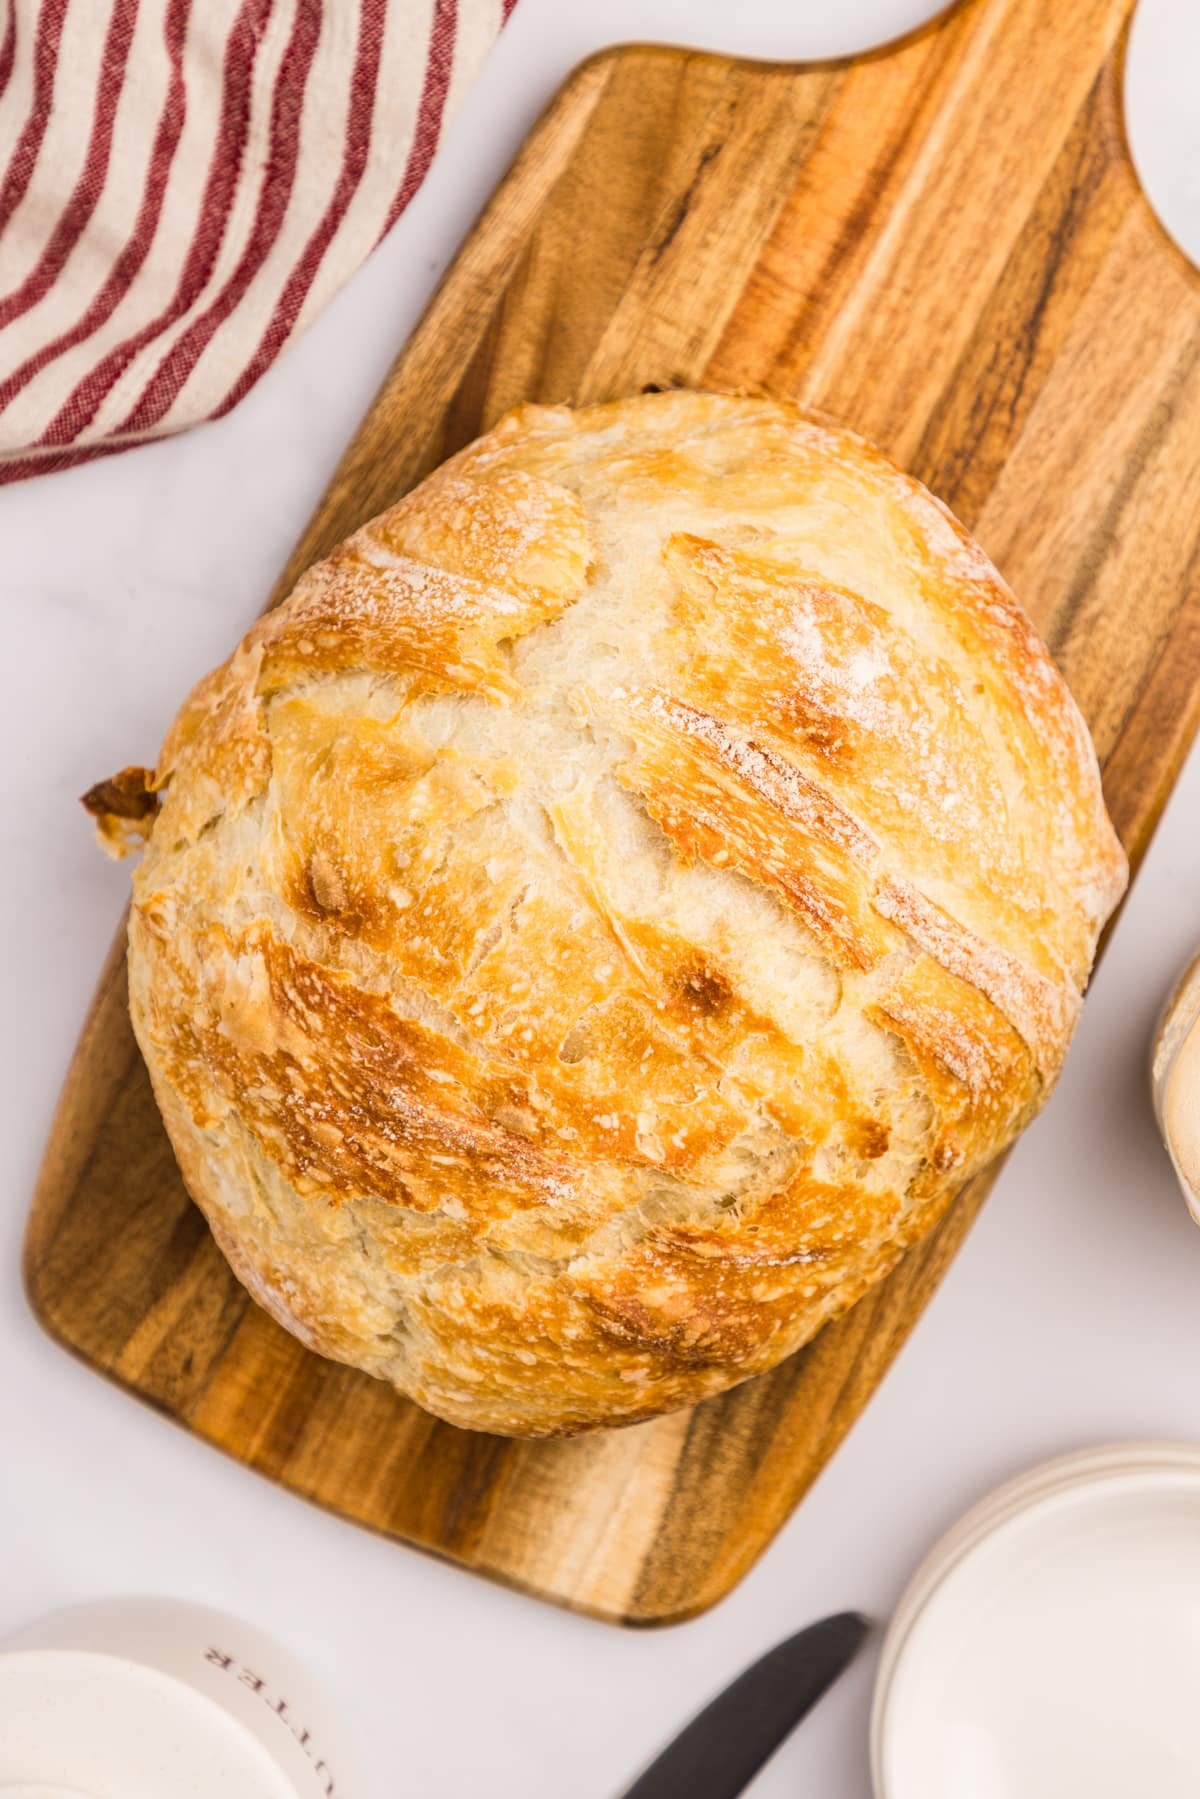
The cornerstone of any sourdough baker's kitchen is the simple, yet delicious sourdough boule.
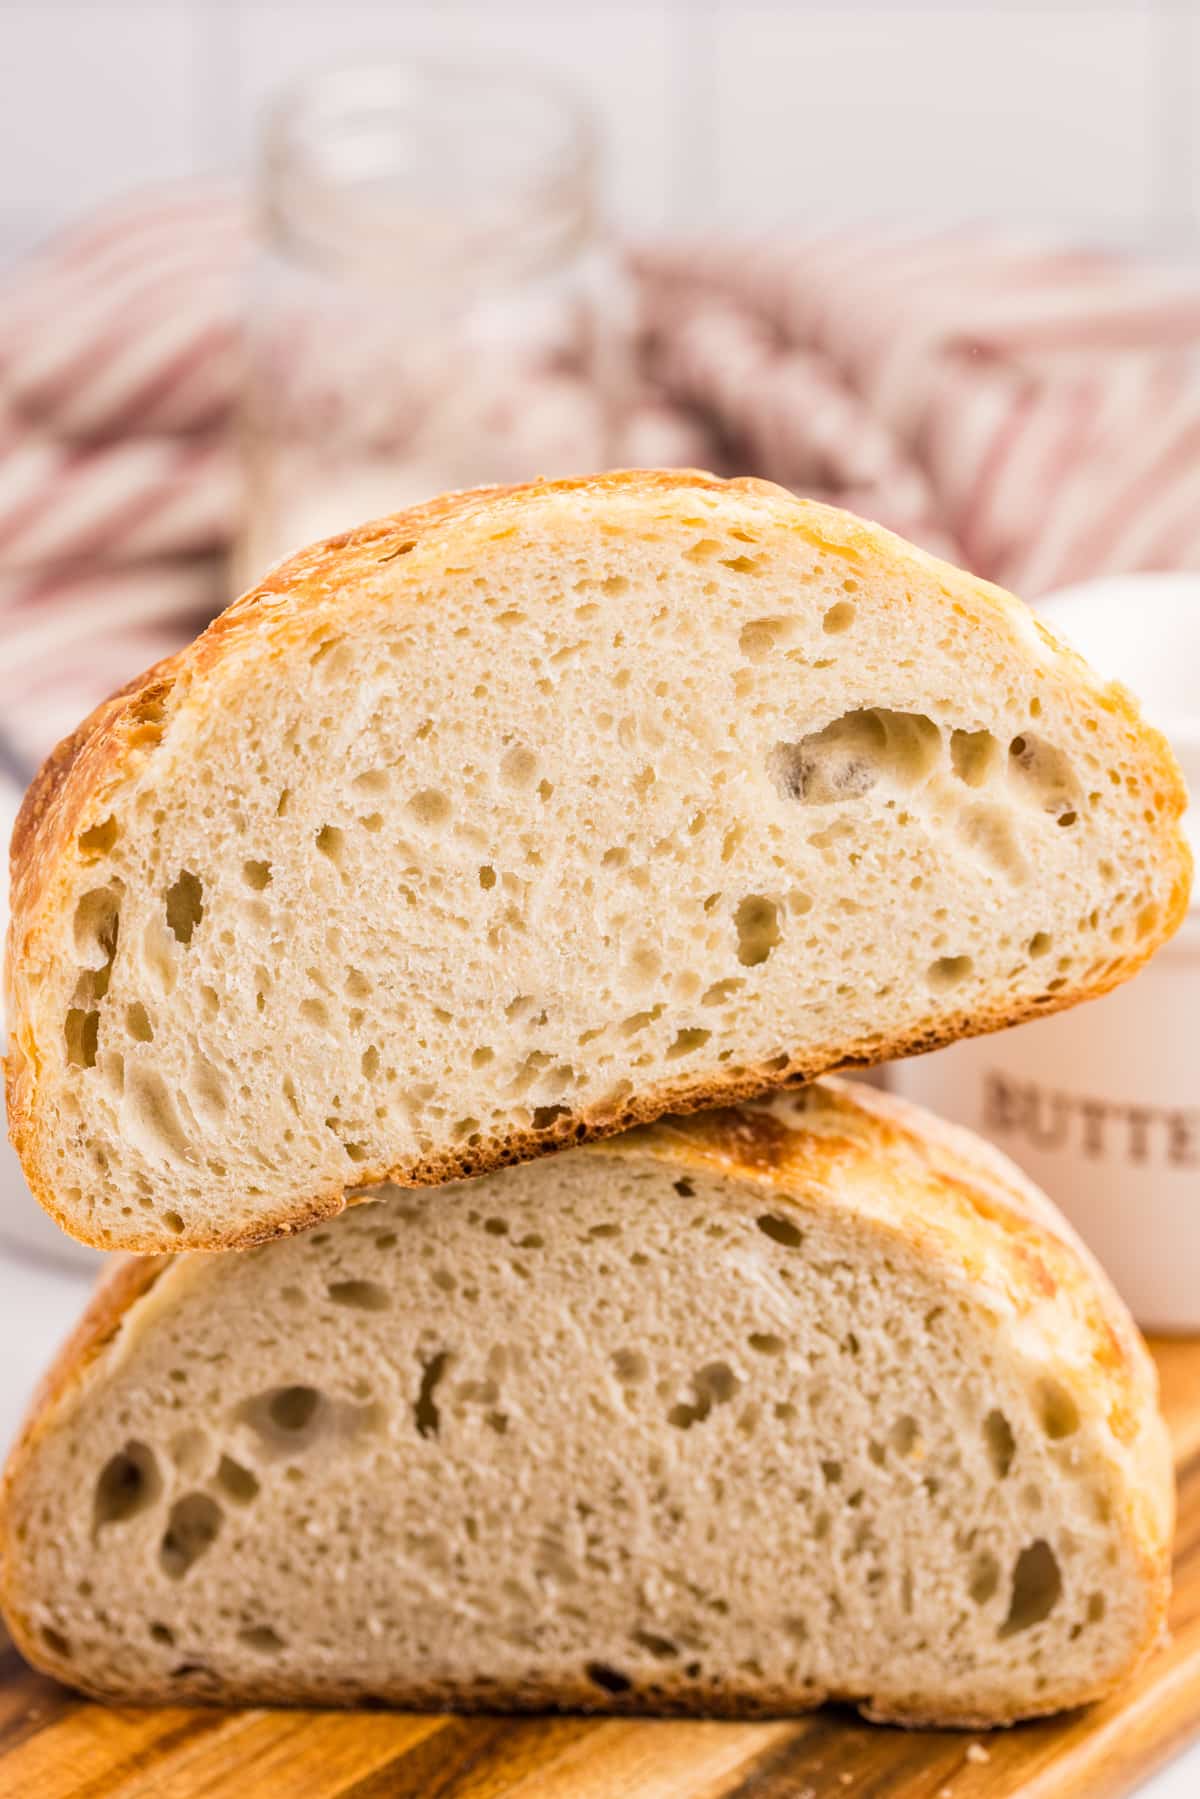
This recipe for Dutch oven sourdough bread is an easier way to master basic sourdough bread. Since the steam stays trapped inside, your bread will be fluffy, with a soft, yet slightly crispy crust, and a perfect crumb.
All you need is a Dutch oven, a sourdough starter, and a few basic tools.
Why You'll Love It:
- No Knead. Instead of kneading by hand (which can be messy!), the dough is strengthened by a series of stretch-and-folds, meaning you won't need a special mixer (or arms of steel) to get the perfect bread dough.
- Uses wild yeast. Leave the commercial yeast packets behind, and make bread the way it's been made for thousands of years!
- Delicious. Anyone who has had homemade sourdough knows it's the most amazing bread! Fluffy, fragrant, and unlike anything you've ever tasted.
- Easy. If you're new to sourdough, there can be a serious learning curve. I've created this recipe with the beginner in mind, and have strived to make the recipe as detailed as possible - without over complicating things.
You Will Need:
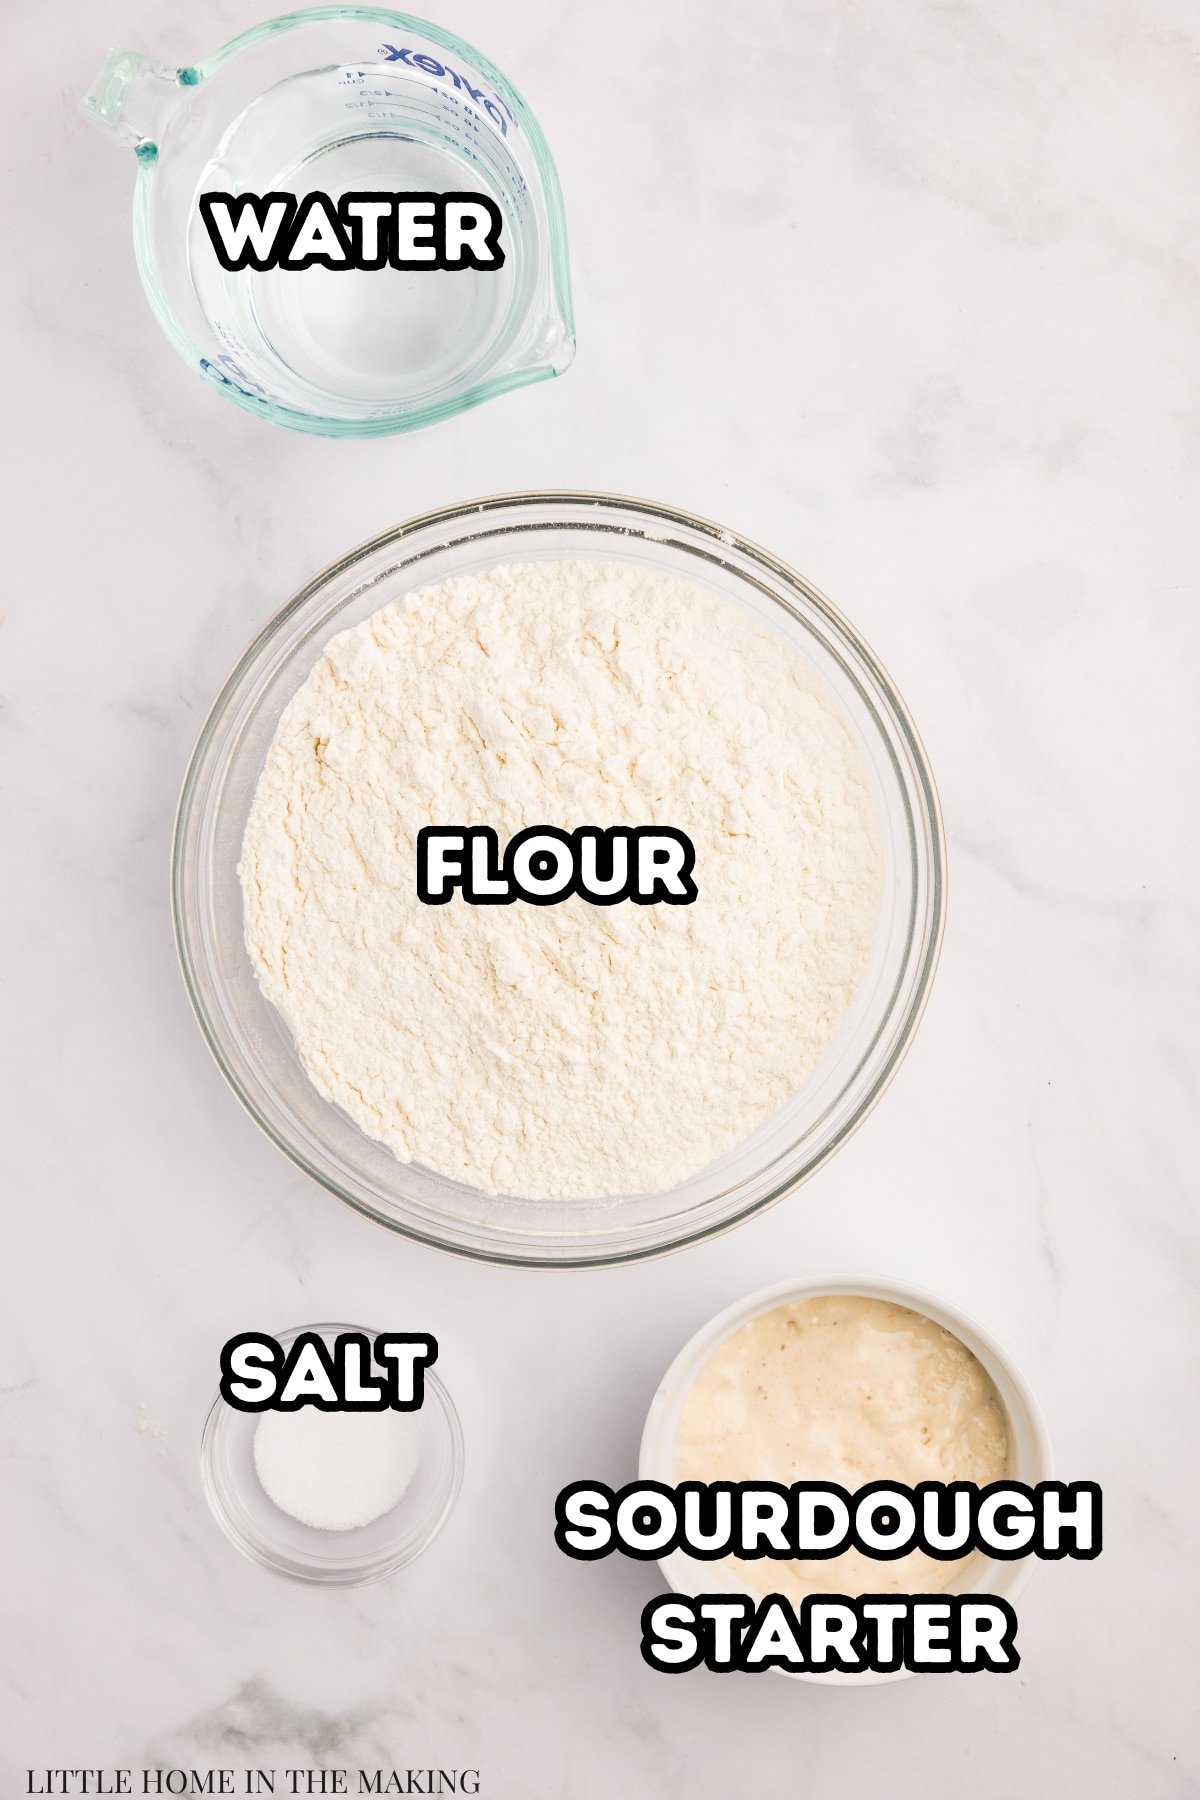
- Flour: Both all-purpose and bread flour have been used when testing this recipe. All-purpose is a perfectly good option, but my preferred type is bread flour. If you can't find any locally, you can make your own bread flour with vital wheat gluten and AP.
- Active sourdough starter: You want to use starter that is bubbly, active, and has doubled in size since the initial feeding. If desired, you can prepare a levain instead (see below).
- Salt: This can be any type of salt you prefer, although a fine salt is preferred. I've used both regular table salt and a mineral salt like Redmond's and both work great.
- Water: Use warm water that is a drinkable quality (but not distilled). Room temperature is just fine, but warmed water (80-85ºF) can help give your bread a boost in cooler temperatures.
Note: If you don't have an active sourdough starter, check out my tutorial on how to make sourdough starter at home.
Equipment
- Cast iron Dutch oven
- Parchment paper (or silicone sling)
- Bread lame (razor blade, or sharp knife)
- Digital scale (recommended)
- Proofing basket (or large bowl)
- Dough whisk (optional, but a great tool for sourdough bakers!)
How to Make Sourdough Bread in a Dutch Oven
For the best results I recommend weighing your ingredients when making sourdough bread. That being said, I've provided cup measurements in the recipe card for those who don't yet have a food scale.
The First Proof
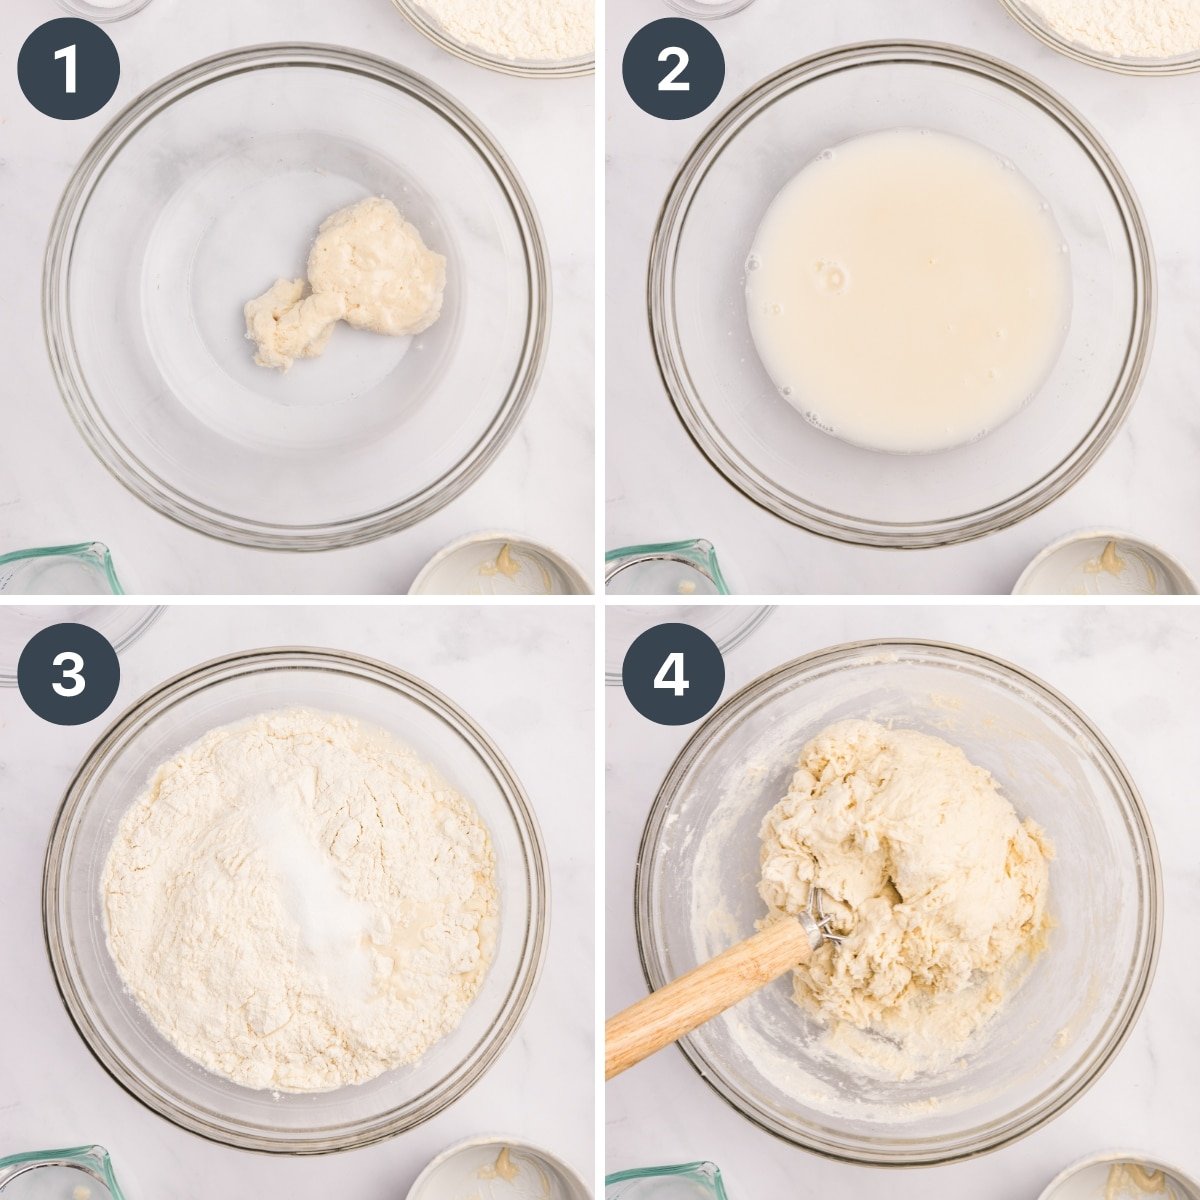
- Add 300 grams of warm water (room temperature, or up to 85ºF) to a large bowl, along with 100 grams of active sourdough starter.
- Whisk together until the water appears "milky" and the mixture is uniform.
- Add 500 grams of flour and 10 grams of salt to the bowl.
- Stir the flour and salt into the liquids using a dough whisk or a wooden spoon. You may need to use your hands to bring the sticky dough together at the end.
- Once the dough comes together, cover the bowl with a damp kitchen towel or plastic wrap and allow to rest for 30 minutes before moving onto the next step.
Stretch and Folds
If you're new to sourdough, you may not have heard of this term before. Stretch-and-folds are a way to build dough strength (AKA develop gluten) without kneading. This is especially helpful in moderate to high hydration doughs, like this dutch oven sourdough recipe.
It is very simple, but you will need to set a time and repeat the steps 3-4 times. Stay close to home for the stretch-and-folds, but once those are done, you can essentially leave your bread for a good 12 hours without another thought. Sourdough can be simple, even if it takes a bit of getting used to.
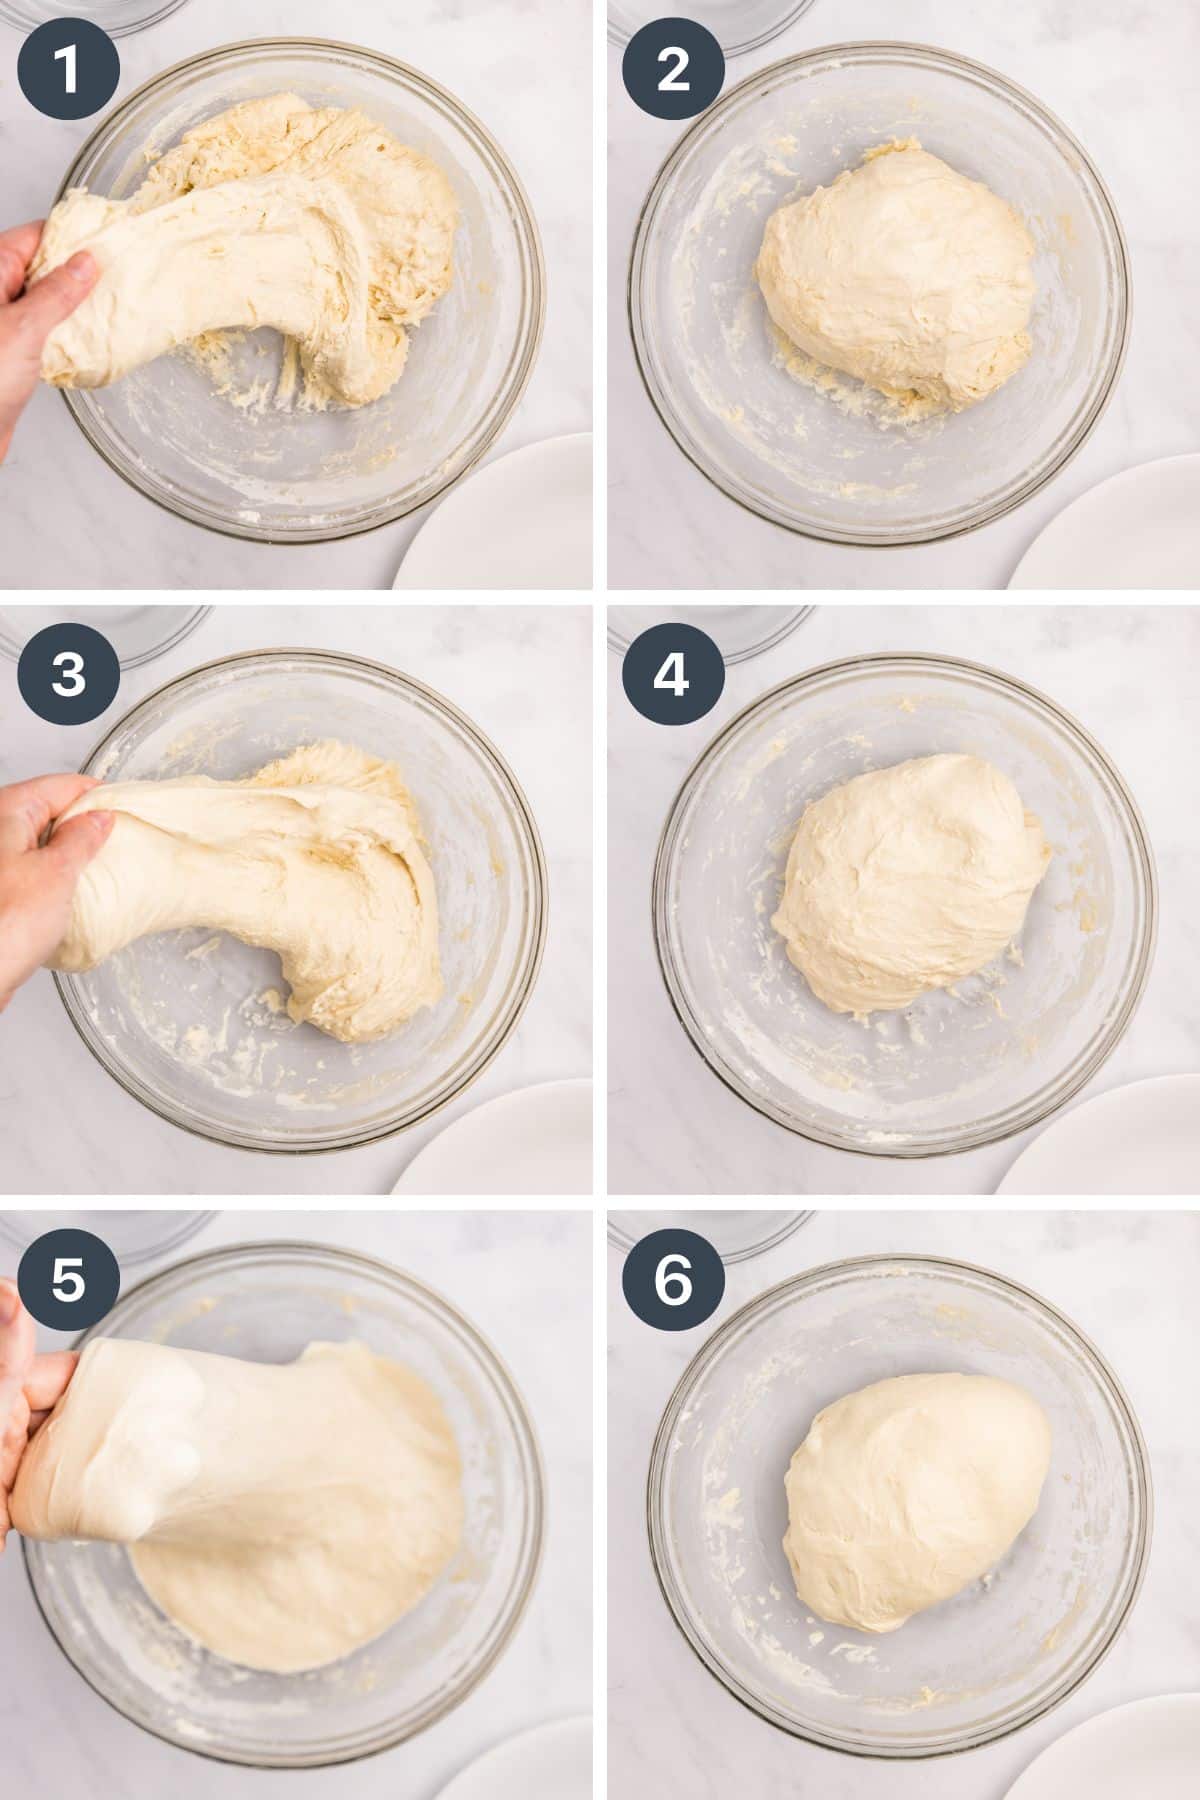
- Using wet hands (to prevent sticking), pick up one side of the dough, stretching it as far as you can, and folding it back into the middle. Repeat in a clockwise motion, 4-6 times, picking up another section of dough, stretching it, and folding it.
- Once complete, cover the bowl and let the dough rest for 30 minutes.
- Repeat the series of stretch and folds. Notice how to dough begins to build strength; you should be able to pull the dough a little further each time without tearing.
- Cover the bowl and allow to rest for another 30 minutes.
- Repeat the stretch-and folds, then cover and rest for 30 minutes.
- Continue to repeat until you've done a total of 4-5 rounds of stretch-and-folds.
- Once your final set has been completed, you're ready for the bulk rise (also known as the bulk ferment).
The Bulk Fermentation
Cover the bowl tightly and allow to rise at room temperature for about 8-12 hours, or until the dough has roughly doubled in size.
If your home is cooler, you may need to place the bowl in a slightly warmer spot like the top of your refrigerator or in the oven (turned off) with or without the light turned on (sometimes the light can cause the oven to become a little too warm - so adjust accordingly).
Final Proof, Shaping, and Baking
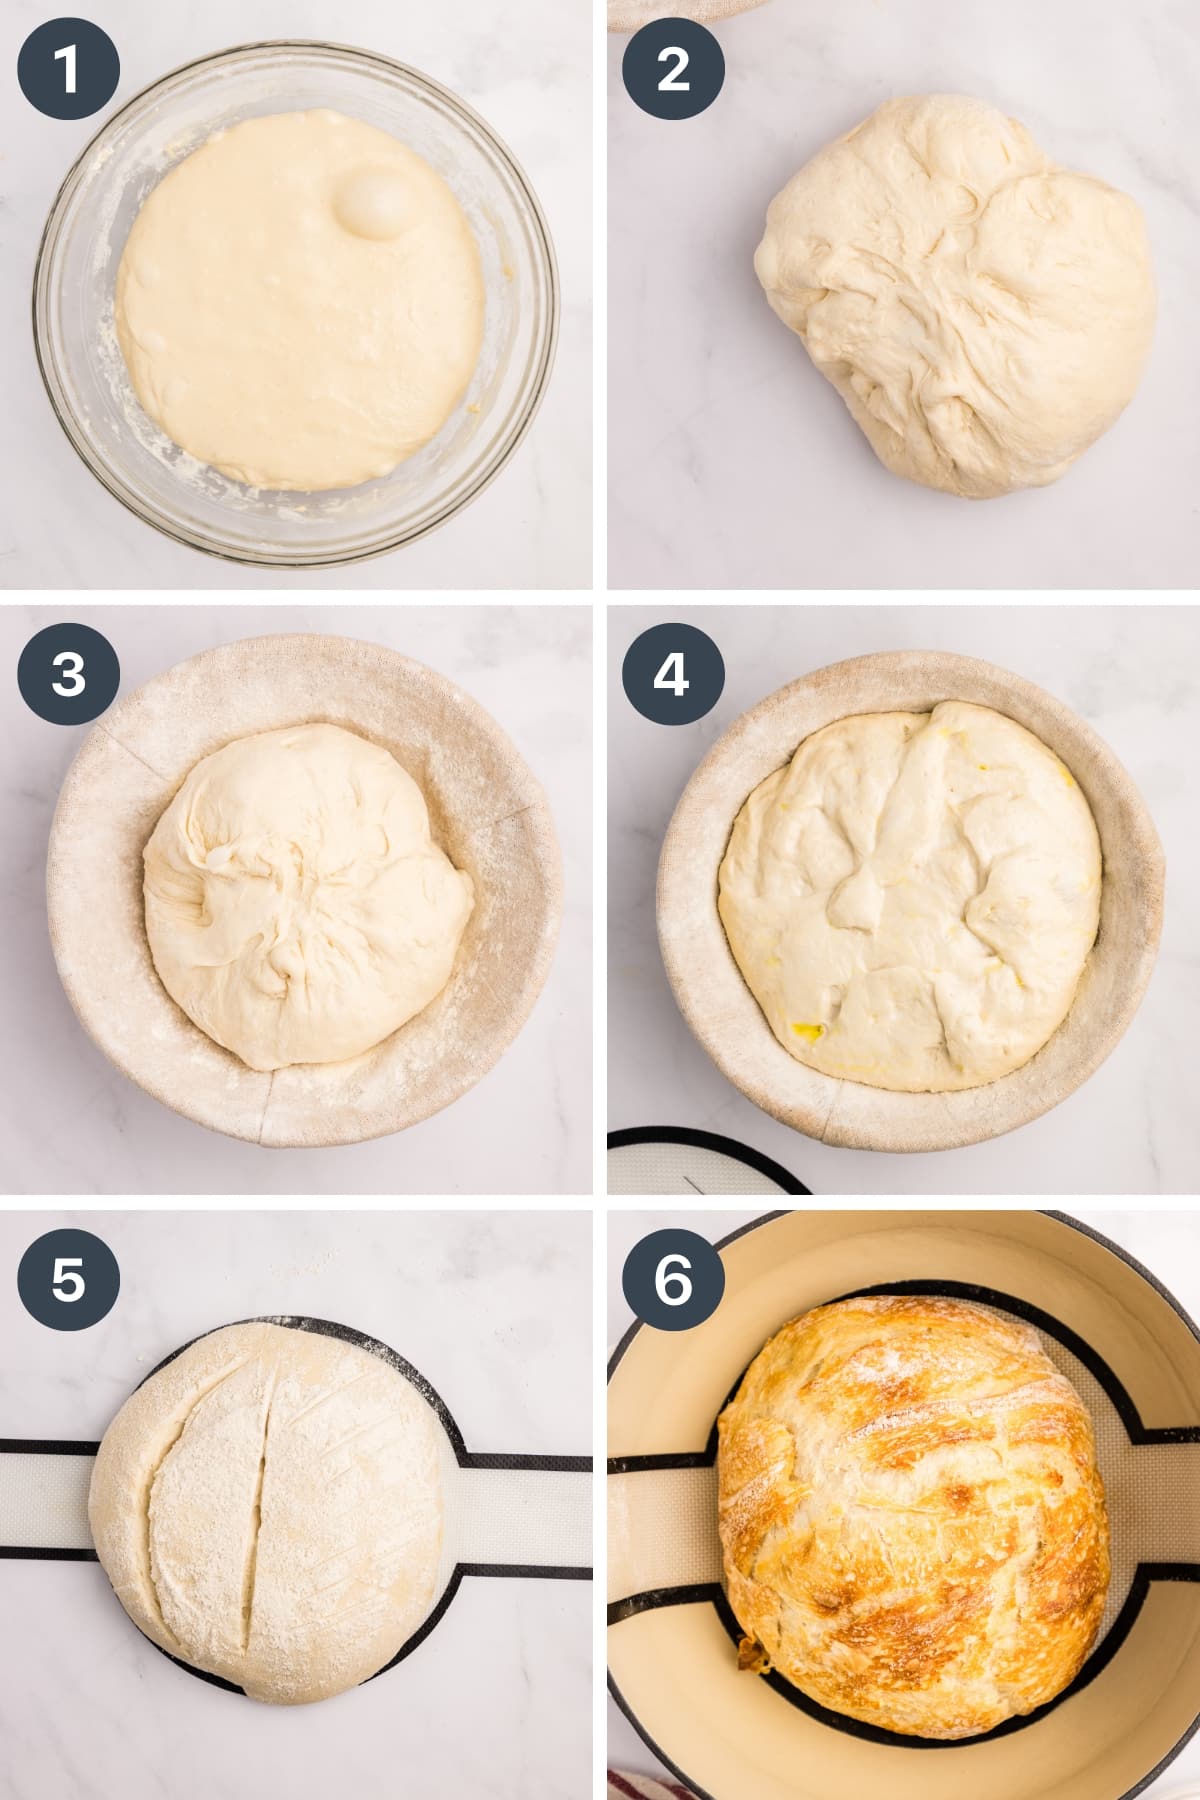
- Once the dough is proofed (roughly doubled in size), you're ready to shape the loaf. For most people, this will be the next day (if you did the bulk rise overnight).
- Turn the dough out onto a lightly floured work surface, and flatten it a bit with the palm of your hand. Then, roll it up, pinching in the sides to form a round shape (or an oval if desired).
- Prepare a proofing basket by dusting it with flour (rice flour is preferred, but all-purpose will do just fine). Place the round dough, smooth side down, into the prepared proofing basket.
- Final proof. Cover the basket tightly (I like to wrap it with plastic, secure with a large rubber band, then place it inside of a plastic bag). Place the basket in the refrigerator to cold proof for 8 hours. After the 8 hours are up, allow the bread to come to room temperature (this will take about 2 hours).
- Preheat the Dutch oven in a 450ºF (232ºC) oven for 45 minutes (while your bread comes to room temperature). Once the dough is ready and the dutch oven is preheated, place the dough in a silicone sling (or on a piece of parchment paper) and score with a bread lame (sharp knife, or razor). I recommend doing 2 cuts - one in the middle, and one on the left side (curved).
- Immediately place the scored bread in the preheated Dutch oven and bake (with the lid on) for 25 minutes.
- After the 25 minutes are up, remove the lid and reduce the heat to 375ºF (190ºC). Bake for another 25-30 minutes.
- Remove the bread from the oven and allow to cool for AT LEAST 30 minutes before slicing, but 2+ hours is ideal for the best texture.
Without a Proofing Basket
If you don't have a proofing basket (AKA banneton basket) - no worries! There are some budget-friendly alternatives.
- A large bowl lined with parchment paper (crumple it first so it's not so rigid)
- A Dutch oven lined with parchment (again, crumpled)
- A decorative basket lined with plastic or parchment

How do I know if my starter is ready for making bread?
- It has lots of bubbles
- Has doubled in size after the most recent feeding
- Signs of activity and movement
- Passes a float test (not foolproof, but can be helpful)
- At least 1 week old, but 2+ weeks is preferred
- Has been fed at least 2-3 times after refrigeration (if you keep your starter in the fridge)
- Smells pleasant and yeasty
Using Levain Instead of Active Starter
If you prefer, you can prepare a levain in lieu of using active sourdough starter that is at its peak. To do so, simply combine:
- 20 grams of starter
- 40 grams of warm water
- 40 grams flour
Stir the ingredients together very well, and place a rubber band around the jar (or mark a line with a dry erase marker or sharpie) to note the starting line. Once the levain has doubled, it's ready to use in your recipe.
Note: if you don't maintain a separate starter from your levain, you should increase the ratio above so you have at least 20 grams leftover to create your next levain. As a general rule, I recommend keeping a separate starter from your levain, as well as having a backup discard jar and/or dried sourdough starter.
Storing your Sourdough Loaf
- First, let the loaf cool to room temperature.
- Tightly wrap with several layers of plastic wrap (or place in a linen bread bag)
- Keeps well at room temperature for up to 3 days (if wrapped in plastic, 1 day if in a bread bag).
- Can be kept in the refrigerator for up to 4 days, but the bread will become a little more dense or tough.
- To freeze, slice, then wrap tightly with plastic wrap. Place the wrapped loaf in a freezer bag and label. Remove slices as needed.
- Leftover sourdough bread that is too hard for toast can be used to make sourdough croutons, breakfast casserole, bread pudding, or breadcrumbs.
Expert Tips
- Use a hot dutch oven. Adding the room temperature dough to a hot dutch oven helps to create that lovely oven-spring we all know and love. Make sure you preheat the Dutch oven (and lid) in a 450ºF oven for at least 45 minutes for the best results.
- Shaping the dough. If it's your first time, you don't need to fuss over shaping the dough too much. But as you advance, try using a bench scraper to pull the dough against the counter. This increases surface tension, and gives the dough a beautiful, firm shape that bakes up like a dream.
- Easy clean up. One of the most difficult things new sourdough bakers face is the clean-up! Sourdough leftovers can be super sticky and difficult to get off. I like to use a dough scraper to remove any bits of dough from the bowl. After that, I add a squirt of dish liquid to the bowl and fill with very hot water and allow it to soak for 20 minutes or so before rinsing and washing.
Sample Baker's Schedule
This is just an example meant to give you an idea of how to plan your baking. It shouldn't be any trouble to customize it according to your schedule. You can lengthen the cold proofing stage to account for work, sleep, life, etc (see the note below).
First Day
- 9AM: Feed your sourdough starter with a 1:1:1 or 1:2:2 ratio (former for a cool home, later for a warm home).
- 1-5PM: Your sourdough starter should be at its peak - which is roughly double the original size.
- 1-5PM: Prepare the first proof by combining the water and starter, then stirring in the flour and salt. Allow the dough to rest for 30 minutes.
- 5:30PM: Complete your first set of stretch-and-folds.
- 6:00PM: Complete your second set of stretch-and-folds
- 6:30PM: Complete your third set of stretch-and-folds
- 7PM: Complete your fourth set of stretch-and-folds.
- 7:30PM (optional): Complete your fifth (and final) set of stretch and folds.
- 7:30PM: Cover the bowl tightly and allow to rise at room temperature for 8-12 hours, or until doubled.
Second Day
- ~7:30AM: Shape the bread and place it into a prepared proofing basket.
- 7:45AM: Cover the bread and place it in the refrigerator to cold ferment for 8 hours.
- 3:00PM: Remove the bread from the refrigerator and allow to come to room temperature (about 2 hours)
- 5:00PM: Bake the bread as directed in the recipe.
- ~6:15 PM: Fresh bread is ready to serve!
Note: Depending on how quickly your starter rises, this schedule can shift by several hours. If you need to extend the proofing time in order to make bread around your sleep or work schedule, the best way to do that is during the cold proofing stage.
Your shaped loaf can proof in the refrigerator for anywhere from 8-48 hours, so you can give yourself a lot of wiggle room once the bread is in the refrigerator.
Recipe FAQs
Because a Dutch oven keeps moisture inside of the cooking vessel, it's one of the best ways to bake your sourdough bread. This method produces a softer crust and better crumb when compared to using a baking sheet or stone (even with the introduction of water and steam to the oven).
If you don't have a proofing basket, you can let your sourdough rise in the Dutch oven if needed. That being said, you will need to preheat the Dutch oven, which means you will have to remove the loaf at some point. Make sure you allow the Dutch oven to warm up (if it has been refrigerated) to reduce the risk of temperature shock when placing it in a hot oven.
Parchment paper is often used when baking sourdough bread, as it offers a non-stick surface, and easily lifts in and out of a Dutch oven for baking. If you prefer not to use parchment paper, you can use a silicone bread sling. Because the dough is sticky, baking it in an unlined pot can cause both sticking and scorching so it is not recommended.
If you loved this recipe for Dutch Oven Sourdough Bread, let me know by leaving a 5-star review in the recipe card or comment below! You can also tag me on Instagram @littlehomeinthemaking.
📖 Recipe
Dutch Oven Sourdough Bread
Equipment
- Dutch oven or heavy-bottomed baker with a lid
- Large bowl
- Digital scale (recommended)
- Bread lame razor, or sharp knife
- Parchment paper or silicone bread sling
- Dough whisk (optional)
- Proofing basket (or bowl lined with parchment paper)
Ingredients
- 100 grams active sourdough starter* about 1 cup after rising, ½ cup stirred down
- 300 grams warm water** about 1 ¼ cup
- 500 grams flour all-purpose or bread flour*** (about 4 cups)
- 10 grams salt about 1 ¾ teaspoons
- 3-4 ice cubes
Instructions
Cook ModeForming the Dough
- Add the water to a large mixing bowl, along with the active sourdough starter. Whisk the water and starter together until “milky”.
- Add the salt and all-purpose flour to the bowl and stir together until a shaggy dough forms. I like to use a Danish dough whisk for this, but you can use a regular wooden spoon, then bring it together with your hands as the dough becomes increasingly sticky.
- Once everything is mixed together, cover the bowl with a damp towel or plastic wrap. Allow to rest for 30 minutes.
Stretch and Folds
- After the 30 minutes have passed it’s time to start the stretch and folds. This helps to build dough strength without kneading.
- Remove the covering from the bowl. Wet your hands with some water (this prevents the dough from sticking to your hands), then pick up one corner of the dough, and stretch it up and over so it folds over the dough. Repeat this process 4-6 times in a clockwise motion, turning the bowl, picking up a section, and folding it over.
- Once you’ve finished the stretch and folds, cover the bowl tightly and allow it to rest for another 30 minutes.
- Repeat the stretch and fold process 3-4 times (for a total of 4-5 sessions).
- Note: Each stretch and fold session you will notice the dough becoming stronger and you’ll be able to pull the dough further. The gluten is being developed through this process. You will know the dough is ready for its bulk rise when the dough is soft, smooth, and pliable.
Bulk rise
- Once the stretch and folds have been completed, place the dough on the counter, and cover for about 8-12 hours, or until the dough has almost doubled in size. This is the bulk rise (also known as the bulk ferment).
- After the dough has roughly doubled in size, prepare a proofing basket (AKA banneton) by generously flouring the basket. You can use all-purpose flour or rice flour for this step. If you don’t have a proofing basket, you can use a large bowl lined with crumpled parchment paper. Set the prepared basket aside.
- Turn the dough out onto a lightly floured surface.
- Flatten out the dough and roll the dough up while folding in the sides until it resembles a round or oval shape (depending on the shape of your banneton or proofing basket).
- Place the dough (smooth side down) into your proofing basket. Cover and place it in the fridge for 8 hours (or for up to 48 hours). This is known as cold proofing, and can give the bread better oven-spring.
Final Proofing and Baking
- At the 8-hour mark, remove the dough from the fridge and allow it to come to room temperature (this will take about 2 hours).
- Prepare your oven by removing all but 1 rack from the oven. Place the remaining oven rack in the bottom groove.
- Place your Dutch oven in the oven on the bottom rack.
- About 45 minutes before your dough is ready to bake (1 hour 15 minutes after pulling it from the fridge), preheat the oven to 450ºF (232ºC) with your Dutch oven inside the oven (preheating the baking vessel gives the finished bread better oven-spring).
- Approximately 10 minutes before you’re ready to bake, turn the dough out onto a silicone bread mat or a piece of parchment paper.
- Using a bread lame, razor, or sharp knife, make a cut (slash) in the middle of the boule, and one curved cut on the left side. This is called scoring the dough, and it helps control the shape of the bread and allows it to rise evenly during baking.
- Place the dough into the Dutch oven, then add 3-4 ice cubes around the perimeter, and cover with a lid. This will create steam and moisture, helping the dough to rise and create a slightly softer crust (compared to baking without steam).
- Bake at 450ºF (232ºC) for 25 minutes with the lid on.
- After 25 minutes, remove the lid, reduce the heat to 375ºF (190ºC), and bake for an additional 25-30 minutes, or until the bread reaches an internal temperature of 200-205ºF (93-96ºC).
- Carefully remove the bread from the Dutch oven and place it on a cooling rack. Allow to cool for at least 30 minutes (but 2+ hours is ideal for texture) before slicing and serving.
Notes
- Be patient. Sourdough bread takes a lot longer than breads made with store-bought yeast.
- Be sure to measure your dough using a digital scale; it is the most accurate way to make sourdough bread. Measuring the flour with cups isn’t as reliable, and can cause your dough to have either too much or too little flour, depending on many factors (humidity, style of measuring, type of flour, etc).
- Cold or hot weather can affect the rise time. You will notice faster proofing times when it is warm, and slower ones when your home is cool.
- Ensure your starter is active; you should see lots of bubbles and activity. Use it once it has reached its peak, which is when it has roughly doubled in size.
Nutrition
Please note that some of my blog posts here at Little Home in the Making may contain affiliate links. If you make a purchase through these links, I will get a small commission at no additional cost to you. See our disclaimer for more information.


Dolly | Little Home in the Making says
This has been our favorite sourdough bread recipe, and is the perfect loaf for enjoying fresh, toasting, or making french toast. I know you'll love it as much as we do!
Kayleigh Dumond says
My bread isn’t rising in the oven. It still tastes great but I think it’s not rising when it bakes. It definitely doubled in size when I left the dough out. I did the folds, I put it in the fridge for 8 hours…. My starter was fed about 12 hours prior to starting and was bubbly. Can’t figure out what could be wrong.
Dolly | Little Home in the Making says
All I can think is maybe it overproofed? Other than that, I'm not sure. Could be the Dutch oven (was it preheated?) or other factors. Sometimes even experienced bakers get flat loaves! I just make sourdough croutons or bread pudding, or even breadcrumbs.
Emily says
I’ve noticed that my bread turns out to rise more when I use it at its peak.. 4-6 hours after feeding!
Dolly | Little Home in the Making says
Yes! The peak is the most reliable indicator! Times are great as a guideline, but everyone has a different environment, which causes a lot of variations in proofing time.
Linda says
This is a beautiful sourdough bread recipie. 🍞 Turned out perfectly. I will definitely make again.
Dolly | Little Home in the Making says
So glad you loved the recipe Linda!
Nicole says
The absolute best sourdough recipe I’ve ever used! 11/10
⭐️⭐️⭐️⭐️⭐️
Dolly | Little Home in the Making says
Oh wow! Thanks for the lovely review Nicole! So glad you enjoyed it!
Jacquie says
I made this recipe and it was my 1st sourdough bread ever. It turned out wonderfully! Soft on the inside, crunchy on the outside. I wish I could add a picture because it’s beautiful!
Dolly | Little Home in the Making says
Aww yay Jacquie! I'm so glad you had success and were proud of your loaf! Wish I could see a picture but I bet it was amazing!
Mindi says
Do you have any recommendations for altitude cooking? We’re about 5000 feet. It seems to take longer for everything. Tried my first loaf. Coming out of the oven soon.
Dolly | Little Home in the Making says
Hi Mindi! While I don't live at high elevation, I do know that with canning you need to process food at higher pressure. I wonder if increasing the oven temperature by 25-50 degrees would help in your case?
Kris says
The dough doubled in size when on the counter to proof, didn’t rise in the fridge for the cold proof(8hrs) and didn’t really rise in the oven when baking either,but was delicious!! First time ever making sourdough bread. It took 2 days before I could bake according to the instructions,so I’ll probably look for a recipe that doesn’t take so long.
Dolly | Little Home in the Making says
Hi Kris! Glad you loved the flavor! If you're new to sourdough your starter might just be a bit sluggish; it will strengthen over time and you should see quicker rise times.
Mary says
Reliable. Turns out great every time. Thank you for sharing.
Dolly | Little Home in the Making says
Thanks for the glowing review Mary!
Jason says
this was my first major sourdough undertaking. great instructions. easy to follow, and it turned out really well. thank you for this recipe!
Dolly | Little Home in the Making says
So glad it turned out so well for your Jason! Thanks for the review!
Dan says
This is my second time making it the first love turned out perfect thank you it was so delicious like restaurant quality
Dolly | Little Home in the Making says
Aww that's awesome! I'm so glad you're loving the recipe!
Pat T says
Wow - wonderful recipe! Enjoying my sourdough loaf with soup tonight. This will become a frequent repeat. Your instructions were so clear compared to other recipes I have tried. Baking loaves in a Dutch oven makes for great results.
Dolly | Little Home in the Making says
Aww yay! I'm so happy to hear you found the instructions helpful! Sometimes I feel I'm being a bit too wordy, but I want to make sure everyone can have success when following my recipes.
Dante says
This bread was called the best I’ve made yet, this will now be my go to recipe. It was absolutely delicious and the crust was crunchy. 12/10
Christi says
Delicious!! This will be my new go to loaf, thank you for sharing the recipe.
Deb says
Your recipe says 100 g of active starter and in parentheses it says one cup 100 g is approximately a half cup which is it 100 g or a full cup of starter
Dorothy Bigelow says
Hi Deb! So sorry about the confusion! The 1 cup is in reference to starter that is freshly risen (without being stirred down), and 1/2 cup would be for the stirred-down starter. I edited the recipe post for better clairity.