


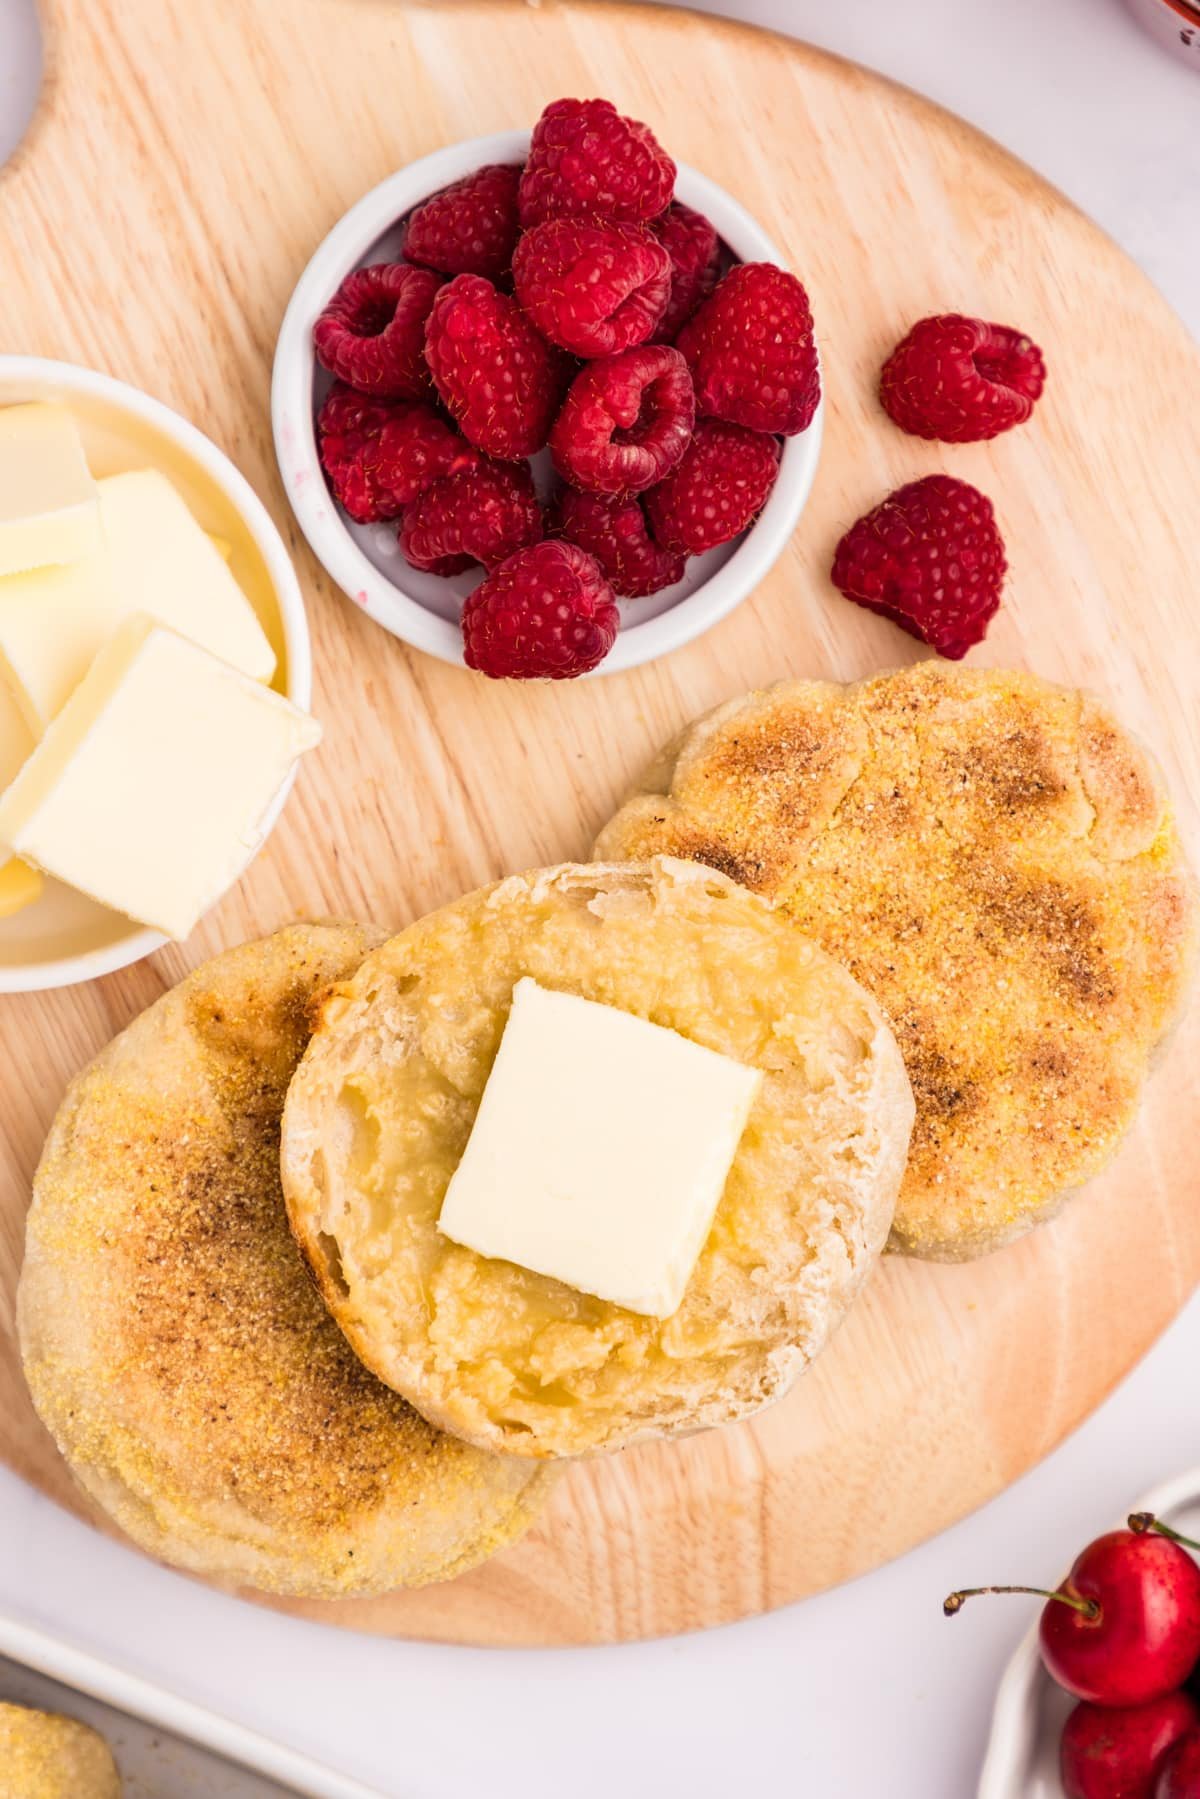
This easy recipe for Sourdough English Muffins is a great way to make the most of your sourdough starter - no yeast needed! They are perfect for toasting and slathering with butter, or as a base for sourdough breakfast sandwiches.
If you love english muffins, I'm certain you'll love these homemade sourdough english muffins even more!
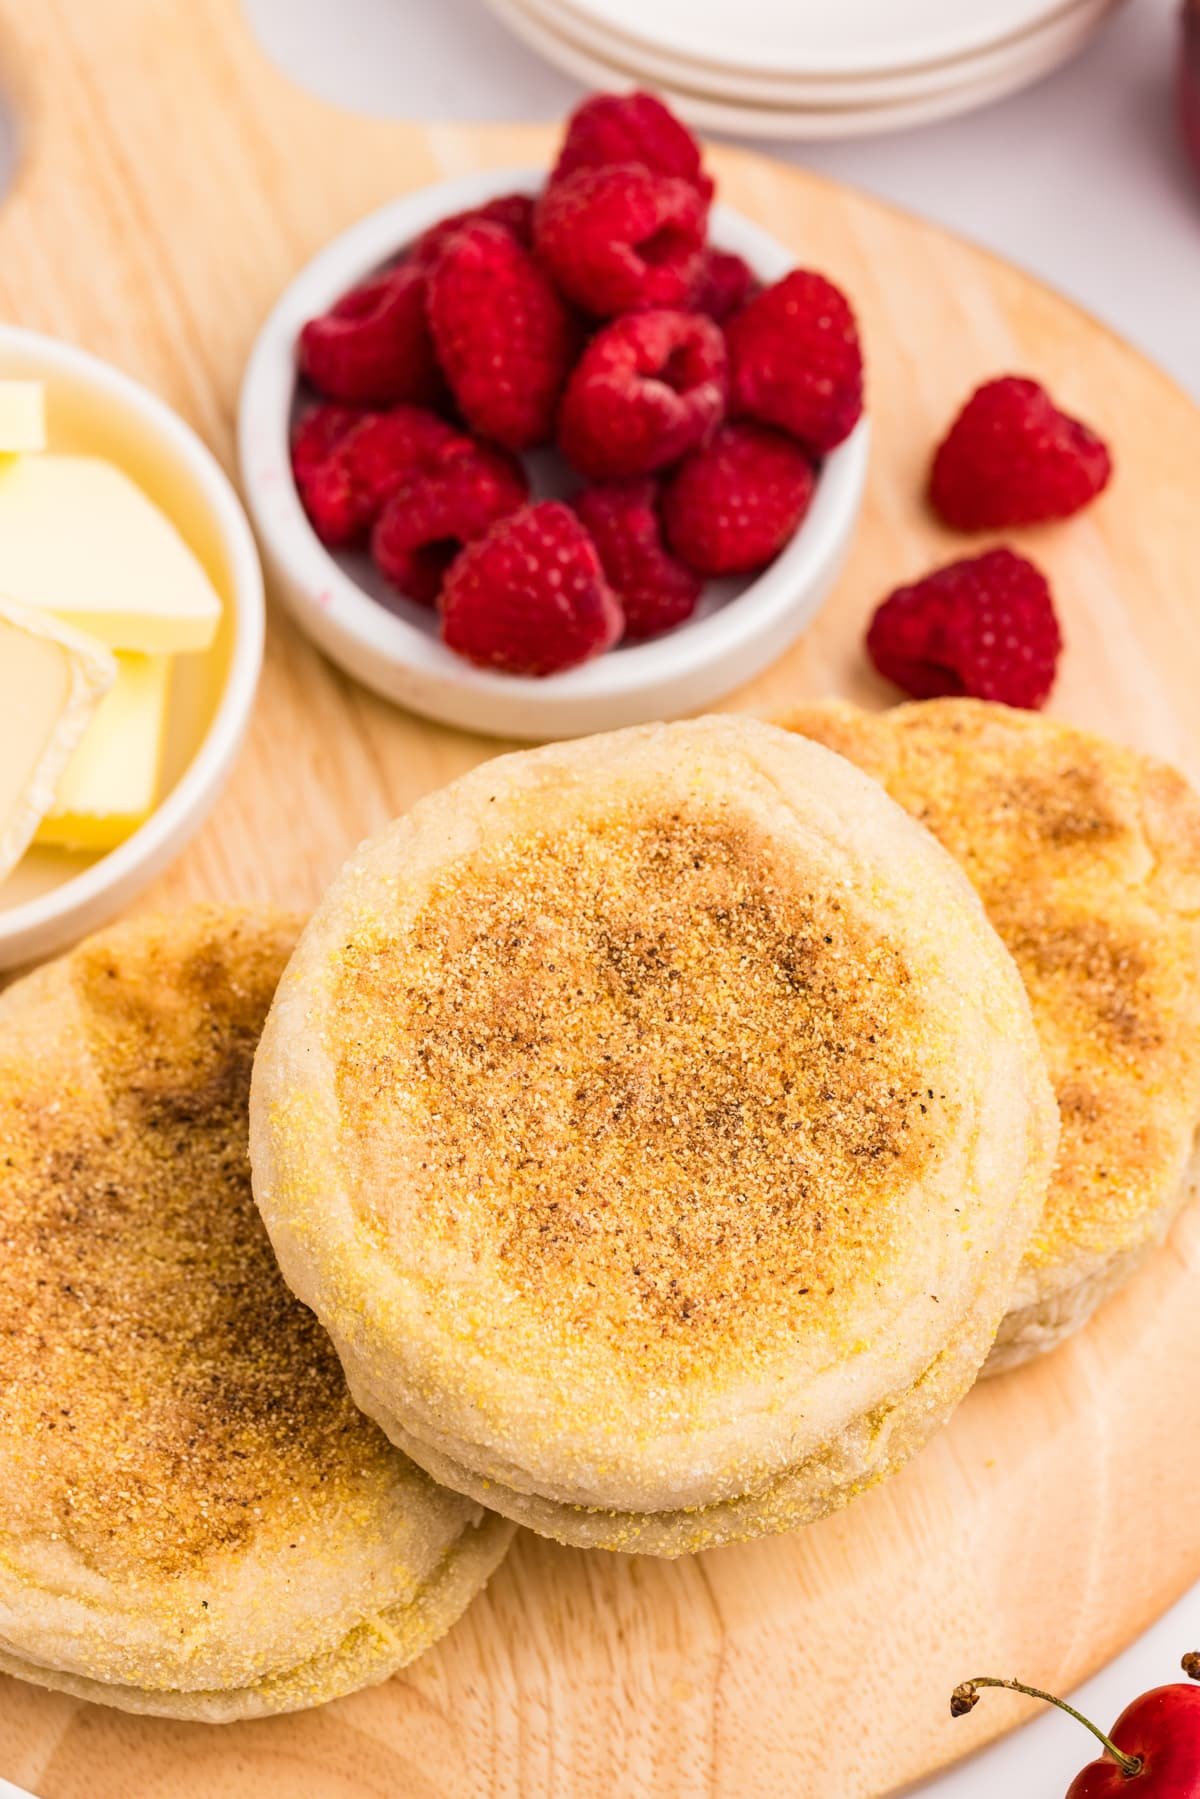
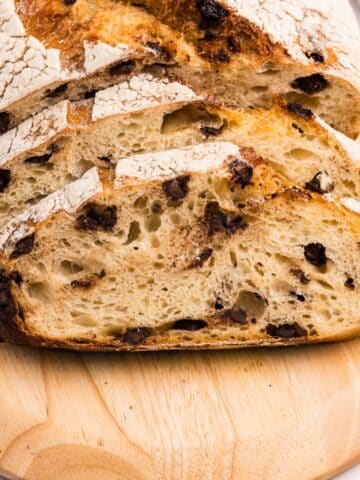
They're fluffy, crispy on the outside, and filled with delicious sourdough flavor. The texture has all of the nooks and crannies you're used to seeing in classic english muffins - no kneading required.
Best of all? It's a yummy way to enjoy all of the benefits of sourdough in an easy make-ahead breakfast food. They can be toasted, used as a base for breakfast sandwiches, or even enjoyed in place of hamburger buns.
Why You'll Love It:
- Detailed. Whether it's your first time baking with your starter, or you're a seasoned pro, I've outlined all steps with clear instructions. You'll also find a baker's schedule towards the end if you like to time everything perfectly.
- No second rise. Once your bulk fermentation is done, you're ready to shape!
- Fully fermented. You get the flavor of classic english muffins, with all of the benefits of sourdough fermentation. Win win!
- No knead recipe. That's right! Put away your stand mixer, this easy recipe is one that relies on stretching and folding rather than kneading the dough.
- Freezer friendly. Prepare a big batch in advance, and thaw as needed!
You Will Need:
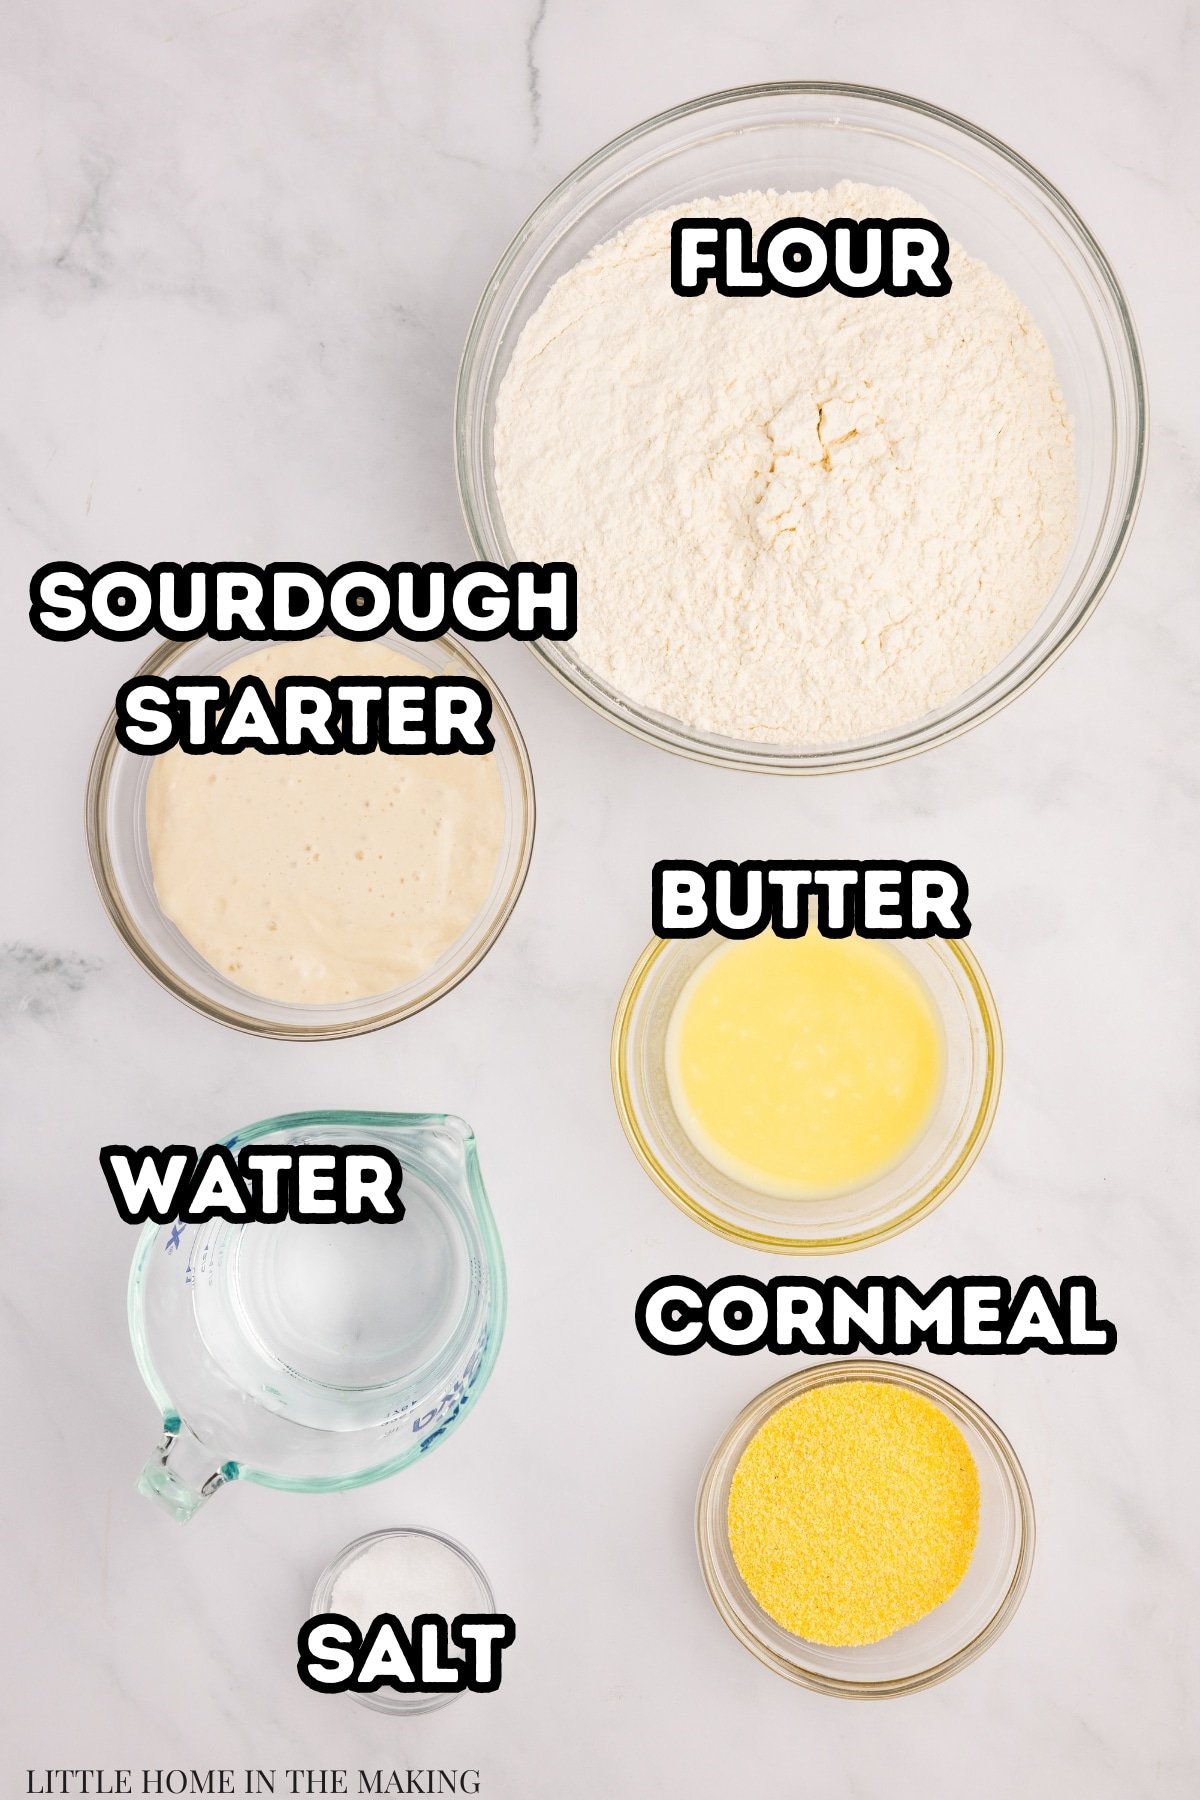
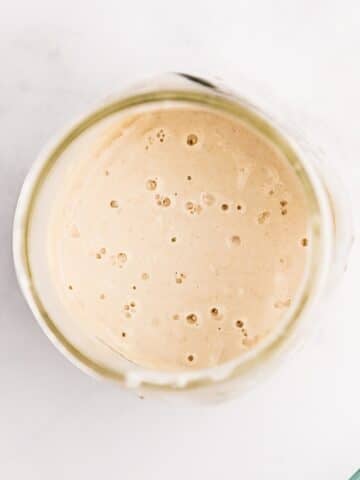
- Sourdough starter: You will need mature sourdough starter. If it's not at its peak, you can make a levain and wait 3-4 hours for it to rise.
- All-purpose flour: I recommend using an all-purpose flour. I use an organic unbleached flour.
- Butter: You will also need some melted butter - I recommend using unsalted.
- Water: This should be warm, which is about 85-100ºF (29-38ºC).
- Salt: Any fine salt will do!
- Cornmeal: This is for coating the outside of the english muffins. It prevents them from sticking and gives them that signature texture and flavor.
Equipment
- Electric griddle (or cast iron skillet)
- Sheet pan
- Large bowl
- Parchment paper
- Digital scale (recommended)
Should I Use Levain or Active Starter?
This recipe is very versatile, and although I offer instructions for creating a levain, you could just as easily swap it out for 200 grams of active, bubbly starter.
A levain is simply a small amount of starter mixed with additional water and flour to create a specific quantity of active starter for a particular recipe.
How to Make Sourdough English Muffins
See the recipe card for detailed quantities and instructions.
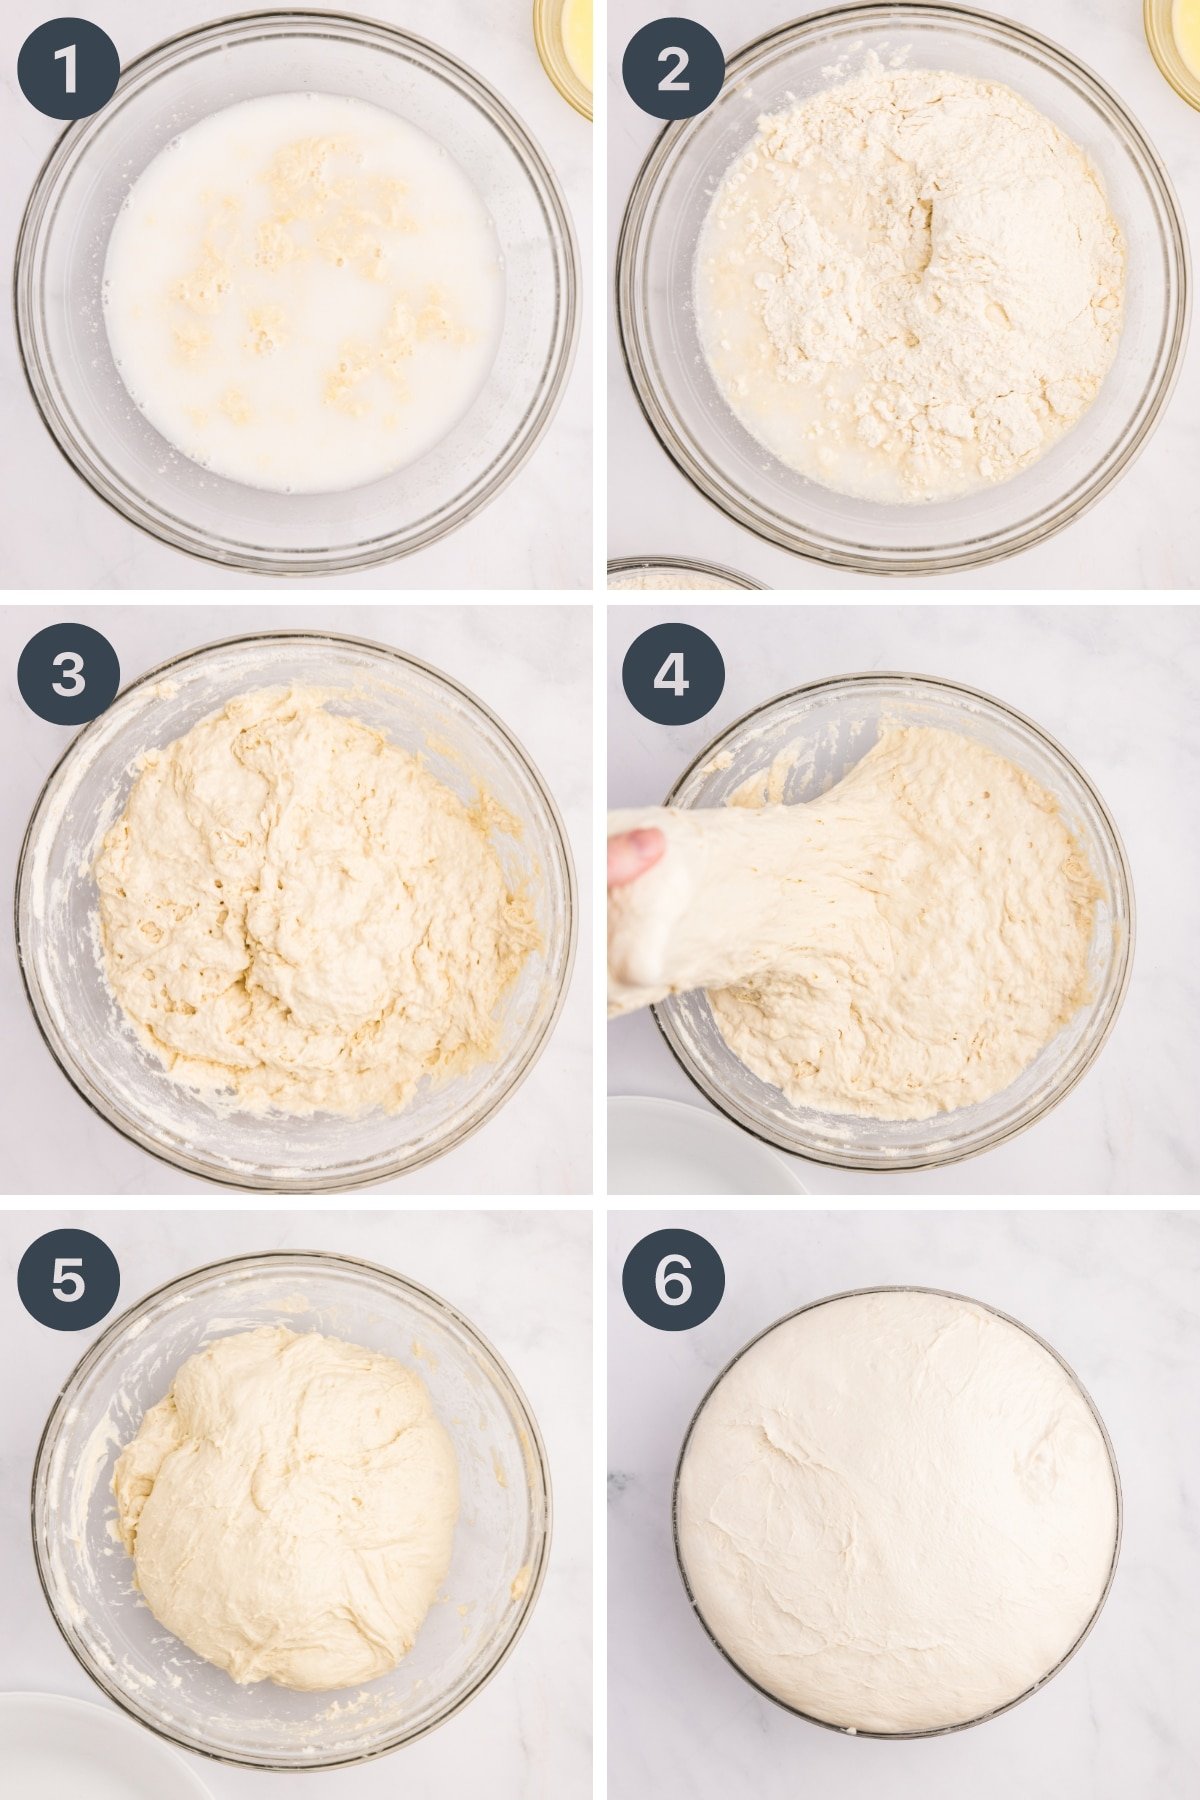
- Add the levain (or 200 grams of active starter) to a large bowl, along with warm water and salt. Stir well.
- Stir in half of the all-purpose flour and stir to combine. Then stir in the melted (and cooled) butter. Add the remaining flour, ⅓ cup at a time, until fully incorporated.
- Rest. Once the flour has been incorporated, you should have a soft and sticky dough. Cover the bowl with a damp tea towel, a bowl cover, or plastic wrap. Allow to rest for 1 hour.
- Stretch and folds. After the dough has rested, you're ready to start your first set of stretch-and-folds. This is done by lifting one side of the dough with your hand, stretching it, and folding it into the center. This is then repeated around the perimeter of the dough about 3-4 times (I like to think of North, East, South, and West). Cover the dough and rest for 30 minutes before stretch-and-fold sessions. Repeat this 3-4 times.
- Bulk fermentation. Cover the bowl and allow to proof at room temperature for 10-12 hours (or 8-10 hours if your home is very warm). You can also bulk ferment for 4 hours at room temperature, then 6-8 hours if your home is warm and you want to prepare them in the morning.
- The next morning (or 8-12 hours later), you'll know the dough is ready when it has roughly doubled in size, and springs back when you press it with a finger. You should also see bubbles and webbing - signs that the dough is active and is strengthened.
Shaping and Cooking
Once your dough is fully proofed, you're ready to prepare your english muffins. First, turn out the dough onto a lightly floured work surface. Then use a bench scraper (or sharp knife) to divide the dough into 12 equal pieces (about 102-103 grams each).
Top tip: For perfect and consistent results, weigh the finished dough and divide it by 12. Weigh each portion of dough, ensuring they are all equal and adjust as needed. I don't do this all the time, but when I make the extra effort the results are worth it.
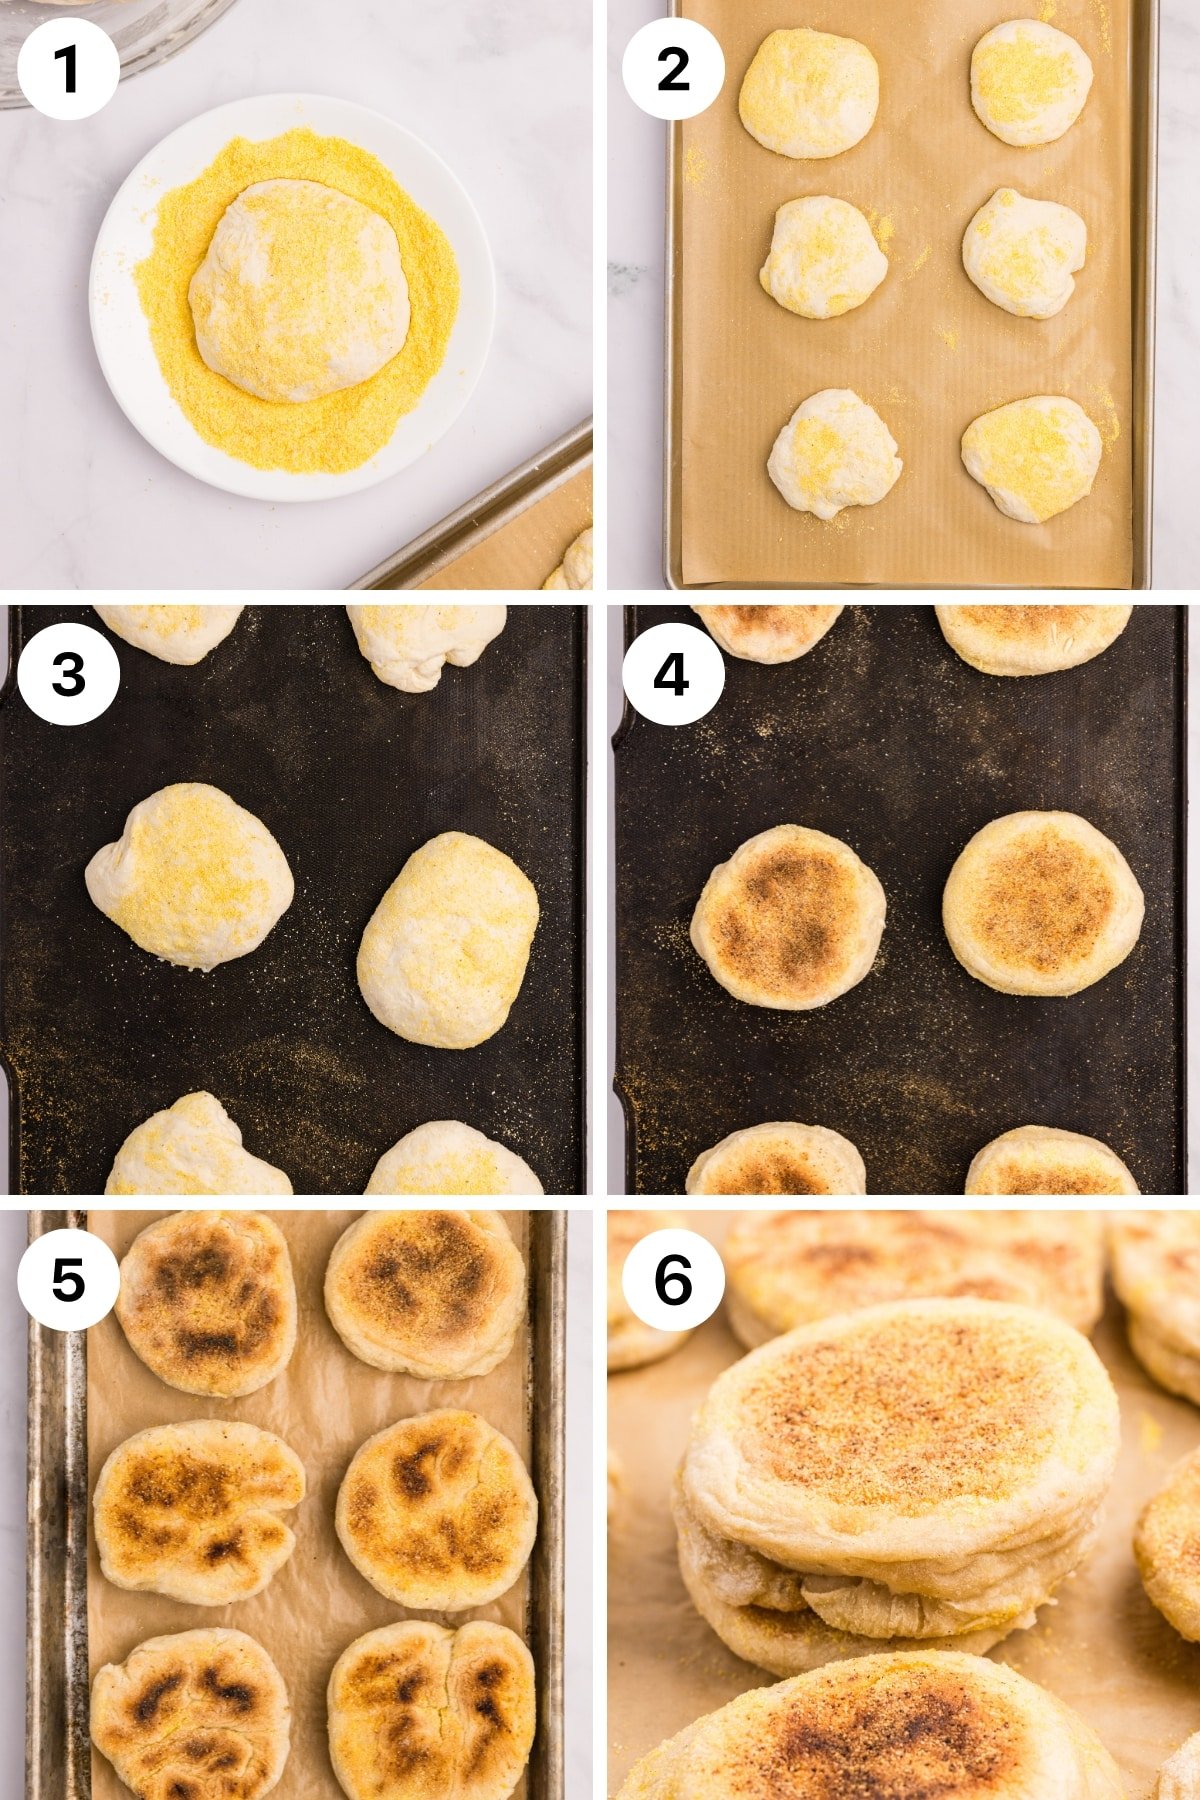
- Shape each portion into a disc, and coat both sides with cornmeal. I recommend adding the cornmeal to a plate or shallow bowl to make this step easier.
- Repeat until all dough discs are coated in cornmeal.
- Cook for 3-5 minutes on an electric griddle (375ºF) or cast iron skillet (roughly medium heat). Note: Be sure that your cooking surface has been preheated in advance.
- Flip the english muffins and cook the other side for another 2-3 minutes, or until the underside is golden brown.
- Bake. Place the browned english muffins on a parchment-lined baking sheet and bake in a 375ºF (190ºC) oven for 12-15 minutes. This will help to cook the insides to a fluffy perfection (200ºF/94ºC).
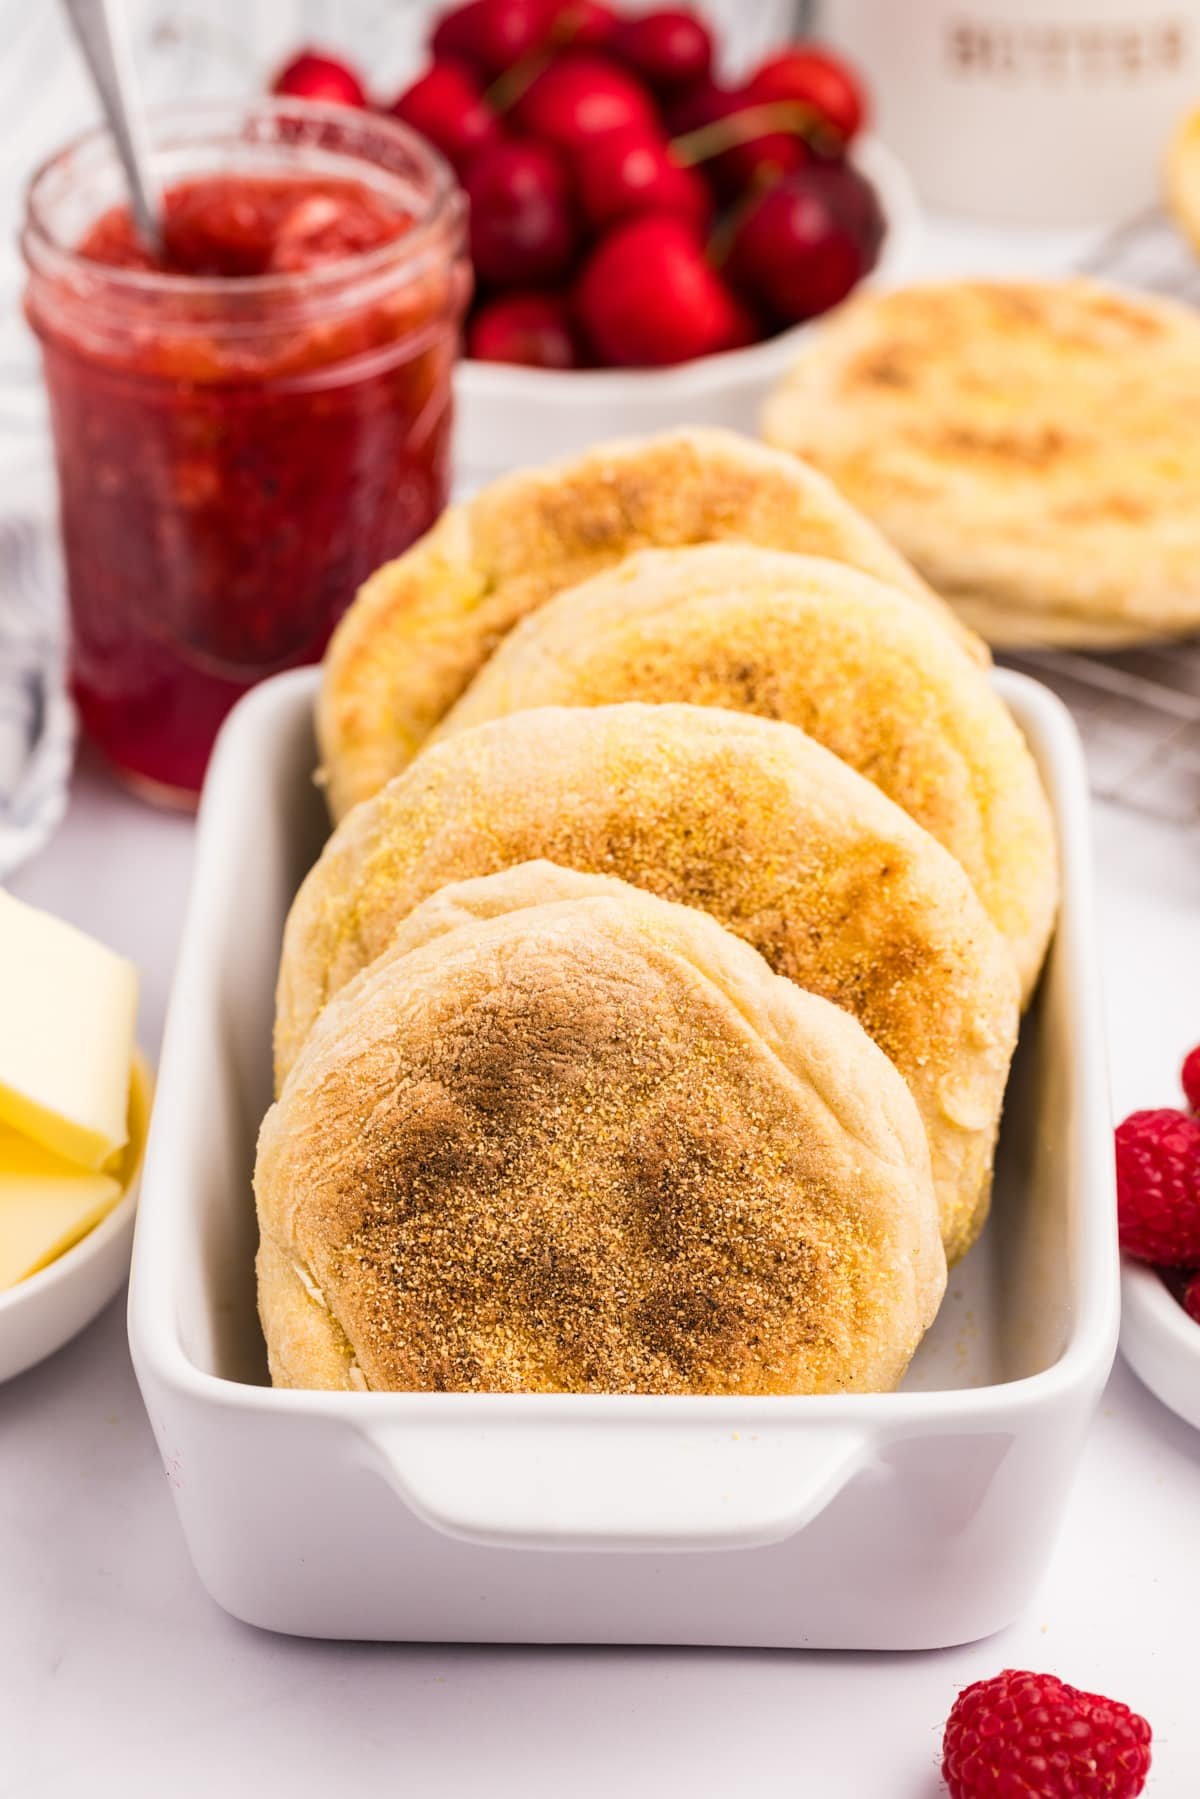
- Cool and serve. Remove from the oven and allow them to cool for 15-30 minutes before serving them, although the texture improves if they are allowed to cool completely first.
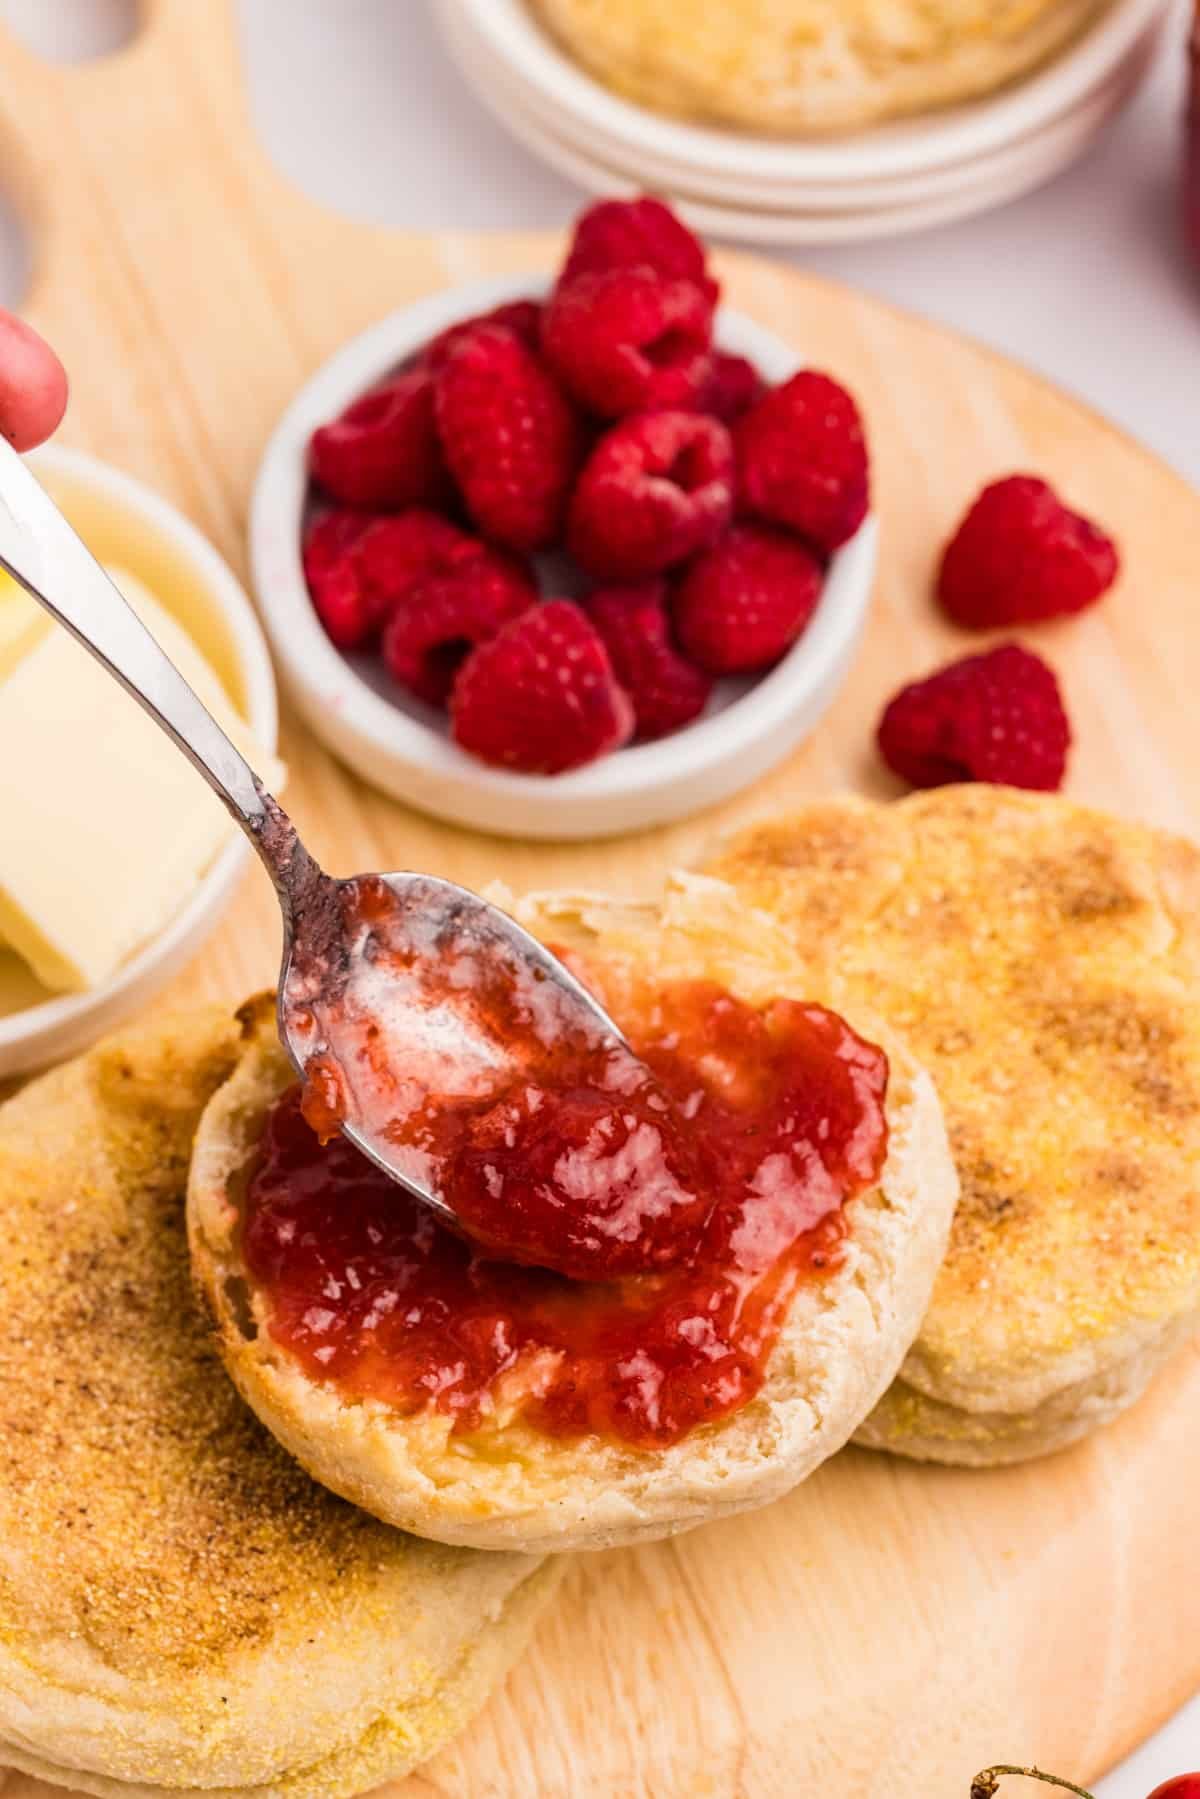
To serve, open them by perforating the edges with the tines of a fork, then gently pry them open. Alternatively, you can slice them in half with a serrated knife.
Tips for Shaping
Hand shaping is good enough for most people, but if you like a really nice round shape you could use a template to help you form them.
English muffin rings (AKA crumpet rings) are available online, but a large biscuit cutter or wide mouth mason jar ring can do the trick. Just be sure to dust the edges with flour to prevent sticking.
Ways to Use Them:
- Spread with butter (especially homemade butter - totally drool-worthy!)
- Toasted with jam, peanut butter, or honey
- As a base for breakfast sandwiches
- To make english muffin pizzas
- As a hamburger bun
- In place of the bread in a sandwich
Storage Tips
- Allow the english muffins to cool completely before transferring to an airtight container or storage bag. This will prevent condensation (AKA moisture), which can cause premature spoilage.
- They keep at room temperature for up to 3 days, or in the refrigerator for up to 4 days (they will be more dense/firm when refrigerated).
Freezing
- Place cooled muffins on a baking sheet and place it in the freezer. Allow to freeze for 2 hours (or until firm).
- Remove and place them in a freezer-safe container or freezer bag. Label and store them in the freezer for up to 3 months.
- To serve a frozen English muffin, remove it from the freezer and allow it to thaw at room temperature for 1-2 hours. They’re best when toasted and spread with butter, jam, or honey.
Recipes FAQs
This recipe hasn't been tested with freshly milled OR whole wheat flour. But in my experience you can substitute up to half of the flour called for (in grams) with whole wheat without major changes to the texture. If you want to experiment, that may be a good place to start.
This recipe uses a no knead method and utilizes stretch and folds for building dough strength. Most sourdough bakers find this method best for working with high hydration doughs, as they are difficult to "knead" both by hand or by machine.
While an electric griddle will give you the most consistent browning, there are lots of other options, including a cast iron skillet, blackstone griddle, or even a good quality non-stick skillet.
Depending on your region, type of flour used, measuring method, and general humidity, your results may vary as far as dough texture. If you find it very sticky after the bulk rise, turn it out onto a floured surface, and work in a small amount of flour until the dough is still tacky, but not sticky. If you add too much flour, the cornmeal won't stick to the dough, so be sure to add just a bit at a time.

Sample Baker's Schedule
First Day
- 12:00 PM: Prepare the levain or feed your starter the required amount of flour and water to be able to remove 200 grams of starter.
- 4:00 PM: Use the levain to prepare the sticky dough. Rest for 1 hour.
- 5:00 PM: Start the first series of stretch-and-folds. Rest for 30 minutes.
- 5:30 PM: Complete another set of stretch-and folds. Rest for 30 minutes.
- 6:00 PM: Repeat. Rest for 30 minutes.
- 6:30 PM: Repeat. Rest for 30 minutes.
- 7:00 PM (optional): Repeat. Rest for 30 minutes.
- 7:30-8PM: Bulk fermentation. Cover the bowl with a damp kitchen towel, plastic wrap, or bowl cover. Allow to proof overnight for 10-12 hours (8-10 hours in a warm house). If your home is very warm (and/or your starter is vigorous), you can do a room temperature ferment for 4 hours, then a cold refrigerated ferment for 6-8 hours.
Second Day
- 8:00 AM (approximately): The next day, your dough is done when it has doubled in size and springs back when poked gently with a finger. Divide, shape, and coat your dough in cornmeal. Prepare as directed.
- 8:30 AM (approximately): Allow the sourdough english muffins to cool before serving.
If you have a warm home, you may need to check on your dough earlier, or start the process later than outlined in the baker's schedule.
More Sourdough Recipes


If you loved this recipe for sourdough english muffins, let me know by leaving a 5-star review in the recipe card or comment below! You can also tag me on Instagram @littlehomeinthemaking.
📖 Recipe

Sourdough English Muffins
Equipment
- Large bowl
- Digital scale (optional, but recommended)
- Electric griddle (optional)
- Cast iron skillet (if no griddle is available)
- Bench scraper (or sharp knife)
Ingredients
- 200 grams active* sourdough starter about 1 cup
- 473 grams warm water about 2 cups (85-100ºF/29-38ºC)
- 1 ½ teaspoon salt 9g
- 600 grams all-purpose flour about 5 cups
- ¼ cup unsalted butter melted and cooled (58g/60mL)
- ¼ cup cornmeal 40g
Instructions
Cook Mode- Levain (optional*). Feed your sourdough starter by adding 50 grams of sourdough to a cup or bowl with 75 grams of flour and 75 grams of water. Allow to sit for 4-8 hours. Note: If you already have an active sourdough starter, you can use 200 grams of that and start right away.
- Once your sourdough starter is nice and bubbly, well risen (2-3 times its original level), and active, add the levain (or starter) to a large mixing bowl with the warm water and salt. Stir to combine.
- Once the sourdough starter has been mostly incorporated, add half of the all-purpose flour. Stir to combine.
- Add the melted and cooled unsalted butter. Stir to combine.
- Once the butter has been well combined, a wet dough will have formed, slowly add in the rest of the flour by adding about ⅓ cup at a time. (this prevents flour pockets from forming.).
- Once all the flour has been added and is fully incorporated, cover the bowl with a plate, piece of plastic wrap, or a damp towel and allow it to sit for 1 hour. **The dough will be sticky and that’s okay.
- Stretch and folds. After it has sat for an hour it’s time to start the stretch and folds. Before you start, wet your hands with water. This will prevent the dough from sticking to your hands. Start by grabbing one side of the dough, and stretch it up and over the dough. Repeat this process 3 or 4 times or until all corners of the dough have been removed from the sides of the bowl. Turn the dough over so the bottom is facing up.
- Cover and allow to sit for 30 minutes.
- Repeat the stretch and fold session 3 more times or 4 times total.
- Bulk ferment. After the last stretch and fold session allow the dough to rise for 10-12 hours (overnight works best for most) this is the bulk rise. Note: If your kitchen is very warm, this may take just 8-10 hours. If needed for timing, you can do half of your bulk rise at room temperature, and then add it to the refrigerator to cold ferment for another 6-8 hours.
- After the bulk rise has finished, the dough should have doubled in size and you should see some bubbles that have formed on the surface.
- Divide the dough. Turn the dough out onto a clean, lightly floured surface. If the dough is very sticky, add a little flour until it is easy enough to work with, but still tacky. Separate the dough into 12 equal pieces and form into balls (roughly 102-103 grams each).
- Preheat the oven to 375ºF (190ºC).
- Line a baking sheet with a piece of parchment paper and set aside.
- Prepare an electric skillet by heating it to 375ºF (190ºC). If you’re using the stovetop, I recommend using a cast iron skillet. Heat the skillet on the stovetop over medium heat for about 3-4 minutes, or until it radiates heat.
- Add the cornmeal to a shallow bowl or plate. Set aside.
- Shape the dough balls into a disc shape and gently press the dough into the cornmeal on both sides.
- Transfer to the preheated skillet or griddle and cook for 3-5 minutes. Flip the muffin over after 3-5 minutes and cook for another 2-3 minutes, or until both sides are golden brown.
- Once finished, transfer to the prepared baking sheet.
- Bake the English muffins at 375ºF (190ºC) for 12-16 minutes, or until your english muffins reach an internal temperature of 200ºF (94ºC) in the center.
- Remove them from the oven and allow them to cool for at least 30 minutes before serving. Open them by perforating around the edges with the tines of a fork, then gently pry them open or slice with a serrated knife.
Notes
Nutrition
Please note that some of my blog posts here at Little Home in the Making may contain affiliate links. If you make a purchase through these links, I will get a small commission at no additional cost to you. See our disclaimer for more information.


MReese says
This recipe made a LOT of dough. The English muffins turned out really big (twice the size of store bought). The dough was really sticky and hard to shape. I cooked mine on a cast iron griddle as I don’t have an electric griddle, nor a heat gun to measure the temp. Medium-high was too hot and all my muffins burned on one side at about the 4 minute mark. I lowered the heat and watched them closely after turning them. I baked them in the oven afterwards. I’m not sure if we’ll eat all of them since one side is burned, but we’ll try scraping that off and give ‘em a try just to see how they taste and if the texture okay.
If I try this recipe again, I’ll cut it in half and make 8 English muffins and use a different pan to cook on and/or lower the heat. I live at elevation so cooking temp may be different — I’ll have to play around with it.
Dolly | Little Home in the Making says
Hmmm, I'm not sure how you ended up with so much dough! The recipe makes about 12 and I've tested it several times (as did a member of my team). Weight measurements (grams) are the best to follow, so if you have trouble I would definitely recommend using weight measurements as a rule.
I did re-test the time on a cast iron skillet and have lowered the temperature and time based on your feedback (and my test results). We mostly use a griddle which can be kept much lower. I'll try to get a video done soon to demonstrate shaping and dough texture.
Janet says
I am getting ready to make my 2nd batch of these muffins. The muffins are by far the best even though very time consuming but so worth
Dolly | Little Home in the Making says
So glad you're loving them Janet! They do take some time, but they do freeze well! I like to make a big batch and freeze them for later, that way I don't have to make them as often.
Carli Blazek says
I made my first batch 2 days ago and am already making my second! These are perfect!!!!!!!