


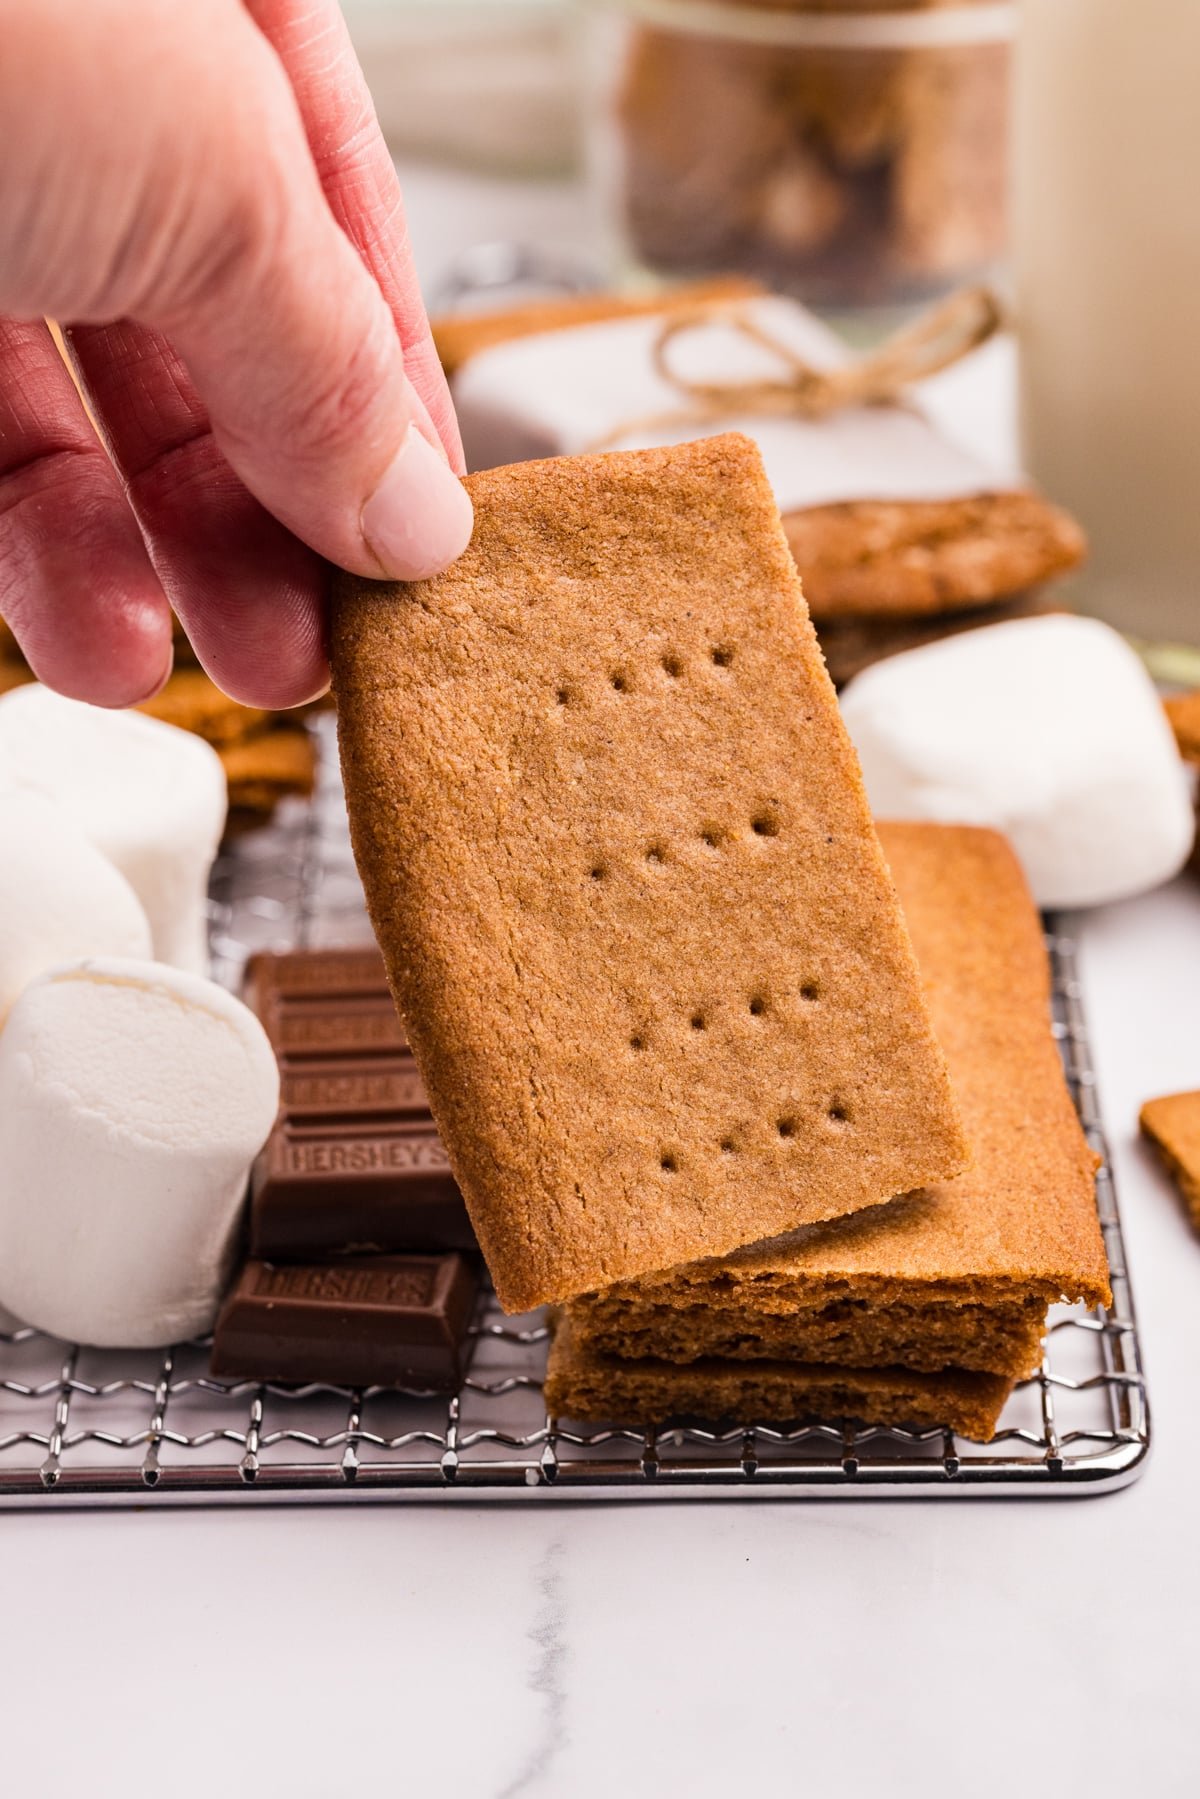
These homemade sourdough graham crackers are SO GOOD! They take a little bit of work, but the results are worth it, and they keep their texture for a long time.
Try making a large batch and freeze them so you always have some on hand for s'mores, graham cracker crusts, or the perfect snack.

If you're like me and you love finding a new sourdough recipe, you need to try these amazing sourdough graham crackers!
I tested them MANY times until I was able to get the perfect texture. They taste WAY better than the store-bought version, yet have all the benefits of sourdough (thanks to cold fermentation).
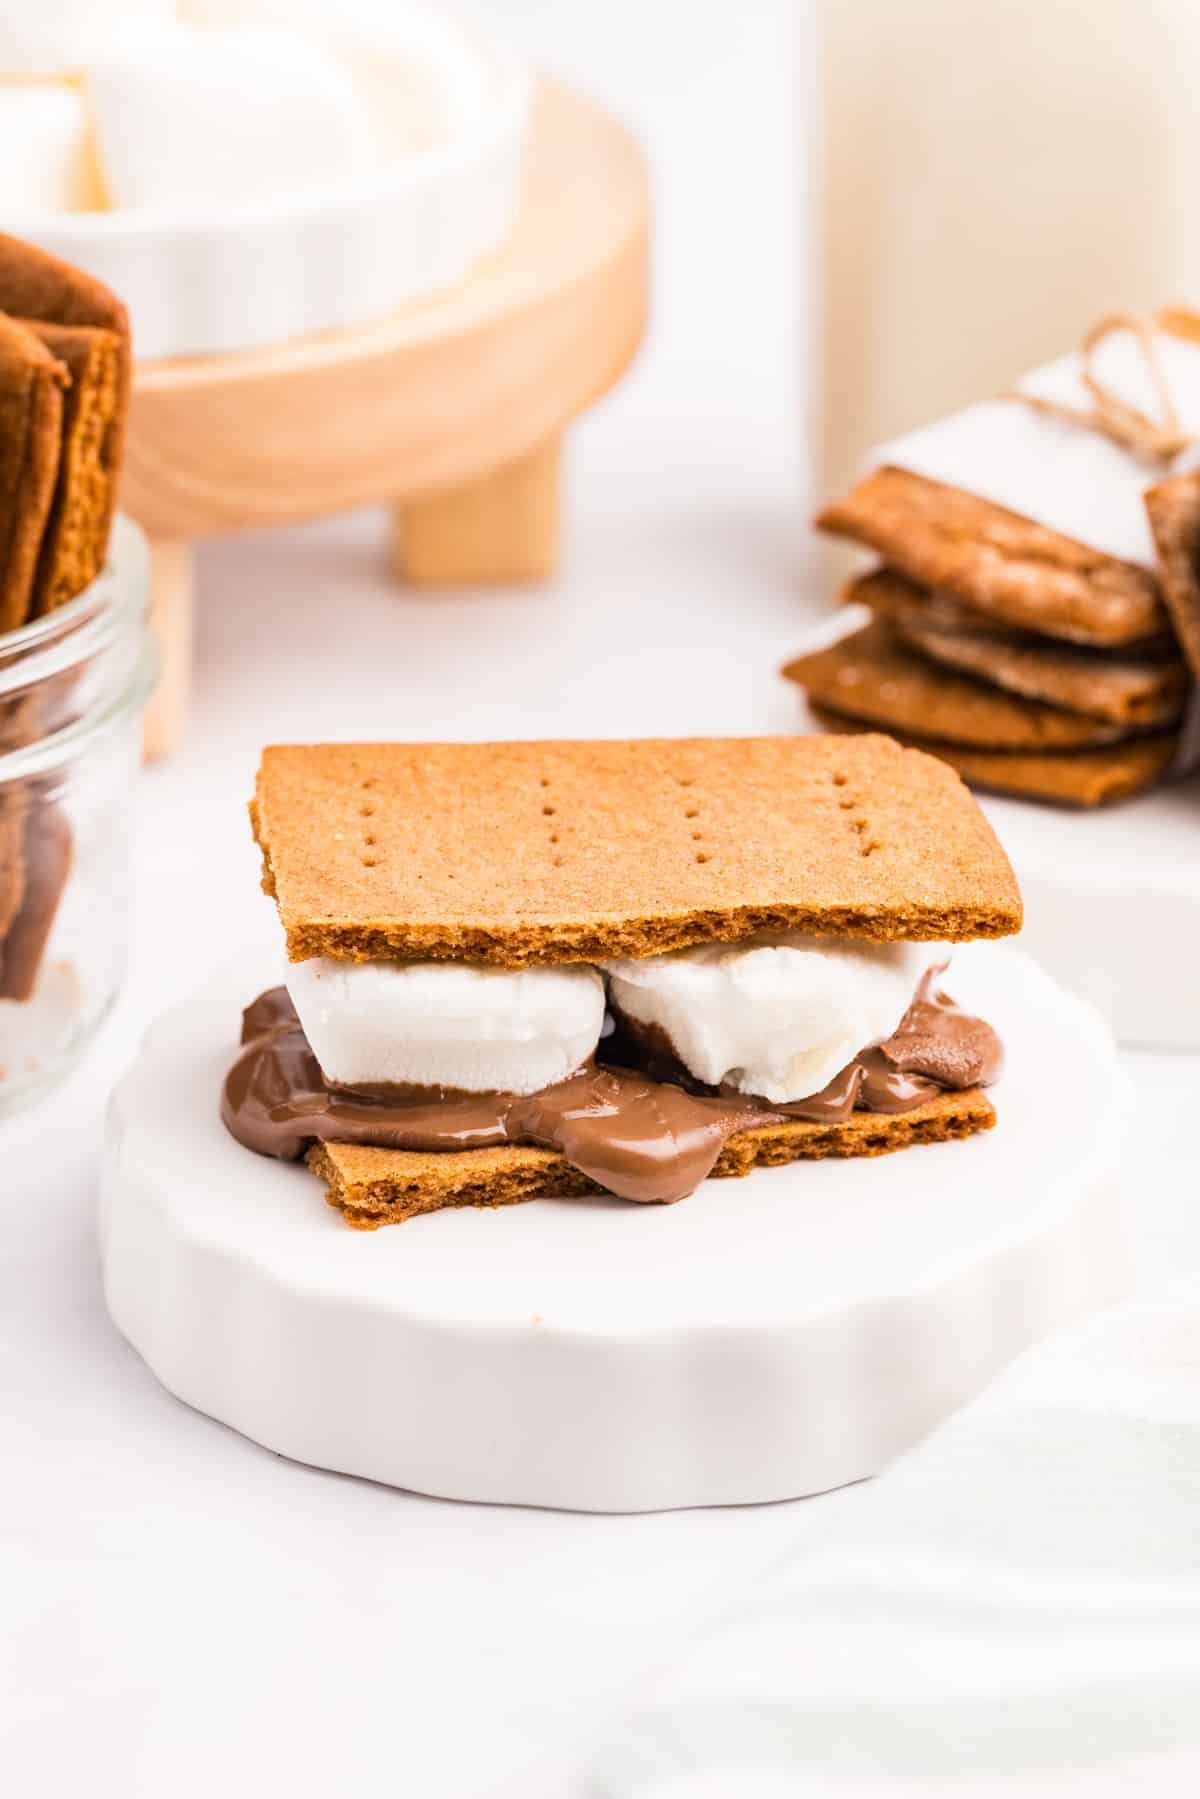
Perfect for making s'mores around the campfire or serving up with a glass of cold milk, these sourdough graham crackers are made with simple ingredients and lots of love. Your family will love them – trust me!
Why You'll Love Them:
- Made with whole wheat flour. Put away your all-purpose flour! This recipe is made with only whole wheat flour.
- Real honey. Traditional graham crackers are a nourishing snack, and the flavor of honey is essential! A combination of honey and brown sugar is used to give them a balanced sweetness and crisp texture.
- Two fermentation options. Whether you want a quick(er) turnaround, or you prefer to let your sourdough fully ferment the flour, you can make this sourdough graham cracker recipe work for your needs.
- The perfect homemade snack. Whether you want to make your own sourdough graham cracker crust, have a sweet snack for your kids, or enjoy s'mores around the fire, these whole wheat and honey crackers are the perfect choice.
Ingredients
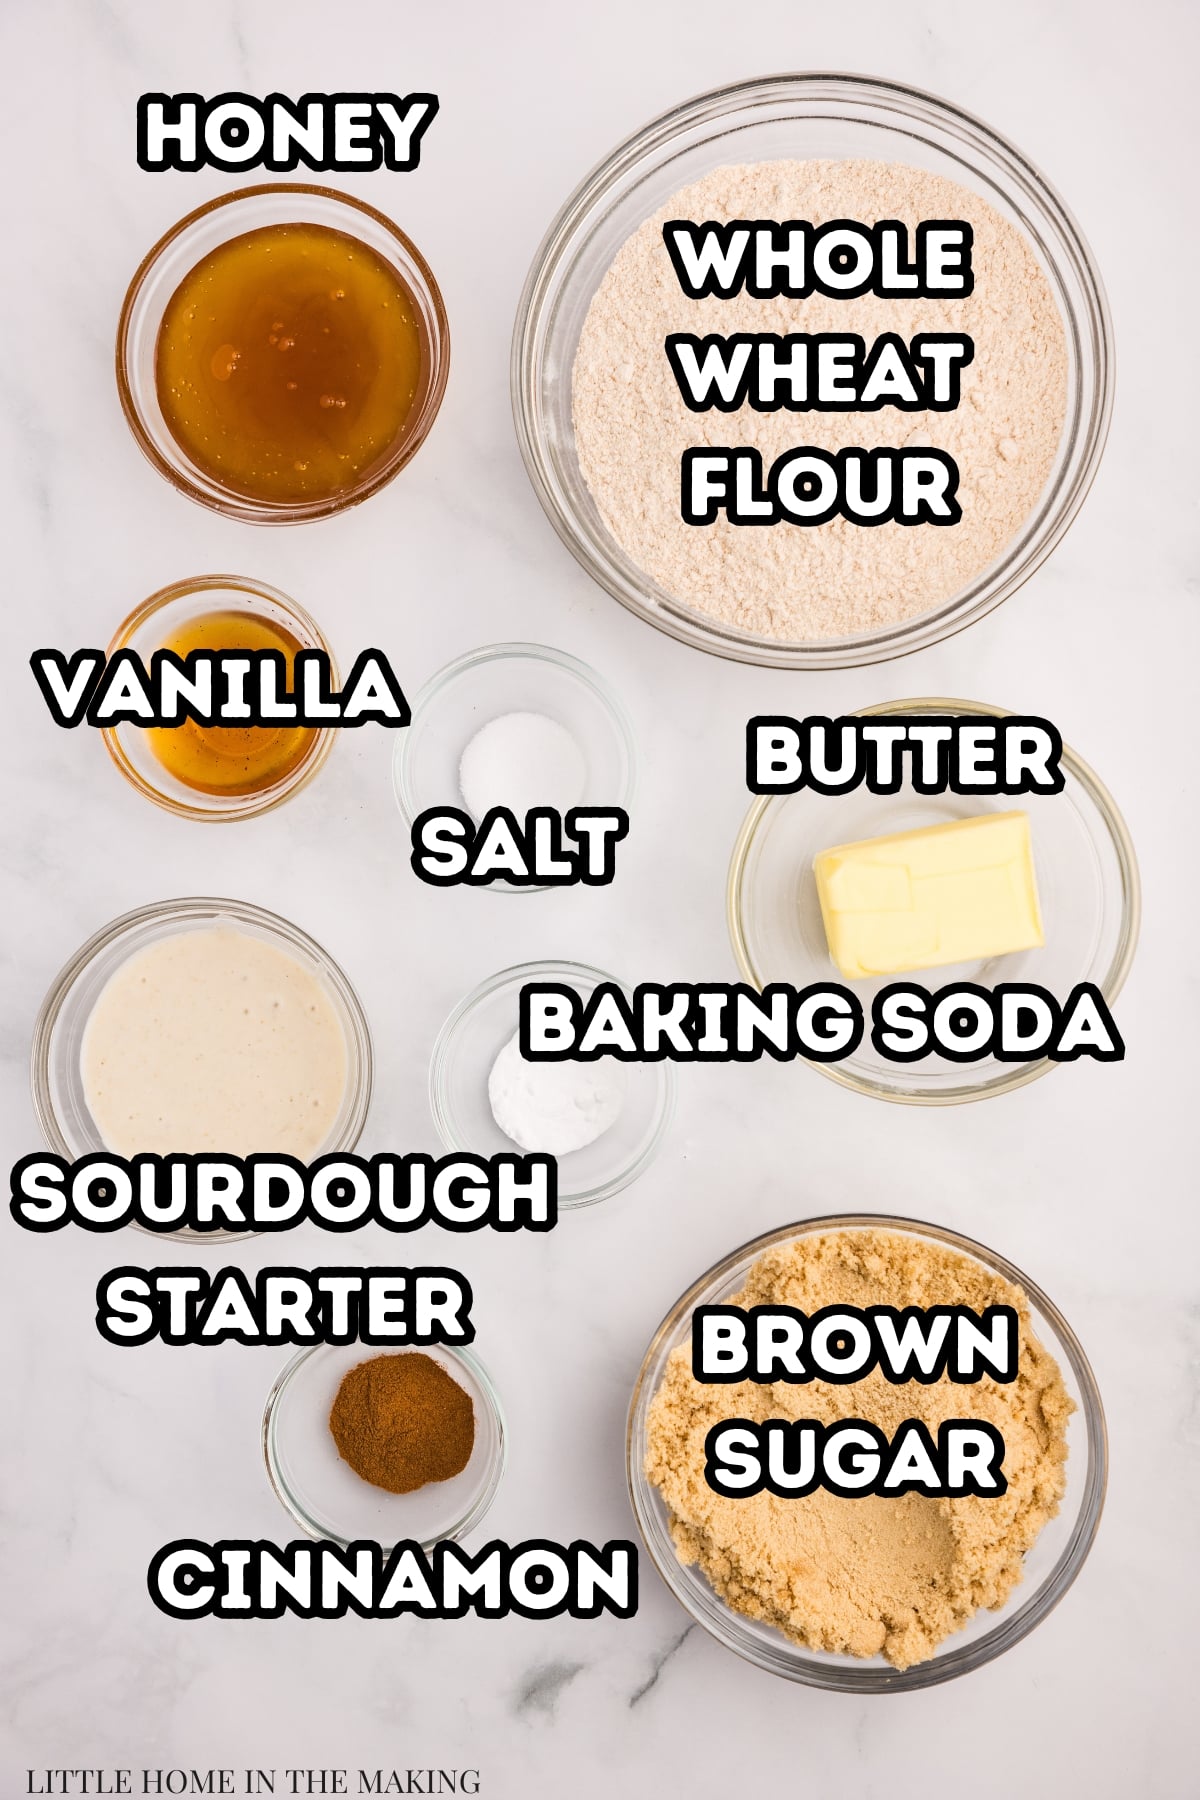
- Whole wheat flour: Graham crackers have traditionally used whole wheat flour (well, technically graham flour, but that's not easily available) so I wanted to make sure this sourdough version did too.
- Honey: You will need about ⅓ cup of real honey. If you have access to local honey I always find that has the best flavor, but whatever you have is just fine.
- Brown sugar: This has a delicious molasses flavor and helps sweeten the crackers without additional moisture, resulting in a crispier cookie.
- Sourdough starter: I recommend using unfed sourdough starter (AKA sourdough discard) – although active starter is perfectly fine to use. I like to use the extras I stash in the fridge for this recipe – it's a great way to reduce waste.
- If you don't already have one, you can make your own sourdough starter using just flour and water.
You will also need:
- Butter
- Vanilla extract
- Cinnamon
- Baking soda
- Salt
Recommended Equipment
- Sheet pan (half size baking sheet)
- Parchment paper
- Rolling pin
- Pastry cutter (pizza wheel, or sharp knife)
How to Make Sourdough Graham Crackers
These sourdough discard graham crackers are a great baking activity to do with kids, or to prep for special treats (like s'mores and homemade cheesecakes). They freeze surprisingly well, so you can make a large batch and freeze for later.
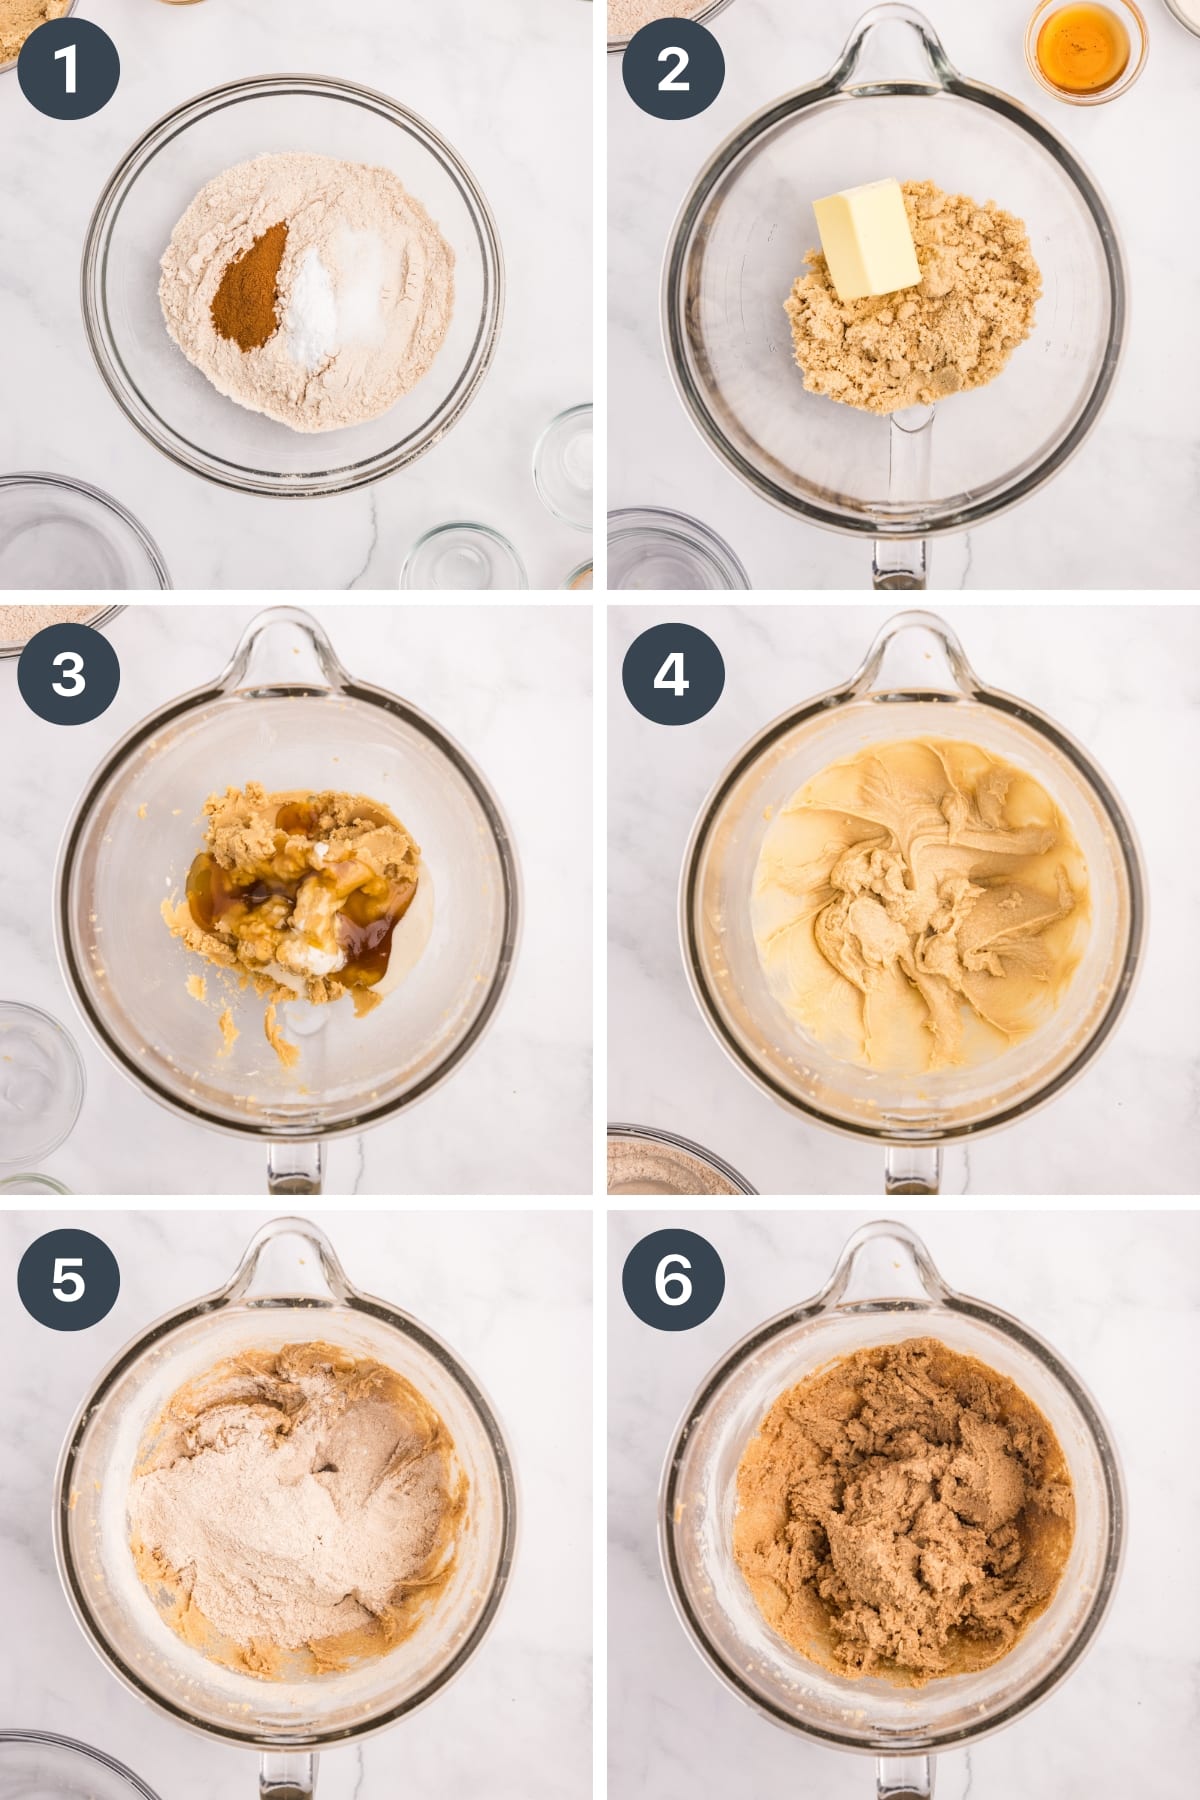
- Mix the dry ingredients. Add the whole wheat flour, cinnamon, baking soda, and salt to a medium mixing bowl and whisk to combine. Set aside.
- Cream the butter and brown sugar. Add the softened butter and brown sugar to the bowl of a stand mixer fitted with a paddle attachment, or a large bowl with an electric hand mixer. Cream the two together for about 2-3 minutes or until light in color and noticeably fluffy.
- Add the wet ingredients. To the creamed butter add the honey, vanilla extract, and sourdough starter.
- Mix until smooth. Turn the mixer on and combine all of the ingredients until smooth.
- Add the dry ingredients. Sprinkle in about half of the dry ingredients, then mix just until the flour is absorbed.
- Add the remaining dry ingredients, then mix gently just until combined.
Please see the printable recipe card for detailed instructions.
Shaping and Chilling the Dough
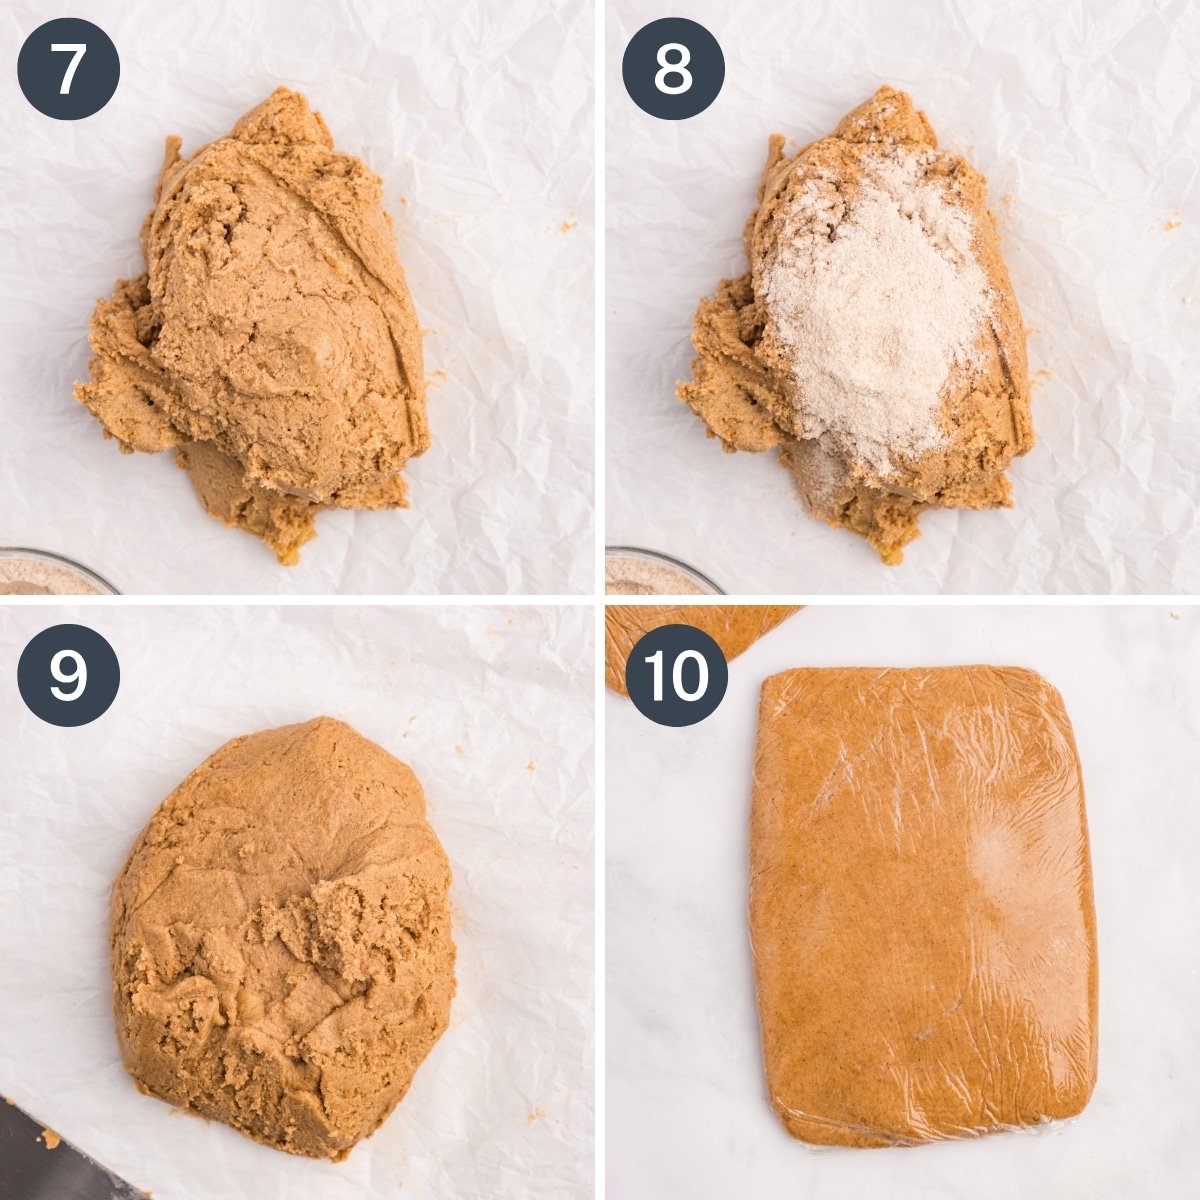
- Adjust the dough if needed. If your dough is VERY sticky, add a little more flour. If your dough is very dry and crumbly, add some milk.
- The best way to know is to use your hands to bring the dough together. It should be quite sticky, but it should also come together into a cohesive dough ball.
- Divide the dough in half. Once the dough is a good consistency, divide it in two halves. I recommend weighing the full amount and then using your scale to make two equal portions.
- Wrap tightly in plastic wrap. Shape the dough into a rectangle, then wrap in several layers of plastic wrap.
- Chill and ferment. Place the wrapped dough in your refrigerator and allow to chill for at least 3 hours, or 12-48 hours for the best results.
Full Fermentation or Quick Bake?
The sourdough graham cracker dough will need at least 3 hours to firm up, but you can cold ferment it for up to 2-3 days to get the benefits of long fermentation. We found the dough is easiest to roll out after 12-24 hours, and the flavor does improve with further fermentation!
If you use the shorter time be sure to use plenty of flour for dusting the rolling surface, as well as parchment (and a silicone baking mat) to prevent the dough from shifting and wrinkling.
Rolling and Cutting the Crackers
Once you've chilled and fermented the dough, you're ready to start rolling out the crackers. Your first batch might be a little wonky, but once you learn the ropes it should improve. Just handle the dough very carefully.
Be sure to follow the recipe card instructions carefully and use parchment, silicone baking mats, and extra flour to help with sticking.

- Unwrap one of the rectangles of dough and place it on a piece of parchment paper that has been lightly dusted with flour.
- Tip: Place a silicone mat underneath the parchment paper to reduce slipping during rolling. Remove it before using the pizza cutter or pastry wheel.
- Roll the dough into a rectangle about the size of the inside of a baking sheet. You will need to "heal" the dough as you go, pressing any crackers together with your warm hands and re-rolling the edges.
- Measure a rectangle about 12" x 14" and use a pastry wheel – or pizza cutter – to trim the excess off.
- Divide into 6 rectangles and carefully separate the pieces so they are about 2" apart on the parchment paper. Transfer the parchment paper to a baking sheet.
- Score the dough. Gently score the dough (don't cut all the way through) by dividing each rectangle in half widthwise, then lengthwise, so there are 4 sections.
- Poke holes. Using the tines of a fork (or a chopstick) prick rows of holes in each section of each graham cracker sheet.
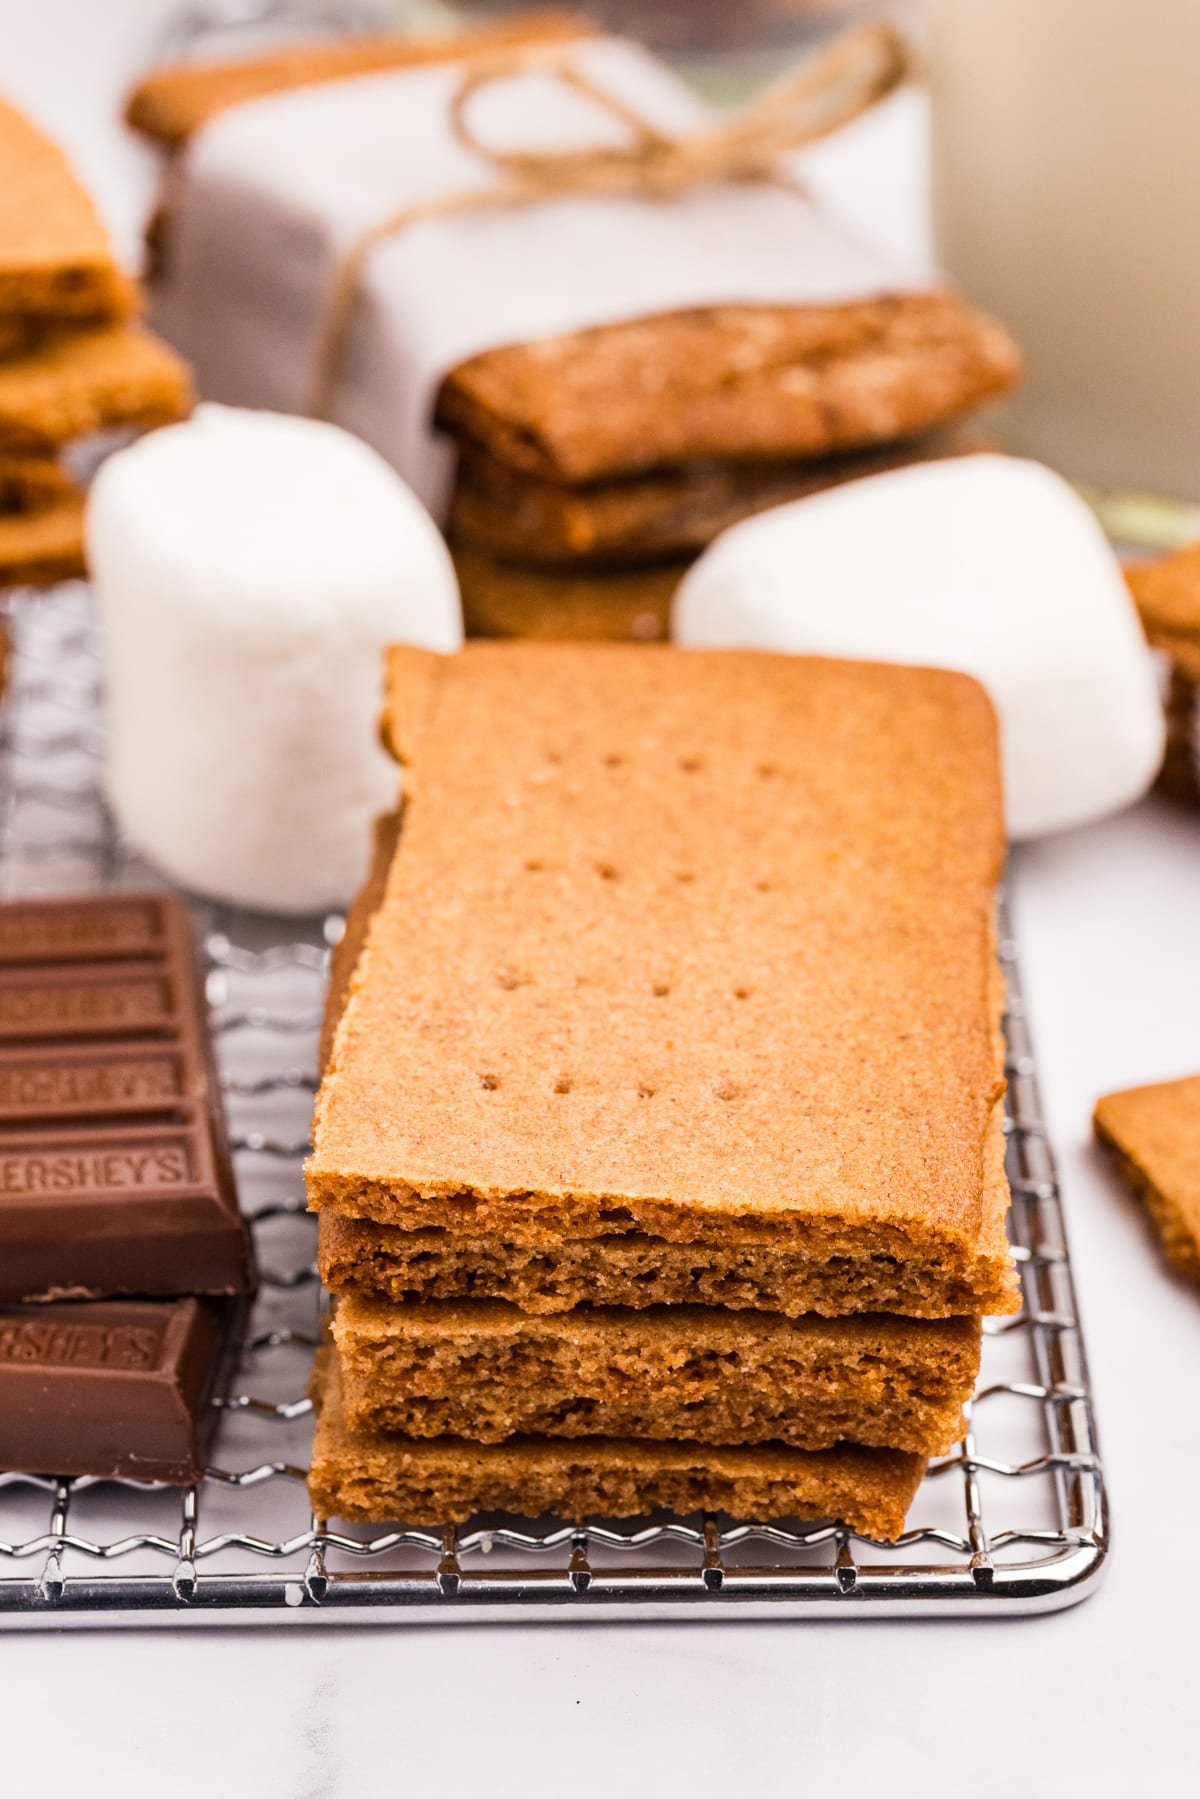
- Bake at 350ºF (177ºC) for 10-13 minutes, or until the edges are golden brown and the crackers are crisp. They will firm up during cooling, so the best indicator of doneness is browning.
- Transfer the crackers (carefully) to a wire cooling rack and allow to cool completely before transferring to storage.
- If you want to use these for s'mores, quickly separate each rectangle at the halfway score line using a butter knife. This is best when done hot.
- Repeat with the second half of the dough.
Storing Homemade Graham Crackers
Allow them to cool completely on a wire rack before transferring to storage. Warm crackers will cause condensation, so it's important to wait.
Place your cooled crackers in an airtight container and store them at room temperature for up to 5 days. They maintain their crispness for the most part but do get a bit softer with time.
Can you freeze homemade graham crackers?
Yes, they actually freeze well! Just transfer cooled crackers into freezer bags and label them. Freeze for up to 2 months, and thaw before serving. If they are softer, try baking them for 5 minutes, then remove from the oven and cool until crisp.
Ways to Use Them:
- S'mores around the fire
- For snacks (so cozy with a glass of cold milk!)
- Sourdough graham cracker crust (crush with a rolling pin or food processor)
- Crumbled and added to yogurt bowls or ice cream (for extra crunch)
- Any way you would use store-bought graham crackers!
Recipe FAQs
No. The dough must be hard and firm for it to roll out properly. Instead, cold ferment the dough for 12-48 hours for the best results, or a minimum of 3 hours if you're in a hurry.
In order to divide the dough into rectangular sheets some of the dough needs to be trimmed off. This extra dough does not need to go to waste! I like to roll the leftovers into a rope, then cut them into ½" pieces and bake at 350ºF for 13-14 minutes, or until crisp. They make a great crunchy snack or cereal substitute.
As a long-time sourdough baker, I always recommend that you maintain your starter with unbleached all-purpose flour. It is the most predictable, and you will have fewer issues in general. I always use all-purpose starter for my recipes that are exclusively whole wheat, and it works very well.
More Sourdough Recipes

If you loved this recipe for Sourdough Graham Crackers, let me know by leaving a 5-star review in the recipe card or comment below! You can also tag me on Instagram @littlehomeinthemaking.
📖 Recipe

Sourdough Graham Crackers
Ingredients
- 285 grams whole wheat flour NOT white whole wheat (about 2 cups + 5 tablespoons), plus more if needed*
- 1 teaspoon ground cinnamon (4 grams)
- 1 teaspoon baking soda (5 grams)
- ½ teaspoon salt (3 grams)
- 7 tablespoons butter softened (100 grams)
- 1 cup light brown sugar packed (232 grams)
- 60 grams sourdough starter discard works best, but active is fine too (about 3 ½ tbsp)
- ⅓ cup honey (118 grams)
- 2 teaspoons vanilla extract (10 grams)
- Milk if needed*
Instructions
Cook ModeMaking the Dough
- Add the whole wheat flour, cinnamon, baking soda, and salt to a large bowl. Whisk well to combine, then set aside.
- In the bowl of a stand mixer (or a separate large bowl with an electric mixer), add 7 tablespoons of softened butter and 1 cup of packed brown sugar.
- Cream the butter and sugar together using the paddle attachment for 2-3 minutes, or until the color has lightened and it’s fluffy in texture. Be sure to stop the mixer and scrape down the sides of the bowl as needed.
- Add the sourdough starter, honey, and vanilla extract to the creamed butter and sugar. Mix just until combined.
- Add half of the dry ingredients, and mix just until the flour is absorbed.
- Pour in the remaining dry ingredients, and mix gently again - just until nearly combined.
- Wet your hands and shake off the excess, then try to bring the dough into a cohesive ball. If it does not do so easily (too sticky), add a little more whole wheat flour and knead it gently by hand. The dough should be sticky, but still able to come together into a soft form. (On the other hand, If the dough is crumbly, try adding 1 tablespoon of milk, kneading, and continuing until a soft, slightly sticky dough forms).
- Once the dough comes together, and is slightly sticky, you’re ready to divide the dough into 2 portions.
- If possible, weigh the dough on a tared scale and divide the total by half. This is the weight that each divided dough portion should be. (Each half should be about 400 grams, but it may vary depending on the time of year).
- Flatten each dough portion into a rectangle, and wrap it tightly in two layers of plastic wrap.
- Chill for at least 3 hours, or for up to 3 days. For the benefits of long fermentation 24-48 hours is my recommendation, but 3 day cookies taste amazing too!
Making the Graham Crackers (please read carefully and thoroughly)
- Preheat the oven to 350ºF (177ºC).
- Once the dough is chilled, place a large piece of parchment paper (I like to use the pre-cut sheets for this) on a clean counter and dust it with whole wheat flour.
- Unwrap one portion of the dough and place it on the floured parchment surface. Dust the top of the dough with a little more flour. (Tip: place a silicone baking mat under the parchment to prevent it from sliding around as you roll the dough).
- Use a rolling pin to roll the dough into a large, flat rectangle, about the size of the inside of a baking sheet, leaving about 1” of margin. As you roll, press any cracking edges together with your hands to prevent further cracks.
- Use a pizza cutter to trim the edges of the dough so an even, large rectangle remains (you can reserve those edges for making graham bites**). The trimmed rectangle should be roughly 12 x 14”.
- Divide the rolled dough in thirds along the bottom, making lines every 4-5 inches. Then, divide the dough in half along the long side, making a line about 7 inches from the edge. You should have 6 rectangles that look like a large graham cracker sheet. Each one should be 4x7” roughly, or up to 5x7”, depending on how thin you rolled your dough.
- Use a thin spatula to gently release each rectangle from the parchment paper, and shift it away so each of the graham cracker sheets are at least 1-2 inches apart.
- Transfer the parchment paper to a baking sheet.
- Use a pizza cutter or pastry wheel to gently score (so don’t go all the way through) each rectangle with a long vertical line through the middle, then a short horizontal line through the middle (dividing it into 4 quadrants).
- Use the tines of a fork (or a toothpick) to prick the dough in each quadrant, in the style of a classic graham cracker.
- Bake in the preheated oven for 10-13 minutes, or until the edges begin to brown. (We like ours crispy, so 13 minutes is the sweet spot for us).
- Remove from the oven. If any two crackers have fused together, use a butter knife to carefully separate them and shift them on the baking sheet while they are still hot.
- If you plan on using these to make yummy sourdough s’mores, separate each sheet in half by using a butter knife to cut along the horizontal score line. Quickly separate them while hot, and as they cool they will crisp up nicely.
- Transfer the graham crackers to a wire rack to cool completely. I recommend using a thin spatula.
- Repeat all previous steps with the remaining half of the dough.
- Allow graham crackers to cool completely before transferring them to an airtight storage container.
Notes
- If the dough is dry and crumbly: add a small amount of milk (1 tablespoon) and knead it gently until incorporated. Add a bit more until you get a smooth, slightly sticky consistency.
- If the dough is sticky/wet: Add a small amount of whole wheat flour, and knead until incorporated. Add a bit more if needed.
Nutrition
Please note that some of my blog posts here at Little Home in the Making may contain affiliate links. If you make a purchase through these links, I will get a small commission at no additional cost to you. See our disclaimer for more information.


Dolly | Little Home in the Making says
We have absolutely loved this recipe for replacing store-bought graham crackers for snacks, s'mores, and graham cracker crusts. They are super crisp and they taste WAY better than the ones from the store... the sourdough fermentation is just a bonus.