


Whether you have a batch of yogurt you've made at home, or you found a great deal at the store, you can strain yogurt to make a delicious and thick Greek-style yogurt. It's also the perfect way to collect whey, which can be used in ferments and a variety of delicious recipes.

When I first discovered that I could make my own yogurt over 10 years ago, I fell in love with the idea. I started making batch after batch of homemade yogurt, but in all honesty? I really missed that thick and rich texture of store bought Greek yogurt.
So I set about the task of making my own Greek yogurt at home. I soon learned that I could easily make my own simply by straining yogurt until it was thick. This process also allowed me to collect whey, which sent me down a whole new rabbit hole of finding ways to use it. Now here I am, up to my eyeballs in fermented and cultured everything. It's been a wild ride!
But you don't have to go gung ho like I did - you can simply learn how to strain yogurt (and collect whey) and carry on with your life. OR, you can join me, and start fermenting and culturing everything you set your eyes on. Up to you!
Why would you want to strain yogurt?
- It thickens the consistency, meaning you can have a thick, protein-rich yogurt without the price tag.
- A great way to make homemade Greek yogurt with homemade yogurt.
- To collect liquid whey, which is great for using in fermenting and baking.
- To make a delicious cream cheese substitute - simply strain the yogurt for 24-48 hours, stirring several times throughout.
Ingredients
- Yogurt: You'll need some plain, unsweetened yogurt for this recipe. While you could definitely use flavored if you plan on discarding the whey, plain yogurt is the most versatile AND you can use the whey for cool fermentation projects like fermented lemonade, fermented bananas, or fermented apples.
A note about yogurt: Most commonly, folks who have made homemade yogurt are looking to strain it into a thicker consistency (similar to Greek yogurt). This doesn't mean that you can only strain homemade yogurt. Store-bought yogurt works perfectly well here, and you will be able to collect whey. Just make sure the yogurt label states that it contains live cultures.
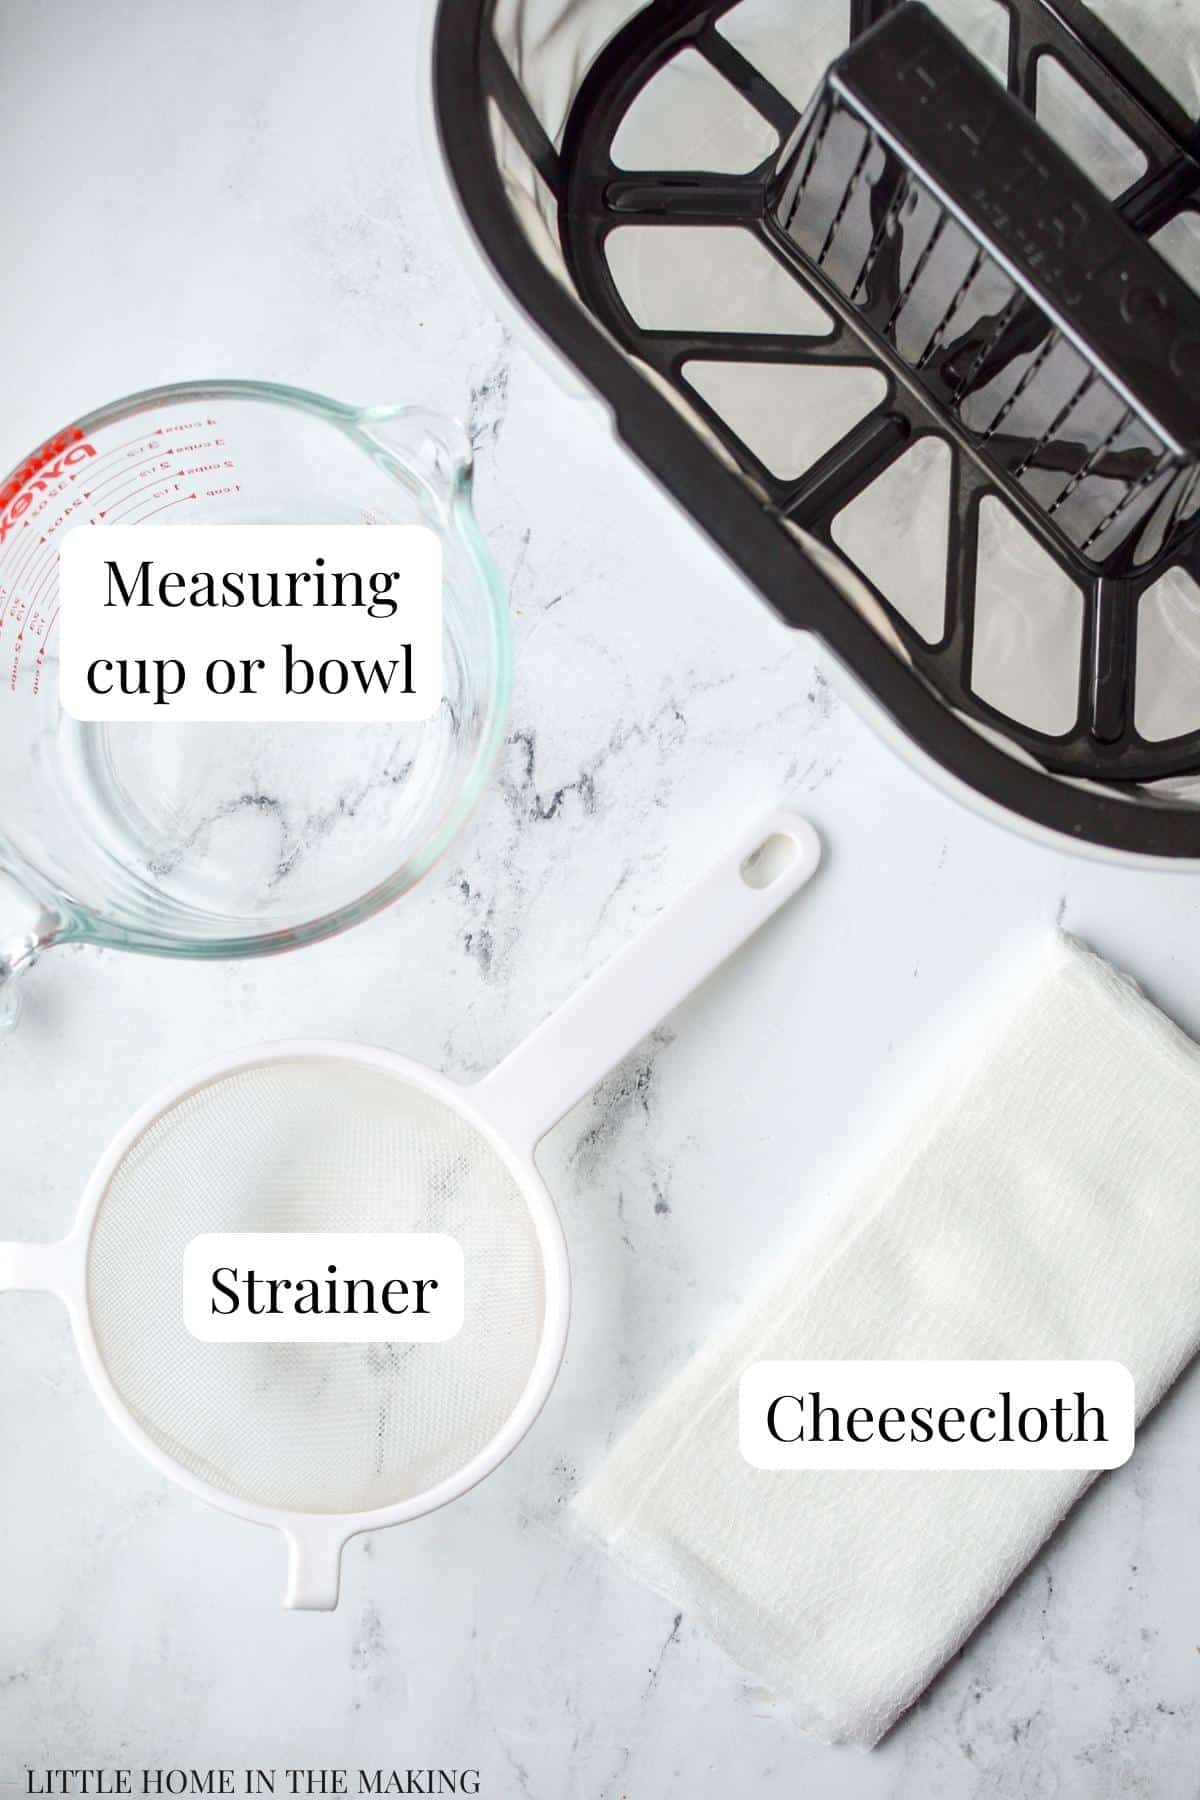
Equipment and Tools
There are two different ways to strain whey from yogurt. There is a common, inexpensive method that involves a basic kitchen strainer and a few layers of cheesecloth, and then there is an option to buy a professional yogurt strainer.
- Strainer: You'll need a strainer to position over a bowl to strain the yogurt. While I always recommend these handy mesh strainers (they work perfectly for making kefir or straining lemon juice), you can use whatever you have on hand. That's because the cheesecloth is going to keep the straining process slow, only allowing the liquid whey to pass through.
- Cheesecloth: This can be any kind of cheesecloth you pick up, but if it has large holes be sure to fold it into 3 layers so it only allows the liquid whey through. You could also use reusable cheesecloth, which needs to be washed in between uses, but can be used over and over again for yogurt, cheese, butter, and more. You could also use flour sack towels, reserving them just for the purpose of yogurt and cheesemaking.
- Large measuring cup or glass bowl: This is for setting the strainer over, so the bowl will collect the whey. If you're doing a small amount, a large measuring cup or batter bowl works well here.
Yogurt strainer: Since I make homemade yogurt often (and use the whey to make ferments and baked goodies), I decided to pick up a pro yogurt strainer. It works well (and definitely saves on cheesecloth). But if you want clear whey, the cheesecloth + strainer method works best. I like to do a little of each - collecting some clear whey for making fermented lemonade, and using the milky whey to make homemade bread or whey cheese.
You'll also need:
- Jars or containers for storage
- A large spoon for transferring yogurt
How to Strain Yogurt and Collect Whey
Once you have decided whether you're using a basic strainer lined with cheesecloth method, OR the pro yogurt strainer method, it's pretty simple from here on out.
Other than a little bit of work up front, most of the process is passive. Your yogurt will need to strain in the fridge for at least 8 hours, but I generally leave it overnight hours for the sake of ease and the thickest greek-style yogurt at the end.
Using a Strainer Lined with Cheesecloth
Although this method is perhaps the messiest, it does yield the clearest whey, which can then be used as a starter culture for ferments like sauerkraut, jalapeños, bananas, apples, lemonade, and more! So I like to always have at least a small amount of yogurt straining with this method so I can get that precious clear yellow whey.
This method also works with alternatives like flour sack towels, nut milk bags, coffee filters, etc.
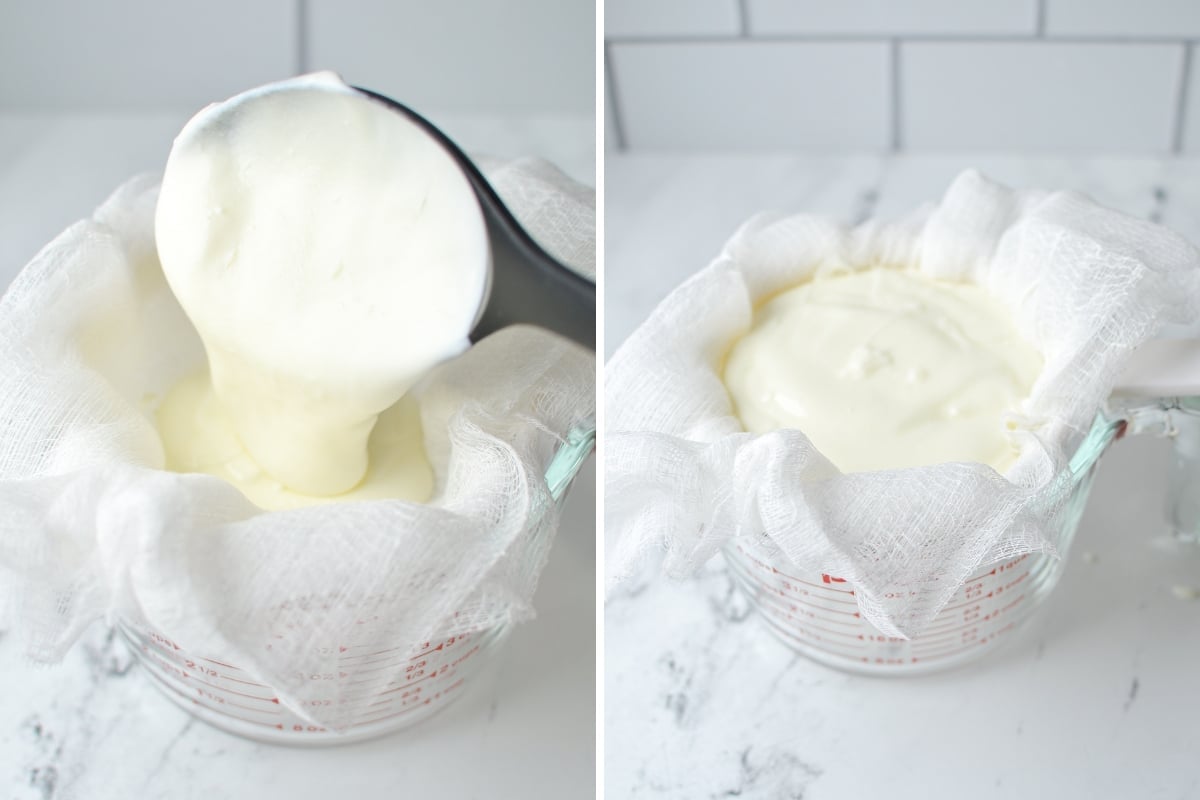
How to Strain Yogurt:
- Fit a strainer over a glass bowl or measuring cup (large enough to hold the amount of yogurt you plan on straining).
- Line the strainer with 2-3 layers of cheesecloth.
- Transfer plain, unsweetened yogurt to the cheesecloth-lined strainer until it is filled almost the edge.
- Cover the strainer and bowl with plastic wrap and place in the refrigerator to strain and chill.
- Strain the yogurt for at least 8 hours, or up to 24 hours (although it is quite thick at 24 hours). If you think of it, stir the yogurt once or twice during the straining time for an even consistency.
- Once the yogurt has strained for 8 hours, transfer the yogurt to a storage container and retain the whey for using in your favorite recipes or as a starter culture in fermenting.
Using a Commercial Yogurt Strainer
If you make homemade yogurt often, I recommend investing in a yogurt strainer (they come in a half gallon and a full gallon size). This does not require any cheesecloth, is completely reusable, and keeps everything packaged up in one easy to use container.
A yogurt strainer does result in a more cloudy whey, since more of the yogurt itself escapes through the strainer, but this cloudy whey is ideal for using in baking, or making whey cheese or whey cream.
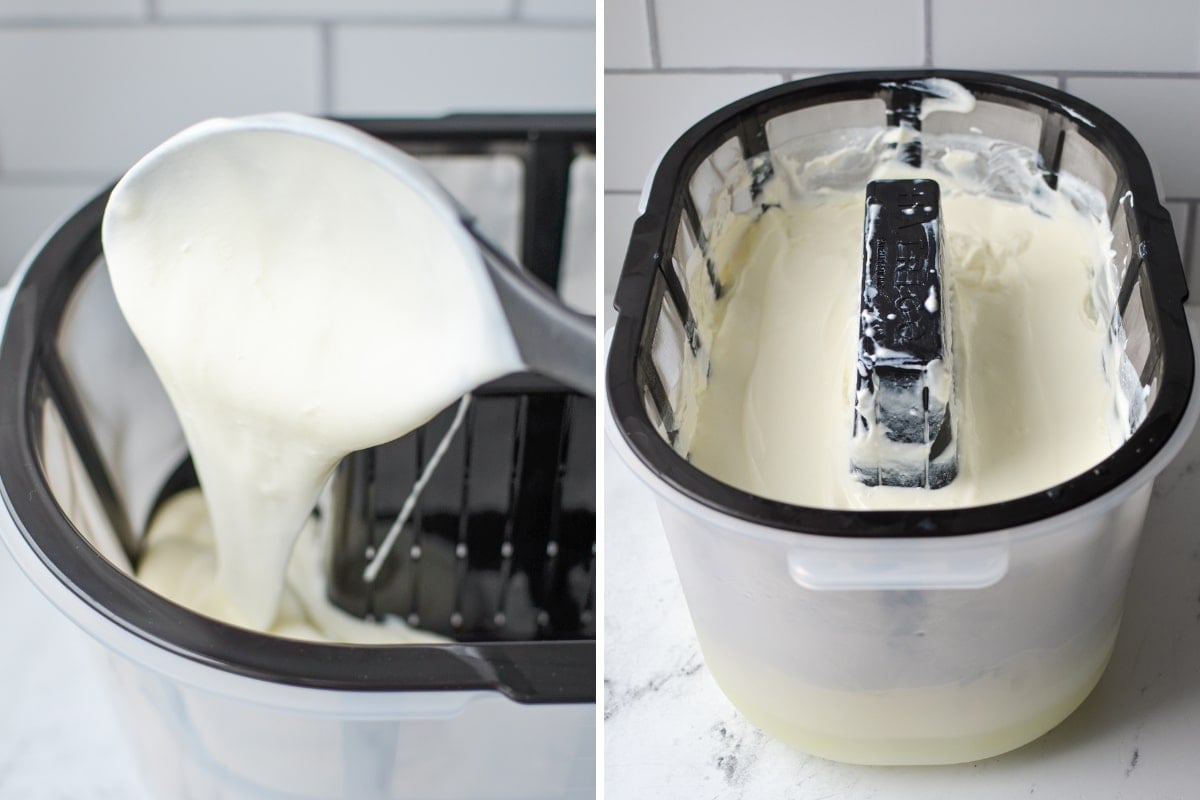
How to Strain Yogurt in a Yogurt Strainer:
- Wash your yogurt strainer thoroughly, and dry it with a lint-free cloth.
- Fit the strainer together so the strainer is nestled inside of the larger container.
- Add the yogurt to the strainer, and spread it out into an even layer.
- Place a lid on the yogurt strainer and place it in the fridge.
- Strain the yogurt for at least 8 hours, or up to 24 hours (although it is quite thick at 24 hours). If you think of it, stir the yogurt once or twice during the straining time for an even consistency.
- Once the yogurt has strained for 8 hours, transfer the yogurt to a storage container and retain the whey for using in your favorite recipes or as a starter culture in fermenting.
How to Collect Whey From Yogurt
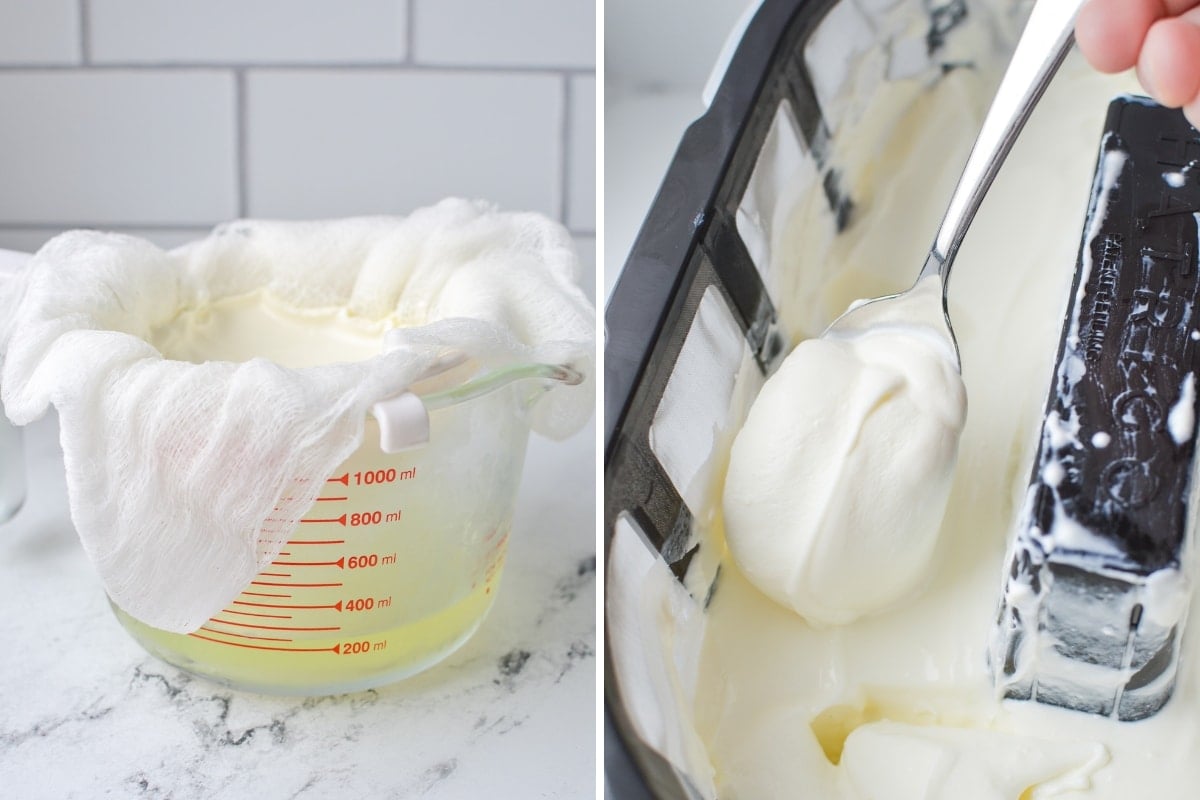
Once your yogurt has strained for at least 8 hours, you're ready to collect the liquid whey and retain it for using in ferments, recipes, etc. The remaining yogurt is thick, and typically Greek-style. If you have a yogurt cheese maker you could strain it even further to make labneh, or a yogurt cream cheese.

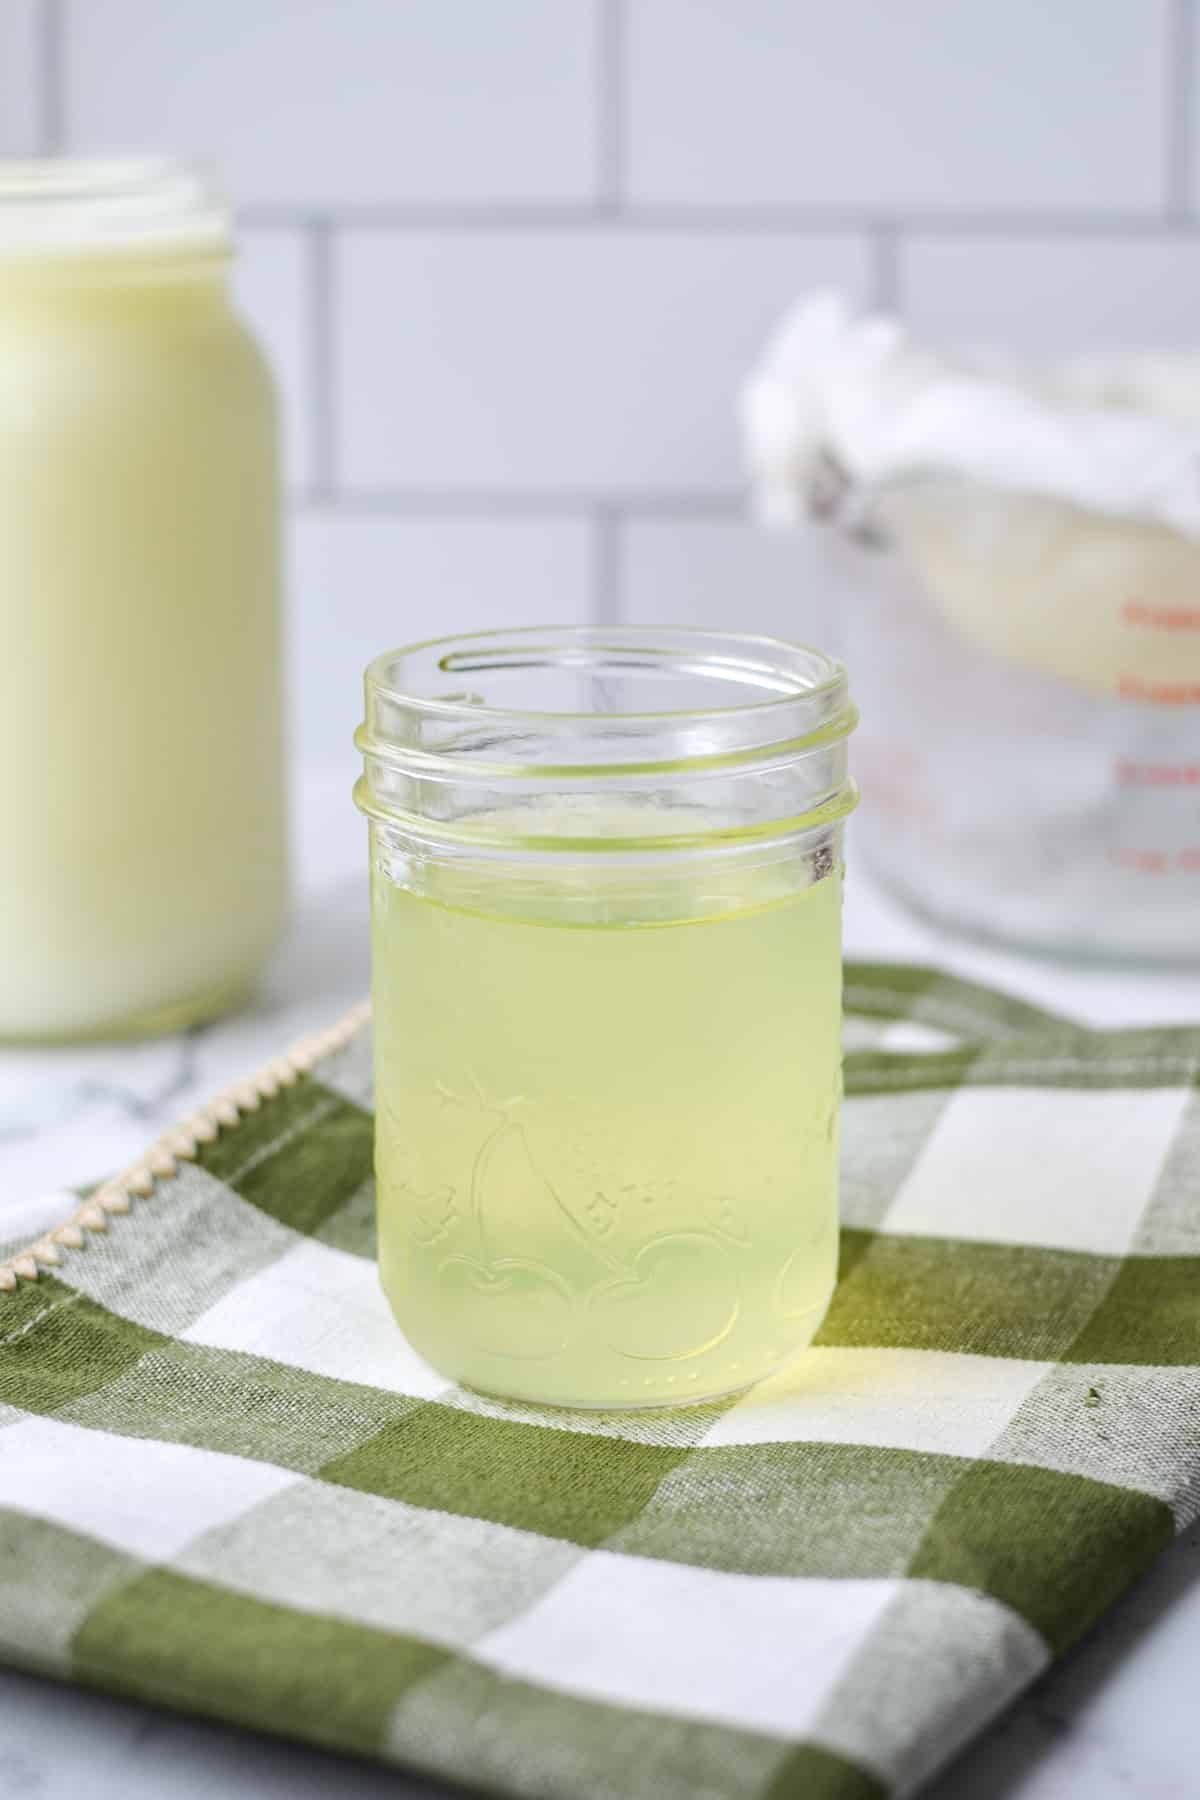
The remaining yellow liquid is what is referred to as whey. If it is bright yellow and clear, it's good for fermenting and culturing. If it is milky white or has a lot of milky sediment, it won't last as long in the fridge and is better for using to make bread, pancakes, or whey cheese than using in ferments.

As you can see, whey that was strained by using a few layers of cheesecloth is much clearer than the whey that was collected from the yogurt strainer.
So if your intention in straining off whey is to use in fermentation projects, I would recommend straining at least a small amount of yogurt using cheesecloth, as this bright and clear whey is exactly what you're looking for.
Storing Whey
When it comes to storage, milky whey can be stored in the fridge for up to 1 week, but should be discarded after that. Clear yellow whey can be stored for at least a month, and oftentimes longer. Just keep an eye out for any signs of spoilage.
I definitely prefer using fresh whey in my ferments rather than whey that has been stored for a while. This just increases the success rate of your home ferments, so I recommend using the freshest whey possible.
Making Greek Yogurt by Straining Yogurt

If you want to make a thick, Greek-style yogurt with either homemade or store-bought yogurt, it's pretty easy to do!
- Fit a large bowl with a strainer.
- Line the strainer with cheesecloth, a flour sack towel, coffee filters, or a nut milk bag.
- Transfer the yogurt to the lined strainer, leaving about ½ inch from the top of the lining material (cheesecloth, etc).
- Cover the strainer with plastic wrap and place in the fridge.
- Allow the yogurt to strain for at least 8 hours, but 10-12 hours is best.
- Once the yogurt has strained, the remaining yogurt will be thick, and very similar in consistency and taste to Greek yogurt. The bright yellow liquid underneath is liquid whey and can be discarded, or used in place of water in your favorite baking recipes.
Ways to Use Liquid Whey
- To replace water in baking recipes like homemade bread.
- As a starter culture for ferments (like fermented apples or fermented bananas).
- Or to make homemade fermented lemonade (AKA whey lemonade).
- Use it to act as an acid when soaking beans or grains.
- Add small amounts to smoothies.
- Give it to your backyard chickens.
- Add it to your homemade soups and stews.
- Or add it to your compost pile for a mineral rich supplement (I've even diluted it and added it around my blueberry bushes for a boost of acidity).
Frequently Asked Questions
The most common and most efficient way to strain yogurt is by using 2-3 layers of cheesecloth. If you don't have cheesecloth, I recommend using clean flour sack towels. Alternatively, you could try using multiple coffee filters or a nut milk bag.
If you want your yogurt to be thick, it's recommended to strain it for at least 8 hours. If you would like something similar to Greek yogurt, 10-12 hours is even better. Go for 24 hours (or longer) if you want to make labneh or yogurt cheese.
Yes, you do have to cool yogurt before straining. Chilling the yogurt is actually what sets the culture and thickens the consistency. If you strain yogurt while it is still warm, more of the actual yogurt will strain off and your yield would be extremely low.
If you don't have cheesecloth (or a yogurt strainer), you can strain yogurt with coffee filters, a nut milk bag, or flour sack towels.
Fermentation Recipes Using Whey
- Fermented Lemonade (Whey Lemonade)
- Fermented Apples
- Fermented Jalapenos
- Fermented Bananas
- Fermented Blueberries
📖 Recipe

How to Strain Yogurt (and Collect Whey)
Ingredients
- Plain yogurt
Equipment
- Strainer
- Cheesecloth
Instructions
- Fit a large bowl with a strainer, leaving plenty of room for liquid whey to collect on the bottom of the bowl.
- Line the strainer with 2-3 layers of cheesecloth, clean flour sack towel, or reusable cheesecloth.
- Transfer the yogurt to the lined strainer, leaving about ½" of space at the top of the material used to line the strainer.
- Cover the strainer with plastic wrap and place in the fridge.
- Strain for at least 8 hours, or 10-12 hours for a Greek-style yogurt. Stir once or twice to encourage an even consistency.
- Strain for 24-48 hours for a yogurt cheese that can be used as a cream cheese substitute.
- Transfer the strained yogurt to a clean container and store in the refrigerator for up to 2 weeks. Discard if there are any signs of spoilage.
- Transfer the liquid whey to a glass jar with a lid and use in fermentation recipes, or baking recipes to replace water. If the whey is clear and bright yellow, it will store for a month or more. If it is milky, do not use it for fermentation, but only for baking or making whey cheese. Milky whey lasts up to 1 week in the fridge.
Notes
Please note that some of my blog posts here at Little Home in the Making may contain affiliate links. If you make a purchase through these links, I will get a small commission at no additional cost to you. See our disclaimer for more information.


KJ
I use a professional yogurt strainer and love it! It works perfectly if I line the mesh strainer with paper towels. Then after I take the strained yogurt out, cleanup is a cinch! there’s nothing better than homemade Greek yogurt. (IMO)
Dolly | Little Home in the Making
I've started using it lined with a clean flour sack towel and it works really well! And yes, homemade is soooo much better.
Ruby
I do a gallon of milk at a time then strain it, but instead of letting it sit in the frig over night, I just pour it in my sieve that is lined with cheese cloth and scrape around with the rubber spatula, scraping the sides and gently stirring it till most of the whey it out. Then i pick up the cheese cloth by the corners and twist the top, twisting tight to squeeze out even more liquid. You can squeeze until you have cream cheese consistency if you want. Typically from 1 gallon of milk, I end up straining out 1 to 2 quarts of whey. When satisfied I put the yogurt in a large bowl to stir in sugars and flavors, then dish out in to individual serving size bowls with lids that I take to work for breakfast. BTW, I have found that mixing in a little vanilla and nutmeg is delicious. Almond extract is also good, with or without the nutmeg. Thank you for the whey recipes, I need to start doing more with that product.
Dolly | Little Home in the Making
Thanks for all the great tips!
Céline Allirol-Molin
Hello. Thank you so much for good info. Just a question though, can i do the same with lactosfree yoghurt?
Dolly | Little Home in the Making
You should be able to! Most lactose free yogurt is made with specially processed milk, and should still have whey.