
Instant Pot Yogurt
Instant Pot Yogurt is the best and easiest way to make homemade yogurt. Step-by-step instructions include options for Greek yogurt too!
Print
Pin
Servings: 8 cups
Calories: 121kcal
Equipment
- Instant Pot 6-quart or 8-quart
- Yogurt strainer (optional - for Greek yogurt)
Ingredients
- 8 cups milk
- 2 tablespoons plain yogurt with active cultures
Instructions
Cook Mode- Prep (optional). Pour boiling water into the Instant Pot and place the lid on. Allow to rest for 5 minutes, then release any pressure before removing the lid. This will help to remove residual flavor or smell that remains in the Instant Pot.
- Pour the milk into the Instant Pot and secure the lid.

- Heat the milk. Select the “yogurt” button and toggle through the options until the display reads “boil”.
- Allow the Instant Pot to complete the cycle, which normally takes about 1 hour. You should hear a beep, indicating the cycle is complete. When this happens, remove the lid and check with a digital thermometer that the milk has reached 180-185ºF (82-85ºC)*.

- Cool the milk. Remove the Instant Pot insert from the electric portion, and allow it to cool down until it reaches 110ºF (43ºC) (a range of 5ºF in either direction is fine). This takes about an hour at room temperature, OR 10-15 minutes in a sink filled halfway with ice water.
- Use a spoon to skim off any skin that has formed on the milk.

- Add cultures. Add 2 tablespoons of plain yogurt (containing live cultures) and stir it into the milk gently with a wooden spoon.
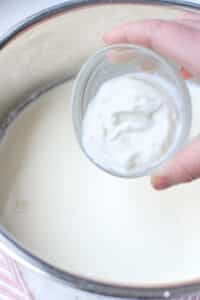
- Place the insert back into the Instant Pot unit and secure the lid.
- Ferment. Select the “yogurt” button and toggle to the timer options (8, 12, or 24 hours). For a thicker, tangier yogurt select the 24-hour option. Select the 8 or 12-hour option for a mild flavor or quick results.
- Check the finished yogurt. Once the culturing time is up the Instant Pot will beep. You can then remove the lid and check your yogurt. The consistency should be thick, spoonable, and with some whey collecting at the edges of the pot.
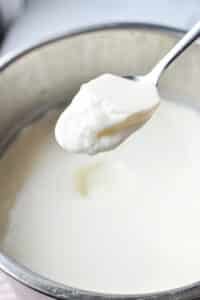
- Refrigerate. Transfer the cultured yogurt to an airtight container and refrigerate until chilled and thick (or, if desired, strain for Greek yogurt).
- To make Greek yogurt: strain the yogurt in a cheesecloth-lined colander set over a bowl, or a yogurt strainer for several hours (I do this in the refrigerator). The yellow liquid that collects at the bottom is whey and can be repurposed. The strained yogurt can be used like regular Greek yogurt.
- Sweeten individual servings of your yogurt with honey, maple syrup, stewed fruit, or low-sugar jam after chilling.
Notes
- Storage: Transfer your yogurt to storage containers or mason jars and store them in the refrigerator for up to 2 weeks. For longer storage, transfer to freezer-safe containers and freeze for up to 3 months. Thaw before using.
- Yogurt starter: You can use 2 tablespoons of any plain store-bought yogurt (or homemade) that contains active cultures. Once you have established a yogurt culture, you can use a few tablespoons of your homemade yogurt to culture the next batch. Some people have success with continuing on, and some find their culture weakens over time.
- Type of milk: You can use almost any type of milk, but I personally recommend using whole milk for the best results and thickest consistency. Ultra Pasteurized milk is not recommended.
- Sweetening homemade yogurt: Allow the yogurt to chill and set up before sweetening. Then use honey, maple syrup, chia seed jam, stewed fruit, or low-sugar jam to add sweetness and flavor. You could also make a simple syrup with sugar or honey and add a little bit of vanilla bean paste.
- Gallon-sized batch: Double the amount of milk and yogurt culture used, but maintain the same process and culturing time. If using a full gallon of milk you will need to use an 8 quart Instant Pot. I have used a 6 quart Instant Pot, but left the milk just below the maximum line, which wasn’t quite 1 gallon ( around 3 ½ quarts).
- Milk isn’t coming up to temperature? If you’re using a large amount of milk in a smaller pot (like a 6 quart), I’ve experienced some issues with getting the milk to reach 180ºF (82ºC). This is easily solved by setting the Instant Pot to “saute” which turns on the element, and heats the milk. This takes just a few minutes, so be sure to monitor closely and remove the pot as soon as the temperature is reached.
- How to Strain Yogurt: I have a post that goes into detail on the yogurt straining process if you want step-by-step instructions. Otherwise, line a strainer with a double layer of cheesecloth OR a clean flour sack towel and strain until thickened. The yellowish-greenish liquid that collects below is known as whey and can be used to culture fruits and vegetables, beverages (like fermented lemonade), used to make bread, or given to livestock.
Nutrition
Calories: 121kcal | Carbohydrates: 12g | Protein: 8g | Fat: 5g | Saturated Fat: 3g | Polyunsaturated Fat: 0.2g | Monounsaturated Fat: 1g | Trans Fat: 0.2g | Cholesterol: 20mg | Sodium: 113mg | Potassium: 338mg | Sugar: 12g | Vitamin A: 246IU | Vitamin C: 0.5mg | Calcium: 289mg | Iron: 0.1mg
